Single Sign-On in P2PE Manager
Single Sign-on (SSO) is a session and user authentication system that allows users to authenticate with the same set of credentials across multiple services. It works by having one service — an Identity Provider(IDP) — maintain a single set of credentials, and having services request authentication from that IDP. Having to use different login credentials across many services is time-consuming and difficult, so SSO allows members of an organization to use just a single username and password.
In P2PE Manager, Single Sign-on (SSO) can be configured for partners and clients. P2PE Manager supports SSO with 2.0 Security Assertion Markup Language (SAML) specifications. SAML is an open standard for exchanging authentication and authorization data between identity providers (IDP) and service providers.
Note
This feature is designed to support one IDP and is implemented by a member of the Bluefin Team. These Bluefin users are also referred to as System Administrators and System Users.
Setup Process
The diagram and instructions below outline the steps in the SAML/SSO setup process.
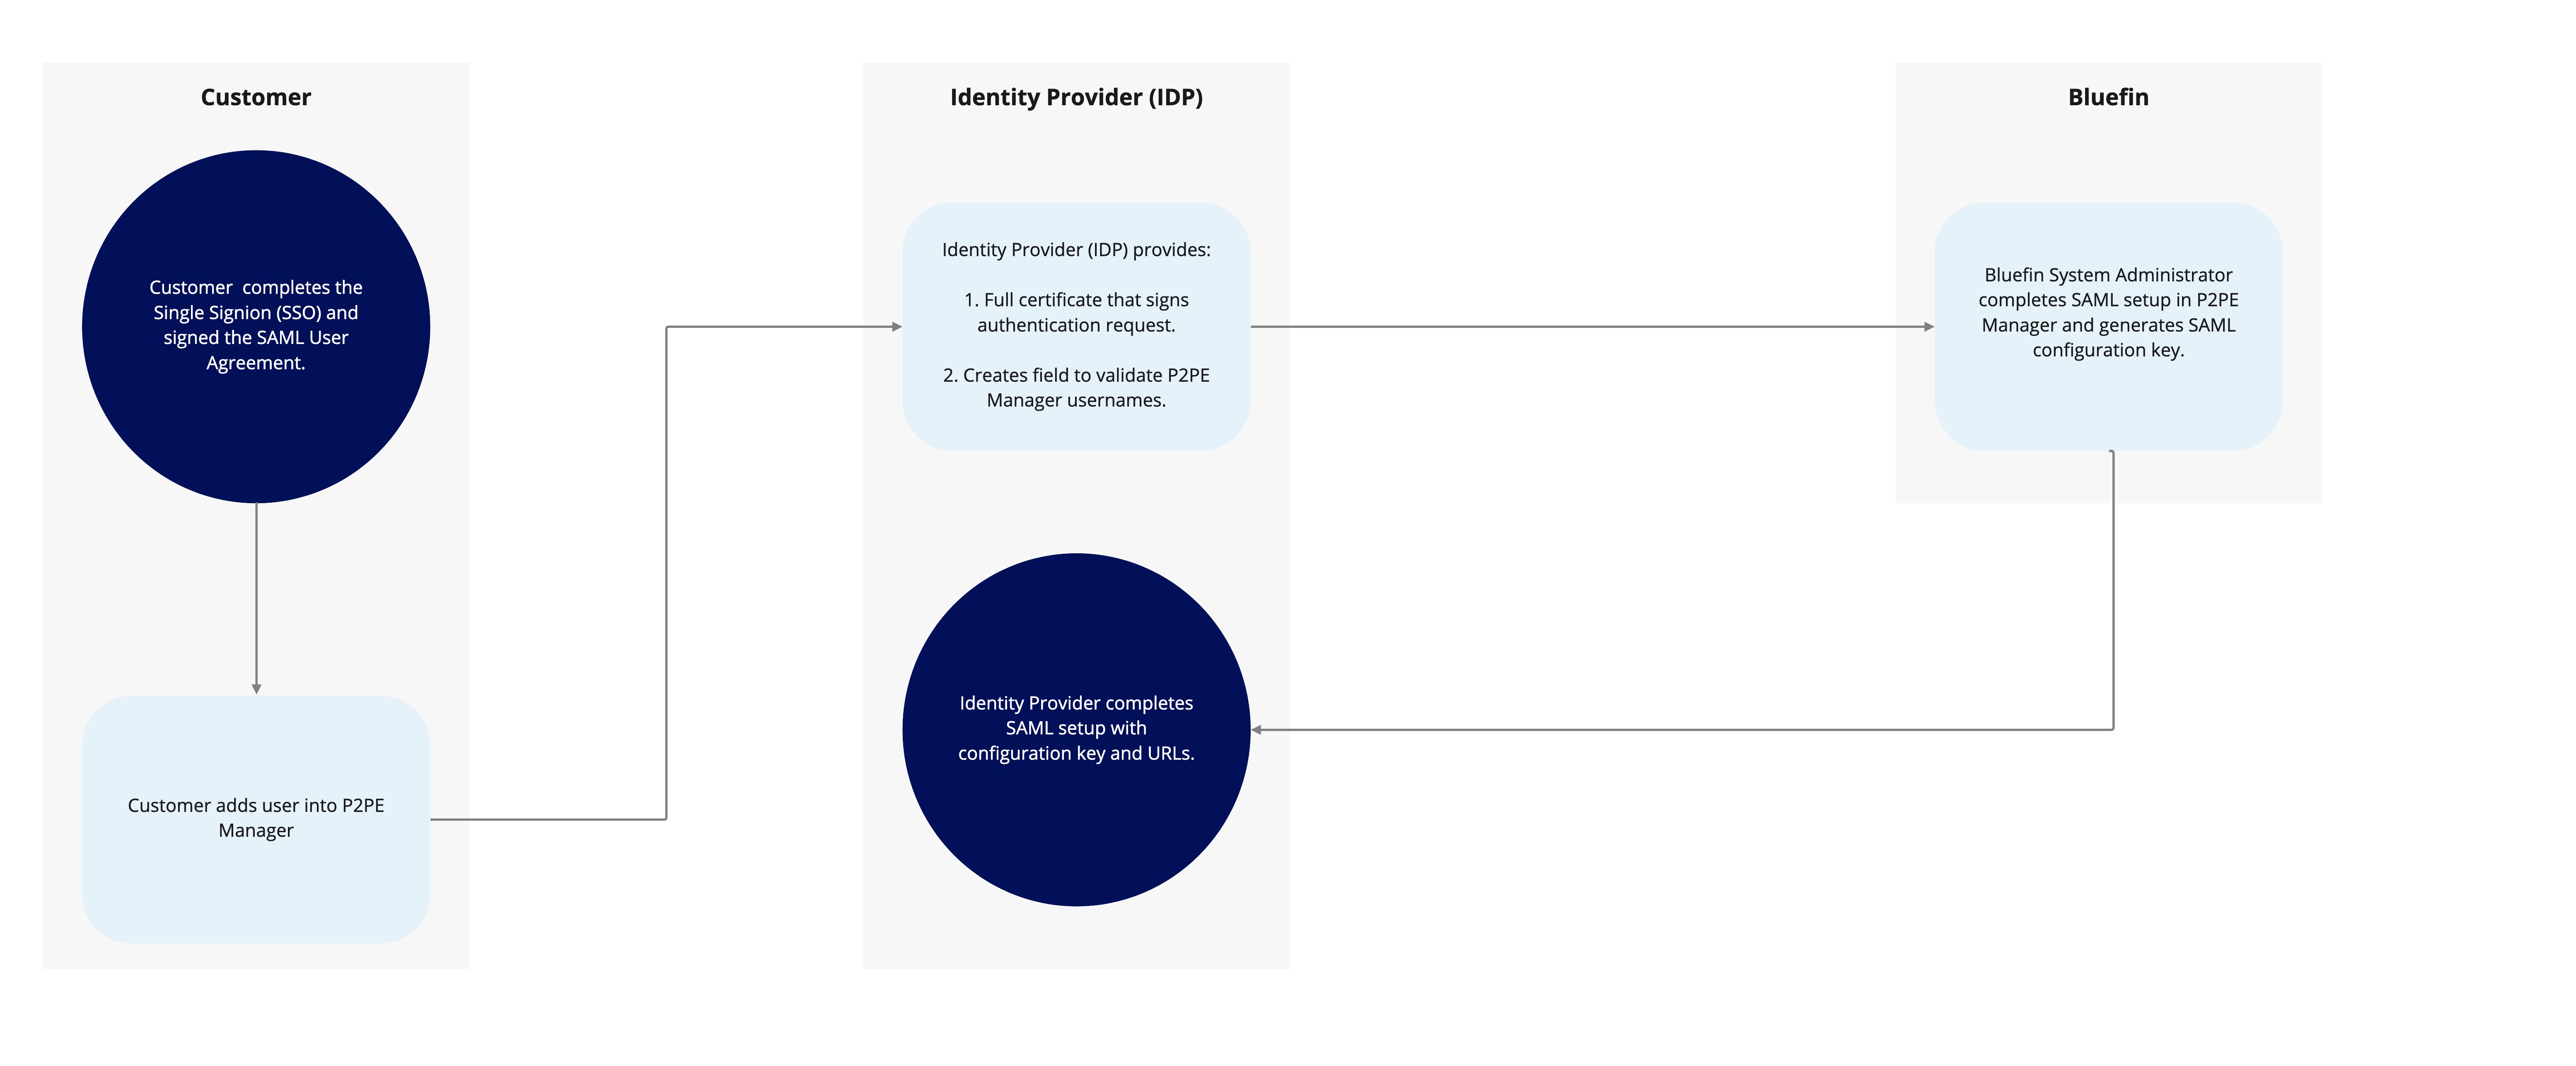
- You complete the Single Sign-on Request Form and the SAML User Agreement. Involve your Identity Provider (IDP) to gather the requested information and to create a field in the SSO system to validate P2PE Manager usernames.
- You add users to P2PE Manager as usual.
- Your IDP provides a certificate that signs Authentication requests and creates a field to validate P2PE usernames.
- After Bluefin receives the requested information, our system administrators configure SAML in P2PE Manager. Then, the Single Sign-On Request form will be returned with the SAML Configuration Key and necessary URLs.
- The last step requires you to submit the SAML Configuration Key and URLs to your IDP to complete setup.
Your IDP will need to provide the entire X-509 Certificate.
Information Needed By Identity Providers
The following information is required by Identity Providers to facilitate SAML configuration. This information should be shared with your Identity Provider's administrator so that your SSO system can be updated.
- Usernames (List of active P2PE Manager users).
- SAML Configuration Key: This key is generated during the setup process after receipt of the Single Sign-On Request Form.
- URLs (The names of the fields vary such as ACS, Audience or Consumer).
a. Consumer Validator: bluefin.p2pemanager.com/saml/callback/samlconfigkey
b. Consumer Connection URL: bluefin.p2pemanager.com/saml/callback/samlconfigkey
c. Logout URL: bluefin.p2pemanager.com/logout (Depending on the IDP this might or might not be needed).
Sample IDP Setup
IDP Configuration
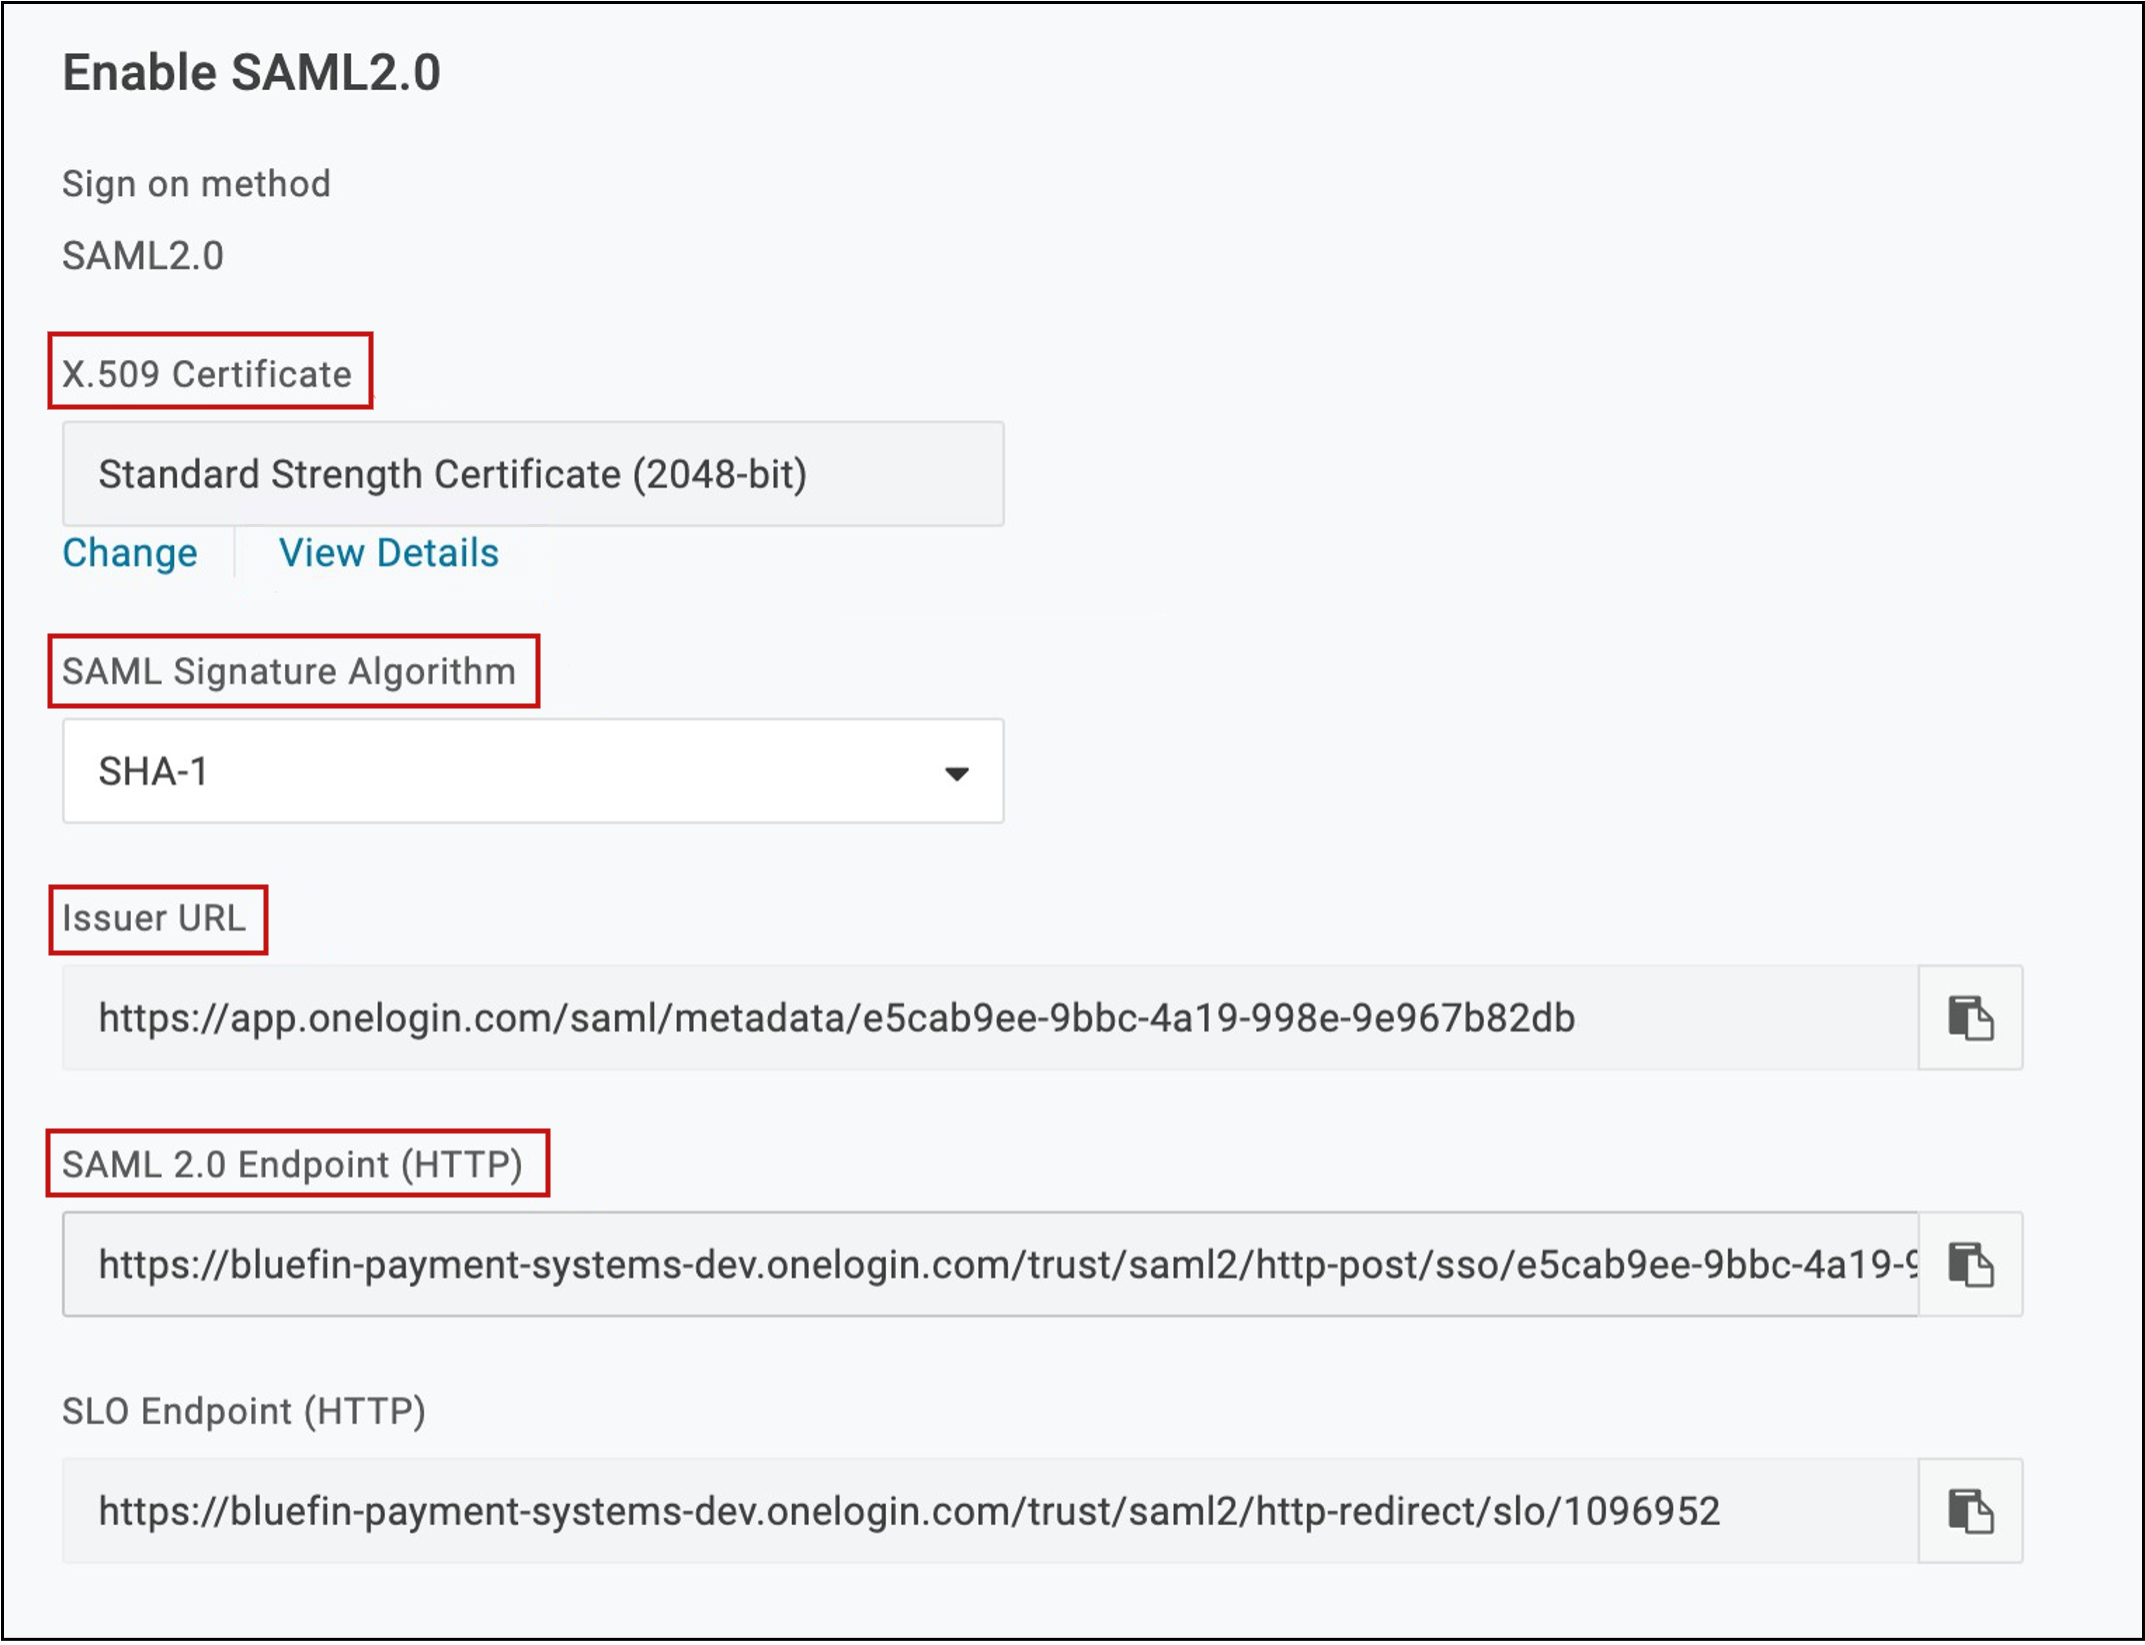
The following illustrates an IDP configuration screen that is used and controlled by the merchant. This example uses screenshots from OneLogin.
| Field | Description |
|---|---|
| X.509 Certificate | The value generated here must to be communicated to Bluefin to setup the SSO connection. In this example, the actual certificate generated is inside the “View Details” link. |
| SAML Signature Algorithm | This setting contains the hash algorithm specified by the Partner based on their security level needs. Bluefin does not need this value. |
| Issuer URL | The value here needs to be communicated to Bluefin to setup the SSO connection (SAML Issuer) This URL should be the source URL for all IDP users. (The URL from which all users originate from.) |
| SAML Endpoint URL | The value here needs to be communicated to Bluefin to setup the SSO connection (SAML End Point) This URL should be the end point of the IDP being used. |
IDP User Configuration
The following illustrates configuring a user inside an IDP. This example is a screenshot from OneLogin.
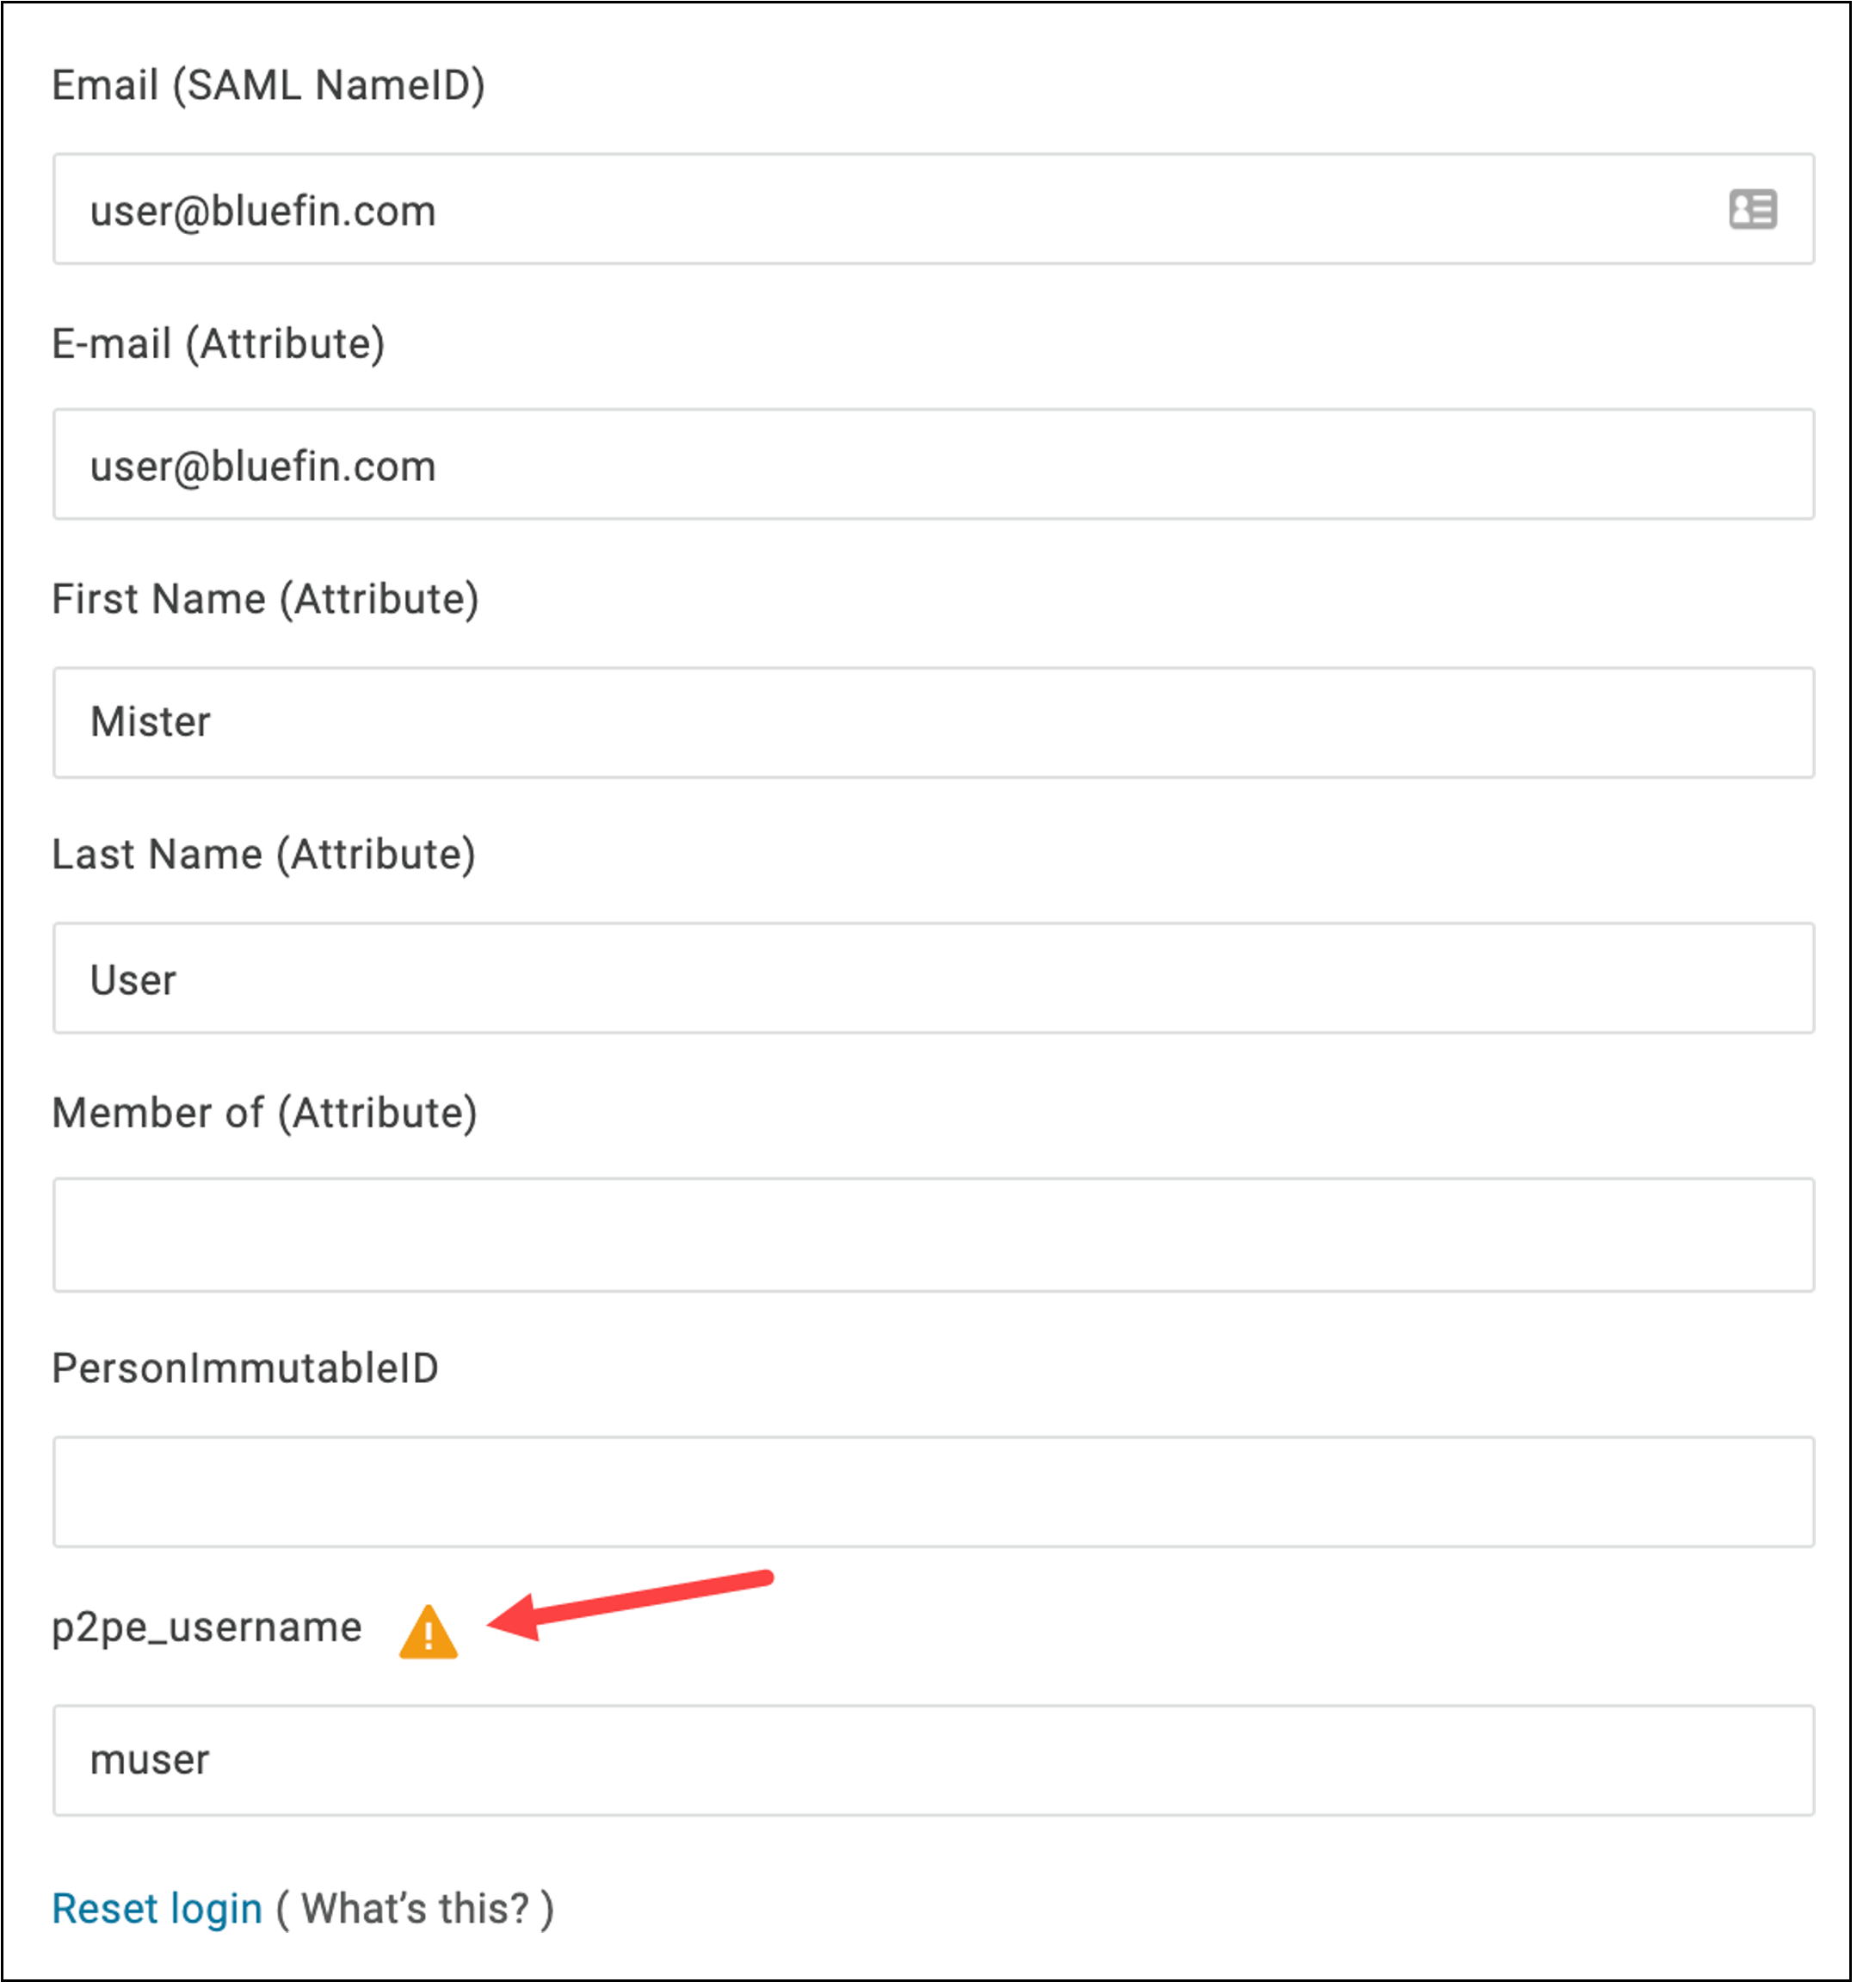
Per the example above, basic demographic information about each user needs to be completed by the merchant in their IDP.
Important
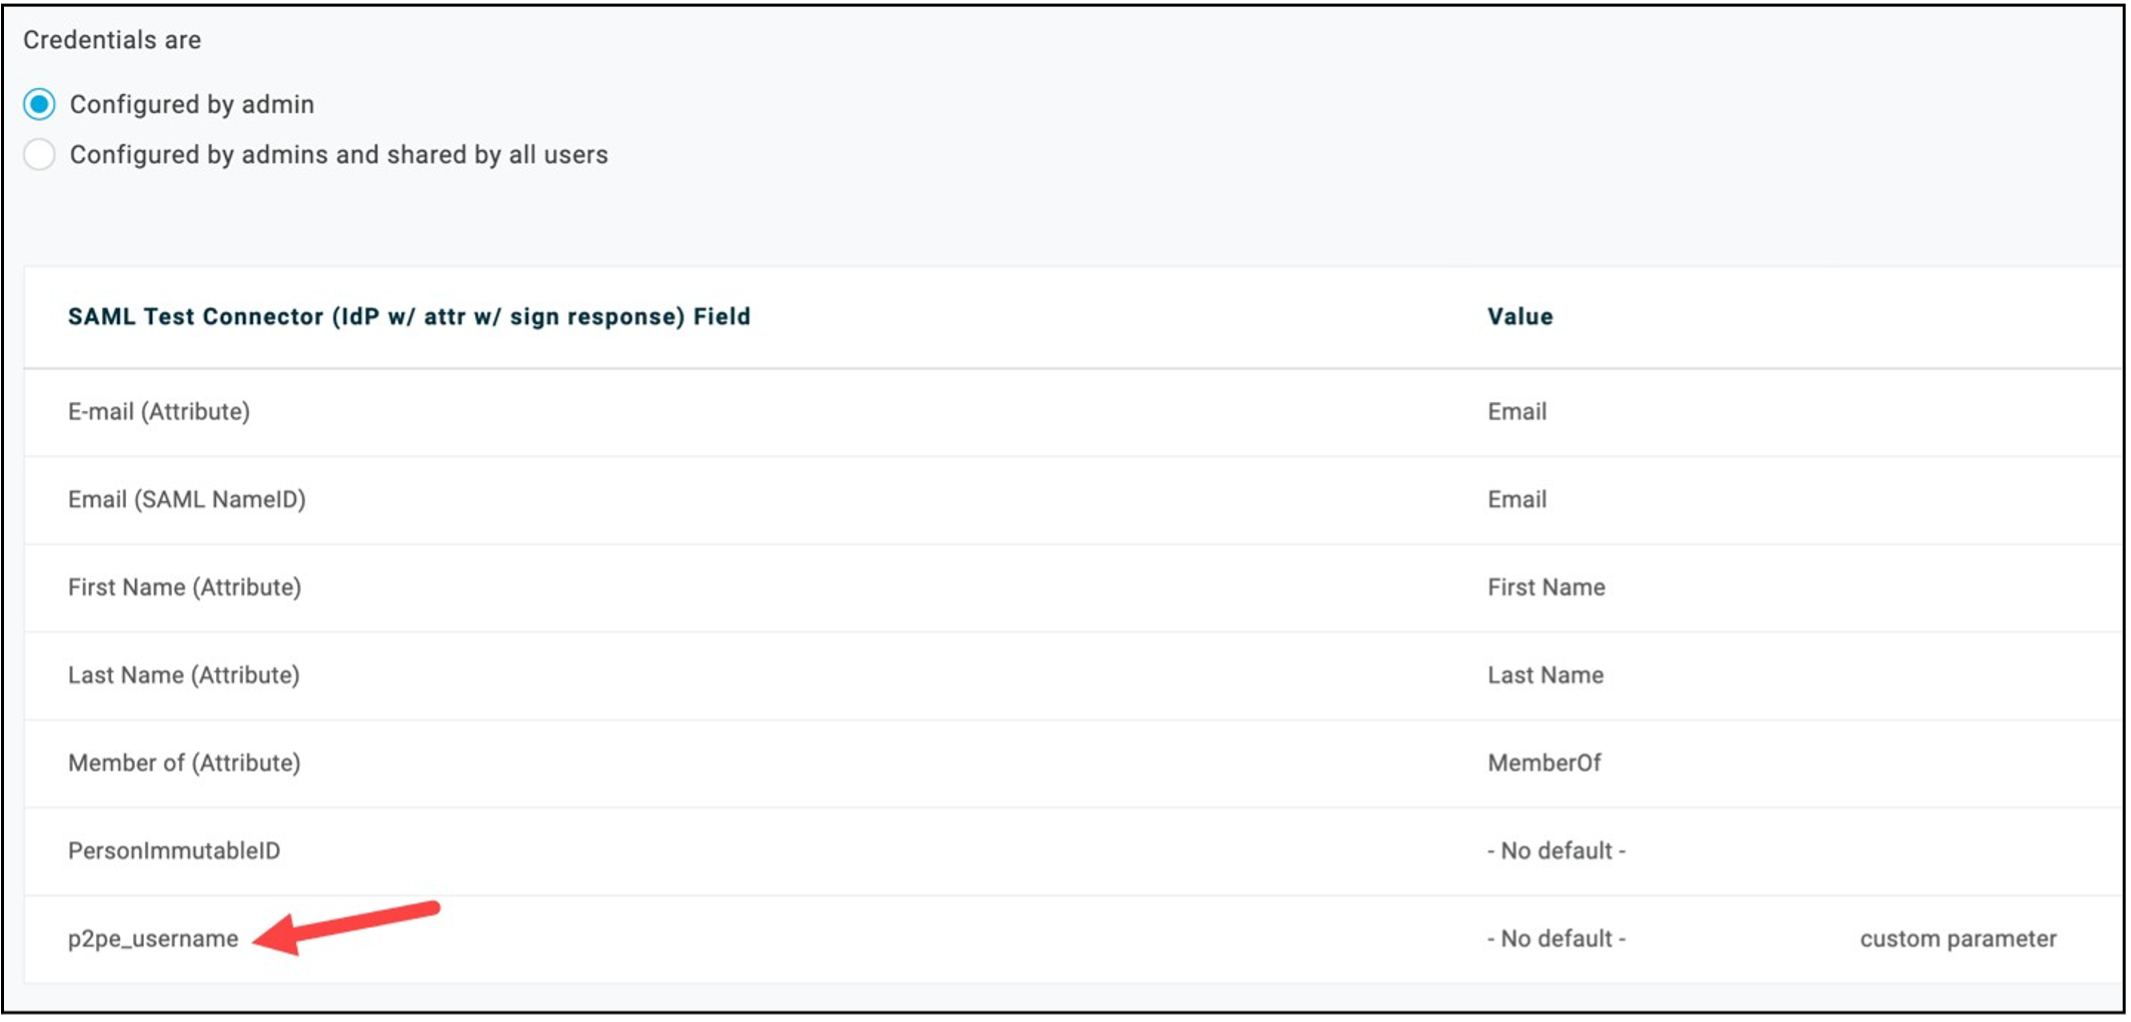
The user login is the only field relevant to configuring SAML/SSO. In the example shown, the p2pe_username parameter was added specifically for the SAML/SSO configuration to P2PE Manager.
This field name (p2pe_username) needs to be communicated to Bluefin to setup the SSO connection (SAML Field Name) Bluefin does not need the value of this entry (“muser” in the example shown), but the value must match a user in P2PE Manager who has access to this specific Partner/Client.
For reference, the following image illustrates the various IDP user fields including a field specifically added for the P2PE Manager SAML/SSO configuration. The IDP administrator should be familiar with this type of screen.
Azure Setup Overview
The following information is an overview of how to prepare Azure. To set up Azure Active Directory portal access do the following:
- Log in to your Azure portal as usual and navigate to the Azure Active Directory.
- In the left panel, select Enterprise Applications.
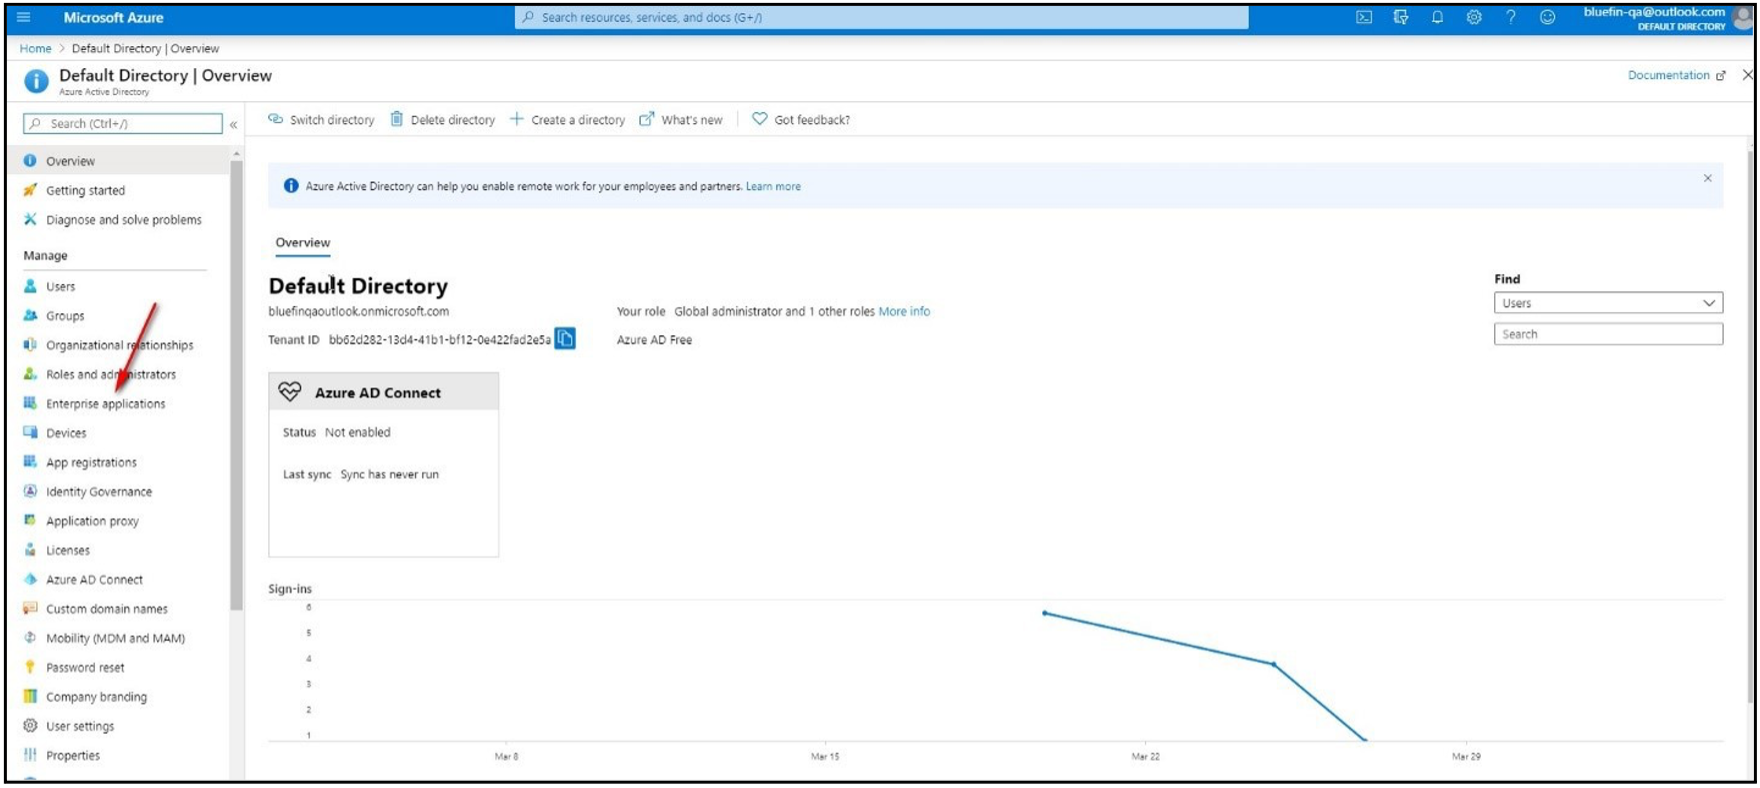
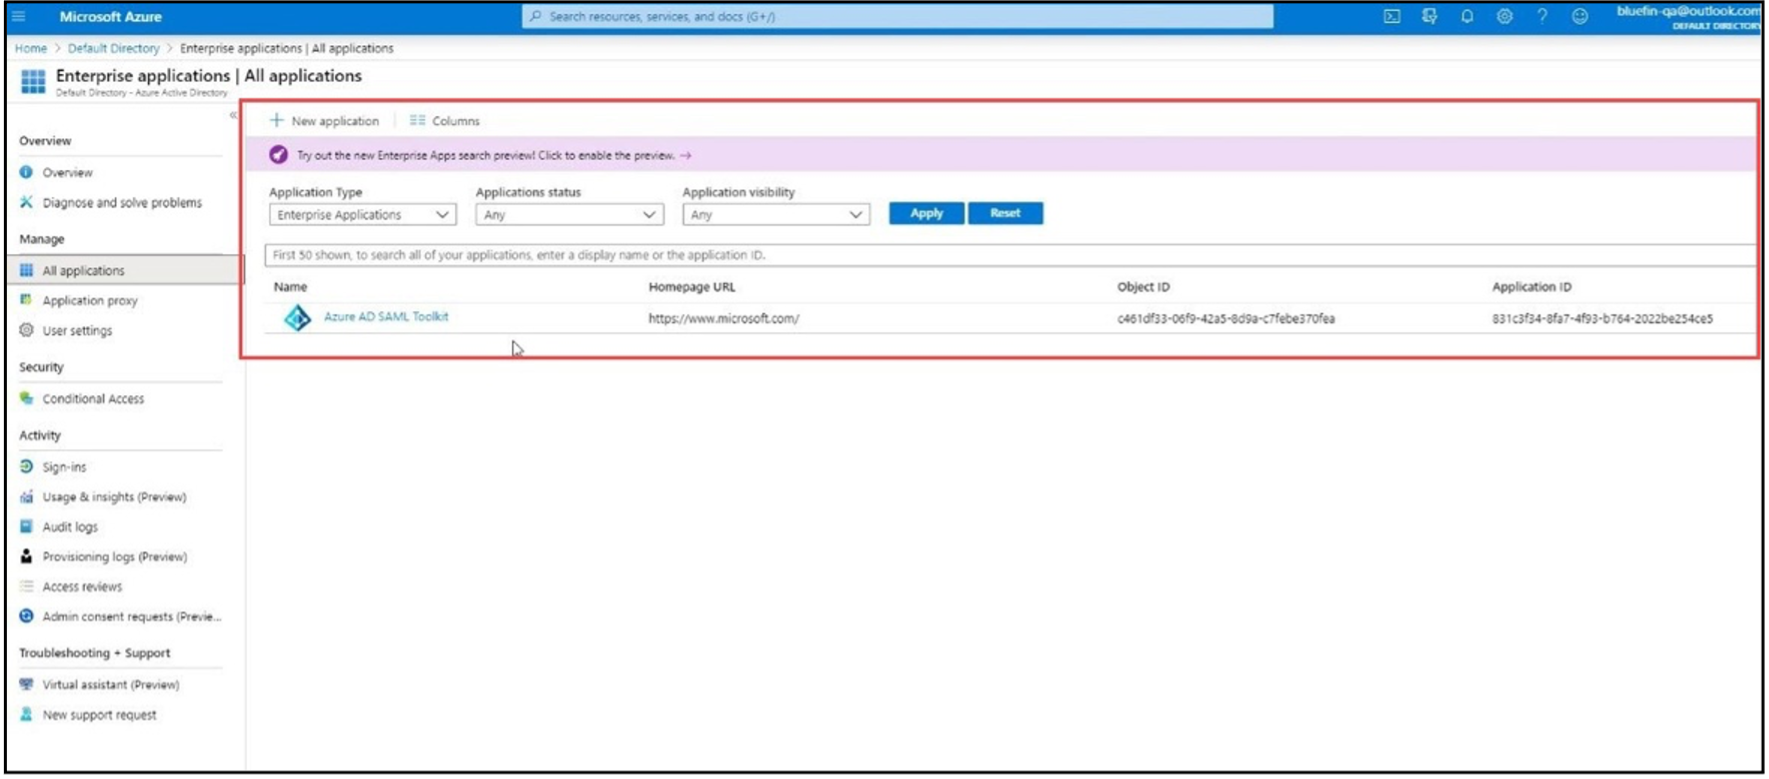
- Create a new application or use an existing one.
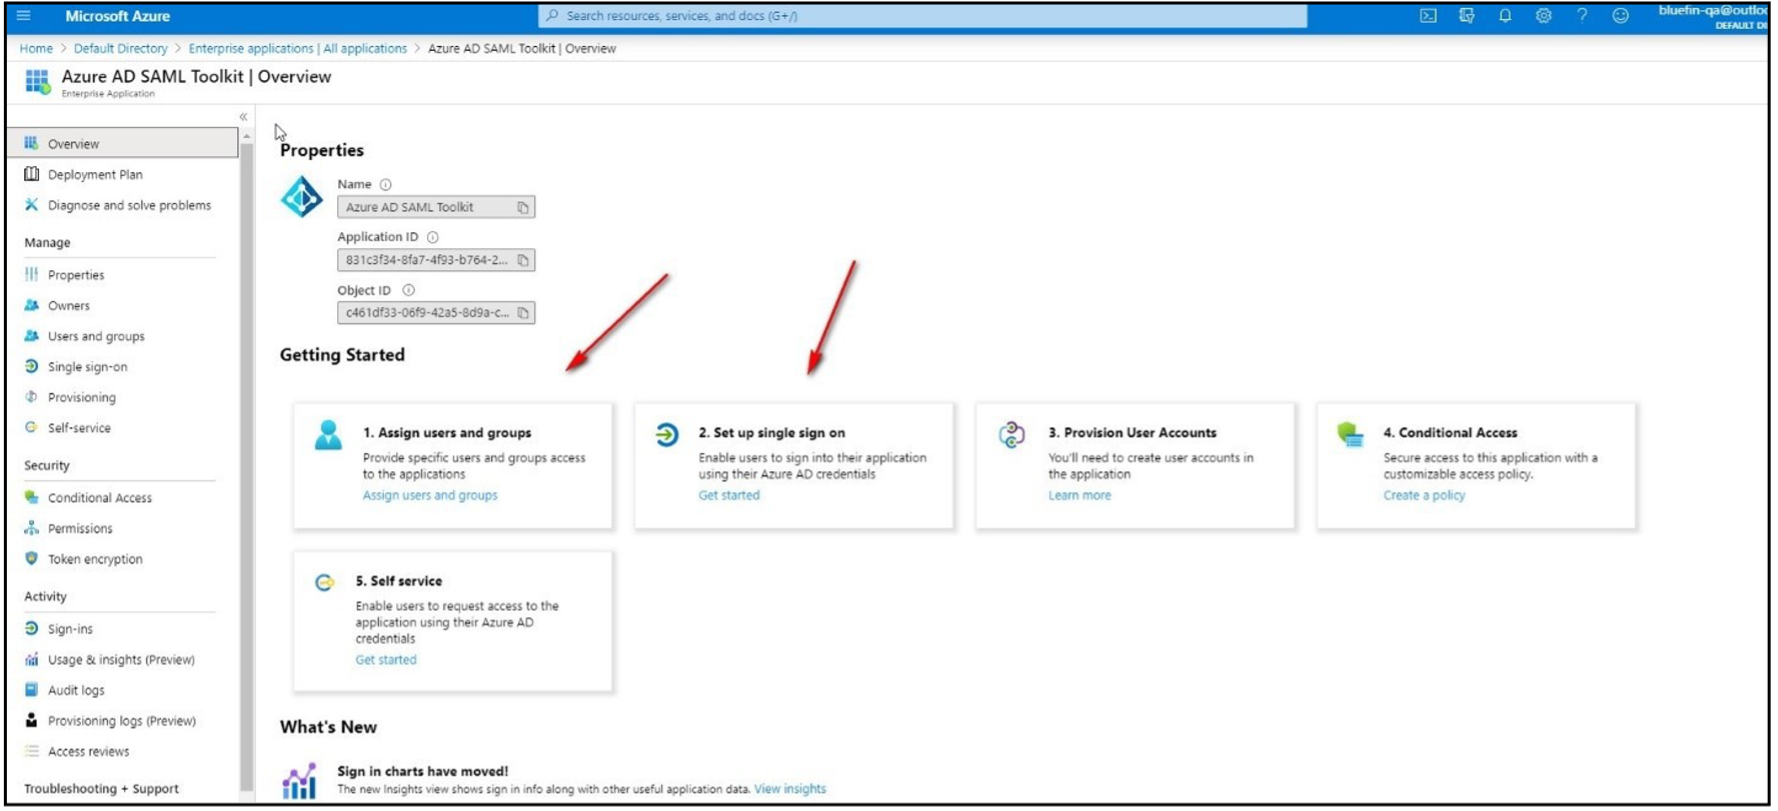
- Follow the instructions shown to assign users to the application and to set up Single Sign-On.
- From the SSO page, enter your information into the Set up SAML test sign on section to populate your information in P2PE Manager.
- Under Identifier (Entity ID), enter the URL for the environment you are connecting to e.g https://bluefin.p2pemanager.com/ or https://cert-bluefin.p2pemanager.com/
- For reply URL, enter the URL with the idpkey provided by bluefin, saml/callback/{idpkey} e.g https://cert-bluefin.p2pemanager.com/saml/callback/{idpkey}
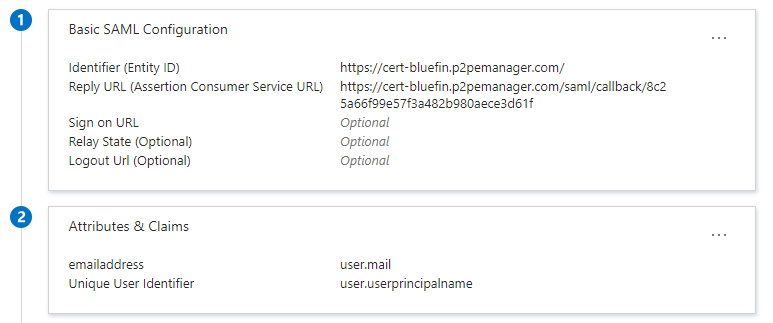
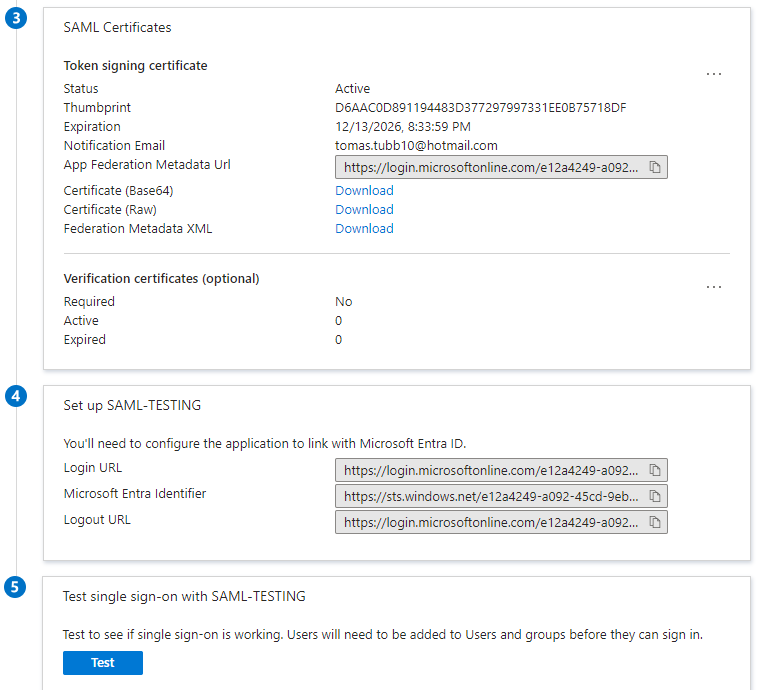
- Under Attributes and Claims, click the three dots on the right and select edit.
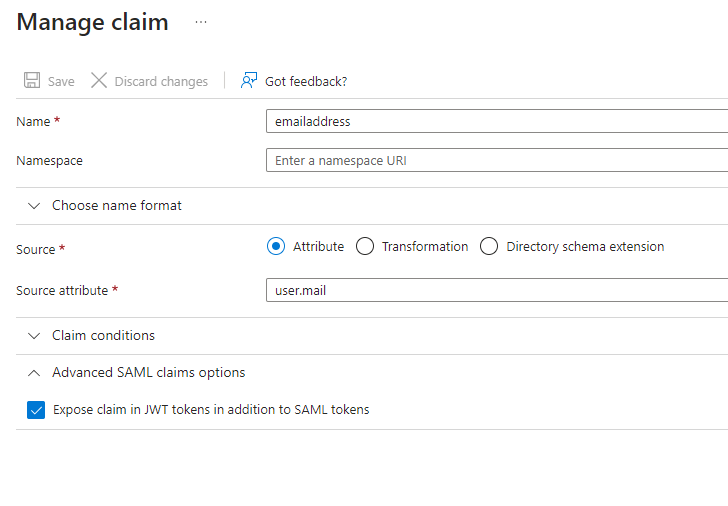
- In this section, an additional claim needs to be created. This additional claim will contain the required data to match up with the username inside of P2PE Manager. The claim name must be provided to Bluefin so the SAML config can be updated. When creating the claim, under Advanced SAML claims options, make sure expose claim in JWT tokens in addition to SAML tokens is enabled.
Single Sign-On Request Form (Sample)
Single Sign-On is designed to support one IDP per partner.
- Collect the information in the tables below and submit to Bluefin ([email protected]).
- Users need to be added to P2PE Manager as usual and be marked as active users.
- Your Identity Provider (IDP) administrator will need to create a field to validate the P2PE Manager username.
- You will need to provide us with the full Certificate from the IDP that signs the authentication request.
- Bluefin will return this SSO Request Form to the IDP Administrator along with the SAML configuration KEY.
- The IDP Administrator will need to update their SSO software with the SAML configuration key and the proper URLs.
Logging in to P2PE Manager for SAML Users
After SSO is fully implemented by Bluefin and your IDP, users will access the P2PE Manager from the following URL: https://bluefin.p2pemanager.com/saml/samlconfigkey
SAML Configuration Information
| Field | Description |
|---|---|
| Partner Name | Enter the partner name. This will enable SAML for partner users (Partner Supervisors, Partner Fulfillment and Partner User.) |
| SAML Config Name | Enter the name of this SAML configuration. |
| SAML EndPoint | Enter the URL of the Identity Provider for the SAML authentication request. (This is the URL of the Partner's instance of their IDP.) Typically called SAML Endpoint, SSO Endpoint, or IDP Login URL. |
| SAML Field Name | The field/variable that contains the P2PE Manager Username. This could be a custom parameter from the Identity Provider or an existing one that contains the P2PE Manager Username. NOTE: The IDP administrator will need to create this field in their single sign-on system to validate P2PE Manager usernames. |
| SAML Issuer | Enter the Issuer URL of the Identity Provider. This is the URL of the Partner's IDP user connection to the P2PE Manager. |
| Certificate file included |
|
| Bluefin returned SAML Configuration KEY | Bluefin will return this form with this value when the setup has been completed. |
Submission Information
| Field | Description |
|---|---|
| Submitted By | [Name of Person Submitting Change Request] |
| Submitter's Company | [Name of Submitter’s Company] |
| Date Submitted | [mm/dd/yyyy] |
Requests are completed 2 business days from receipt of complete and accurate forms. Changes are completed during business hours: Monday through Friday, 8:30 a.m. to 5:30 p.m. CST. Some requests may require scheduling and may take longer than 48 hours to complete.
Partners and Resellers are responsible for Tier 1 application and IDP support.
Updated about 1 year ago
