Devices
Creating Devices
The KIF should receive all inventory as it arrives for storage in your dual controlled cages.
Creating and injecting devices occurs after devices have been pulled off the shelf and physically injected for a client. This is the first step in preparing a virtual shipment. Your key injection team will provide you with a work order outlining the serial number, corresponding tamper label (security seal number) and tracking number.
The portal is designed to create and ship devices orders as they are ticketed to your organization. There are two ways to get started:
- Manually add each device. NOTE:A scan gun should be used to ensure accurate records.
- Batch Upload
a. Serial Number Range
b. Scan Gun
Manual Entry
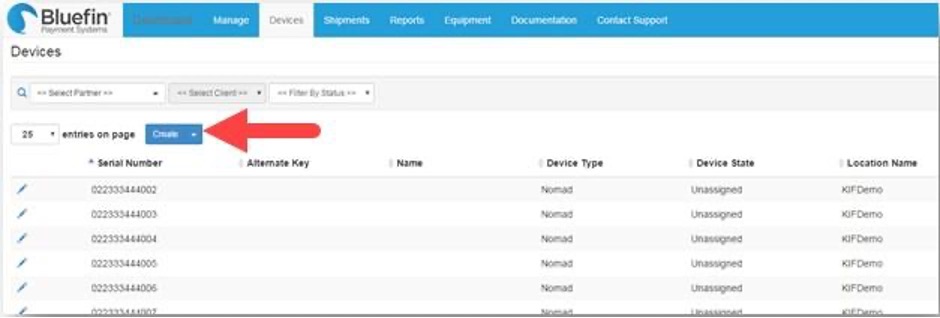
To manually enter devices, do the following from the Devices tab:

- Click Create.
- Complete the following fields:
| Field | Description |
|---|---|
| KIF | Required. Enter KIF Name. |
| Location | Required. KIF Location and Address. |
| Serial Number | Required. Enter device serial number. NOTE: If you have a Nomad or Ingenico device, refer to the corresponding appendix. |
| Name | Optional. |
| Device | Required. Select an option as appropriate. |
| Inject Key | (auto-populated based on Device Type) |
| Device Build | Select an option as appropriate. NOTE: Options displayed are based on Device Type. For more information, see Device Builds below. |
| Partner | Enter Partner according to the Bluefin ticket. NOTE: Only Partners which were selected in Partner/Sub-Partner Details will be available for selection in the drop-down list. Not required if the device is being stored at a Distribution Channel. |
| Client | Enter the client according to the Bluefin ticket. NOTE: Only Partners which were selected in Partner/Sub-Partner Details will be available for selection in the drop-down list. Not required if the device is being stored at a Distribution Channel. |
| Attestation Period | Select a date for device inspections. |
| Audit Next Date | Select a date for device inspections. |
| Notes | Optional. System Users and KIF Users can add pertinent device notes as needed. |
- Click Save when you're done. NOTE: The device is automatically put into an “injec- ted” state and is ready to be shipped.
Batch Entry
To enter devices as a batch, do the following from the Devices tab:
- Click Create.
- From the Create drop-down list select Create From Batch.
- Click Edit under Serial Numbers.
- Choose one: Range or Scan Gun.
Batch Range Entry
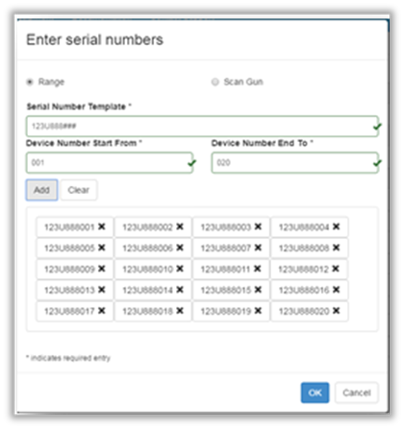
The range option allows you to quickly enter a range of sequential serial numbers for the same device type.
- Follow the Batch Entry steps 1-3.
- Select Range and complete the following fields:

| Field | Description |
|---|---|
| Serial Number Template | Enter the beginning range of numbers followed by the number of hash marks. |
| Device Number Start From Device Number End To | The number range that equals the same number of hash marks identified in the template. |
- Click Add.
- Confirm number populated correctly and click OK.
- Select the Device Type.
- Complete the remaining fields. Refer to the table of fields in Manual Entry step 2.
- Click Save.
Batch Scan Gun Entry
The Scan Gun option allows you to quickly enter a group of serial numbers for the same device type.
- Follow the Batch Entry steps 1-3.
- Select Scan Gun.
- Scan each device.
- Confirm number populated correctly and click OK.
- Select the Device Type.
- Complete the remaining fields. Refer to the table of fields in Manual Entry step 2.
- Click Save.
The device is automatically put into an “injected” state and is ready to be shipped.
Device Builds
Each device in P2PE Manager must include the device build. This information includes the details of the Bluefin certified device such as, PTS, application, firmware and hardware version.
The available device builds for each device will display based on the Device Type.
The Ingenico devices are organized by certified Retail Business Application (RBA) versions and Bluefin will provide details in the KIF work order.
The available RBA versions are as follows:
| RBA Version | Build Name |
|---|---|
| 12.X | 12.X |
| 14.X | 14.X |
| 17.X | P2PE 1.0 |
| 21.X | P2PE 1.1 |
| 22.X | P2PE 1.1 |
Updating Devices
From the Devices tab, click Edit (pencil icon) next to the device you want to update. The following fields can be updated. Click Save when you’re done.
| Field | Description |
|---|---|
| Name | Enter a short name that allow you to easily identify the device. Example: “Lisa’s desk”, “Register 10”, or “front desk.” Device names do not affect processing. |
| Device State | Select an option from the drop-down list. |
| Attestation Period | Select an option for device inspections. |
| Audit Next Date | Select a date for device inspections. |
| Notes | Optional. System Users and KIF Users can add pertinent device notes as needed. The information recorded here is not reportable. (Maximum 250 alphanumeric characters and symbols allowed.) |
Deleting Devices
When necessary, you can delete injected devices before shipping them. To delete a device, do the following:
- From the Devices tab, select a device to edit it.
- Scroll down the page and click the Delete button.
Updated about 4 years ago
