Device Management
Click the Devices tab to see a summary of devices including serial number, name, device type, device state, client, location, activation date, MID, virtual, and notes. To search for a device, enter your search criteria in the Search field and then click Search.
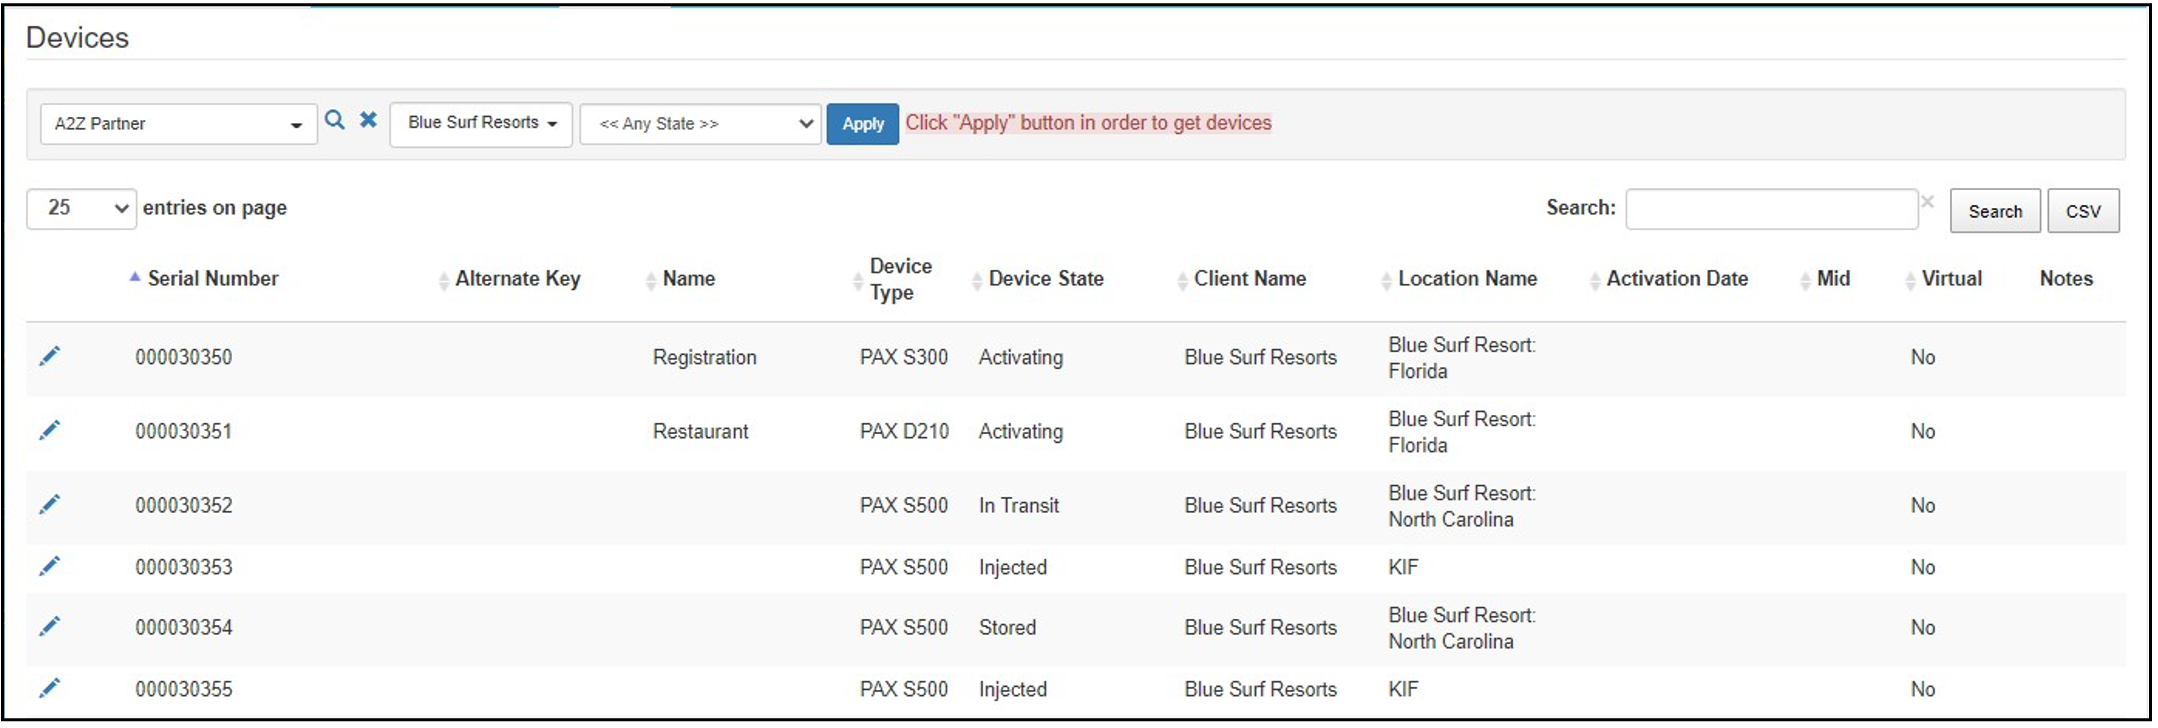
You can filter the list by device state: Any State, Active States (default), or Non Active States.
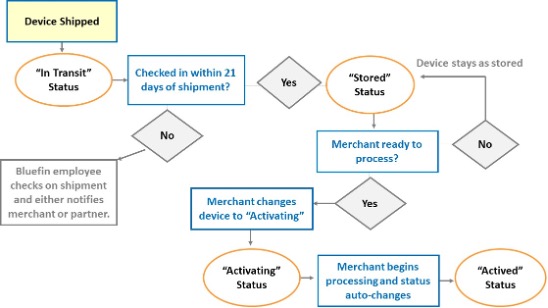
Device Activation Process Flow
The following diagram describes the device activation flow.
Updating Devices
From the Devices tab, click Edit (pencil icon) next to the device you want to update. The following fields can be updated. Click Save when you’re done.
| Field | Description |
|---|---|
| Name | Enter a short name that allow you to easily identify the device. Example: “Lisa’s desk”, “Register 10”, or “front desk.” |
| Device State | Select an option from the drop-down list. See Device State Definitions below for additional details |
| Attestation Period | Select an option for device inspections. Refer to Changing Device Attestation Date for details. |
| Audit Next Date | Select a date for device inspections. Refer to Changing Device Attestation Date for details. |
For instructions for activating a brand-new device, see Batch Receiving Devices.
Device State Definitions
The following is a summary of all device states. For more details about device status and the impact of making various updates, refer to the P2PE Instruction Manuals (PIM). (Click Documentation and download a manual or an appendix as needed.)
| State | Can Process | Definition |
|---|---|---|
| Activated (Automatic) | YES | Device is in hands of merchant and processing of cards has begun (state change from “activating” to “active” occurs automatically.) NOTE: In Branded versions of P2PE Manager, if Allow External Device Activation Mode is enabled by the system administrator, then system users, partner supervisors and client administrators can change a device's state to Activated manually and via batch upload. |
| Activating | YES | Device is in hands of merchant and ready to begin processing cards |
| Damaged | NO | Unit is inoperable due to physical damage. |
| Destroyed | NO | Unit is inoperable and cannot be recovered. NOTE: System admins and users only. |
| DOA by KIF | NO | Device needs to be removed from service for destruction. NOTE: Key Injection Facility (KIF) use only. |
| In Repair | NO | Device needs to be removed from service for repair. |
| In Transit (Automatic) | NO | Device has been shipped to the merchant. NOTE: KIF use only |
| Injected | NO | Encryption key has been injected into the unit. NOTE: KIF use only. |
| KIF Test | NO | Used by the KIF to do an end-to-end test prior to shipping. NOTE: KIF use only. |
| Lost | NO | Merchant does not know where device is. |
| Malfunctioning | NO | Unit is inoperable or inconsistently operable for unknown reasons. The state is automatically triggered when the system detects 10 consecutive decryption failures. Additionally, an email alert is sent to the device custodian so they can address this issue with Bluefin or their service provider. |
| PIN Pad | YES | Device is in the hands of the merchant and is available to be used when processing cards. PIN Pad devices are optional external devices used in conjunction with an activated "host" payment processing device. This is a non-billable device state. NOTE: System admins and System users only. |
| Quarantined (by KIF) | NO | Unit was discovered to be malfunctioning or was tampered with prior to shipping. (Unit was returned to KIF outside of the RMA process.) NOTE: System admins and System users only. |
| Retired | NO | Merchant no longer wishes to use a device. If the merchant closes their Bluefin account, all devices will be marked as retired. |
| RMA Return Merchandise Authorization | NO | Device needs to be returned to the KIF. NOTE: Use caution when selecting this state because it is not reversible. KIF will send return instructions to the merchant to retrieve device that is not working correctly. |
| Stored | NO | Device is in possession of merchant and stored in a secure location, but not ready to begin processing cards |
| Tampered | NO | If a merchant believes that a device was tampered with, they must put the device in this state. Contact your relationship manager or Bluefin Support for next steps. |
| Unassigned | NO | Unit is injected and held by KIF. |
Viewing Device Details
Chain of Custody
From the Devices tab, click Edit (pencil icon ) next to the device you want to review.
Click the Chain of Custody tab. It will display all custodians who were responsible for the device.
NOTE: User names display with a hyperlink, so you can see their contact information.

Device State History
From the Devices tab, click Edit (pencil icon ) next to the device you want to review. Click the History tab. The device will be listed along with dates when the status changed. NOTE: User names display with a hyperlink, so you can see their contact information.

Lifecycle Report - Detailed Device History
From the Devices tab, click Edit (pencil icon) next to the device you want to review.
Click the Lifecycle tab. The device will be listed along with dates when the device status changed as well as the location and custodian.
NOTE: User names display with a hyperlink, so you can see their contact information.

Return Merchandise Authorization Process
IMPORTANT: The Return Merchandise Authorization (RMA) is an irreversible step!
If you discover that your device is malfunctioning or suspect it has been tampered with, con- tact your relationship manager or contact Bluefin Support.
Based on their guidance, if you are advised to return the device, do the following from the
Devices tab:
- Select your Partner Account and choose Client if applicable.
- Click Edit (pencil icon) next to the device.
- Change Device State to RMA.
A device can only be moved to RMA after it’s been received.

When the device status is RMA, it will not process transactions. The device serial number will automatically be appended to include the date.
Checking on Device Shipment and Tracking
You will not see the device in P2PE Manager until the KIF injects the device and uploads it to P2PE Manager.
Below are instructions for viewing device status before and after it’s shipped.
Checking Tracking Number
Access the Shipments tab. If your device has been shipped, it will be listed along with the tracking number which you can use at the carrier’s website to track the shipment.

Checking Device Status
NOTE: Depending on how your organization was setup, you may or may not have access to the Equipment tab. (If you do not have access to the Equipment tab, check your email for updates or contact Bluefin Support.)
If there is no tracking number, do the following:
- Select the Equipment tab
- If the device is listed, that means that the order has been successfully placed. NOTE: If the device is not listed, and depending on how your order was placed, the device will display just before it is shipped.

- Select the Devices tab.
- Locate the device. If the Device State = Injected, the key has been injected and it will ship shortly.
NOTE: If the device is not listed and the device was ordered more than five busi- ness days ago, please contact Bluefin.

Checking Order Status
NOTE: If the device is not listed, that doesn’t mean that your order was not successfully placed. Depending on how your order was placed, it may not show up here.
- Select the Equipment tab.
- Refer to the Status section.
INITIAL: Order was successfully submitted.
PENDING: Someone at key injection facility has been assigned the order and is working on it.
COMPLETED: Order has been shipped.
Transferring a Device between Custodians or Locations
IMPORTANT:These instructions only apply to active functioning devices. (If a device is retired, lost, or stolen, these steps do not apply.) Additionally, this option is restricted to Client Administrators and Client Custodians.
You can transfer a device to a different location if the device is moved. EXAMPLE: A device is moved from the “Chicago Office” to the “San Francisco Office.”
You can also transfer a device’s custodian from one person to another. EXAMPLE: A custodian changes job roles within the organization and is no longer overseeing device compliance. Or, the custodian is no longer employed by the organization.
To transfer a device, do the following from the Devices tab:
- Click Edit (pencil icon) next to the device you would like to transfer.
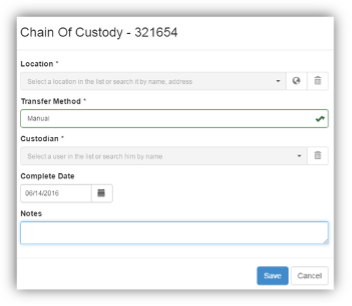
- Click the Chain Of Custody tab and then click Create.
- Complete fields and click Save. Transfer Method:
- Choose Manual if device is handed off or if someone else taking responsibility for the device.
- Choose Shipment if device is being mailed from one location or custodian to another. Complete additional fields when prompted.
Transferring Multiple Device Locations
This functionality is restricted to following user roles: Client Administrators and all Partner roles.
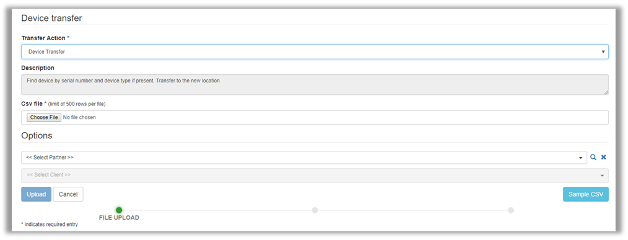
You can use Device Transfer to move devices in bulk from one Location record to another Location under the same Partner and Client record.
Prerequisite:
Create a CSV file with the following column headings: Serial Number, Location and Device Type.
From Manage > Device Transfer you can download a Sample CSV.

To transfer devices to another location under the same Partner and Client record, do the fol- lowing from the Manage tab:
- Select Device Transfer in the left column.
- Required. Click Choose File and navigate to your CSV file.
- (Partners Users only: Select the Partner and Client from the drop-down lists.)
- Click Upload when you’re done.
If devices were not successfully transferred, hover your house over the Warning
sign for an error description.
Equipment
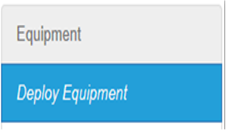
During the account setup process, you will order equipment directly with your sales representative.
Deploying Equipment
“Deploying Equipment” refers only to placing an order to send additional equipment to your location(s). This option is restricted to Partners and Client Administrators.
All device orders must be tracked in P2PE Manager to properly track chain of custody.
Depending on how your organization was setup, you may or may not have access to the Equipment tab. (If you do not have access to the Equipment tab, check your email for updates or contact Bluefin Support.)
- Navigate to Equipment > Deploy Equipment and then click Create.
- Complete the Deployment request as noted below.
| Feild | Description |
|---|---|
| Partner | (Partners Users only: Select the Partner from the drop- down lists.) |
| Client | (Partners Users only: Select the Client from the drop- down lists.) |
| Location | Required. TIP: If sending to a new location, add the location before placing order. Refer to Adding Locations. |
| Contact | Required. |
| Device Type | Required. IMPORTANT: All Bluefin equipment is listed as an option but keep in mind that this equipment may or may not be compatible with your specific processing solution. |
| Quantity | Required. |
| Client Order # | Optional. Enter the Client Order # if applicable. It will be included in the Bluefin invoice. |
| Client PO # | Optional. Enter the Client PO# if applicable. It will be included in the Bluefin invoice. |
| Client RA # | Not applicable. |
| Bluefin Order # Bluefin PO # Bluefin RA # Submit Date Processed Date | (These fields are automatically generated.) |
| Notes | Required. Notes are submitted to the KIF for processing. IMPORTANT: Use the Notes field to document special data packages, specific configuration requests (RBA #) or debit keys, and so forth, that must be injected into the device. EXAMPLE: RBA 22; Chase - PIN/Debit key |
- Click Save to save your work and finish later. Click Submit when you’re ready to submit the order for processing.
Opt Out of Bluefin Program
This option is restricted to Client Administrators and does not apply to Partners.
Opting Out retires all devices in your account so they cannot conduct transactions.
- Access the Opt Out tab.
- Check the acknowledgement check box and click Opt Out. An email alert is automatically sent to Bluefin Services.
Opt Out will not entirely cancel your Bluefin account. To cancel, you will also need to contact Bluefin to notify us and receive additional cancellation instructions (varies depending on account configuration and setup). Refer to Contacting Support
Device Attestations
PCI Compliance requires that merchants using a P2PE solution inspect their devices for tam- pering at least once per year. P2PE Manager makes these inspections easy to complete.
Viewing Completed Attestations
The Completed Attestations tab provides you with a record of all the devices that have been attested.
- Navigate to the Attestations tab
- Click Completed Attestations in the left column.

- Review the Complete Date for attested devices.
Shortly before a device needs to be inspected and attested to, you will receive an email notification. (The email includes device serial number and location.)
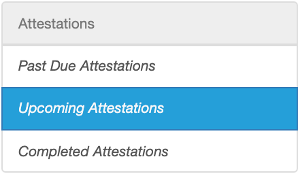
- Click the Attestations tab. Select Upcoming Attestations in the left column.
- Select the checkbox next to the device(s).
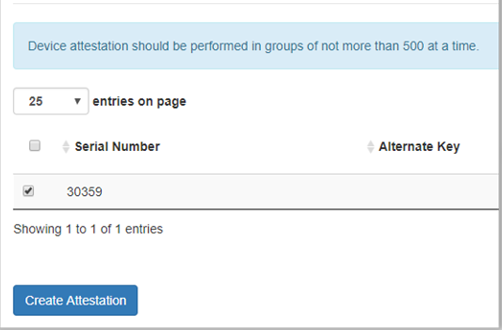
To select all devices, click the check box above the list of devices. You can select up to 500 devices and perform attestations on the selection as a group.
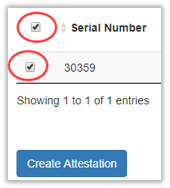
- Click Create Attestation.
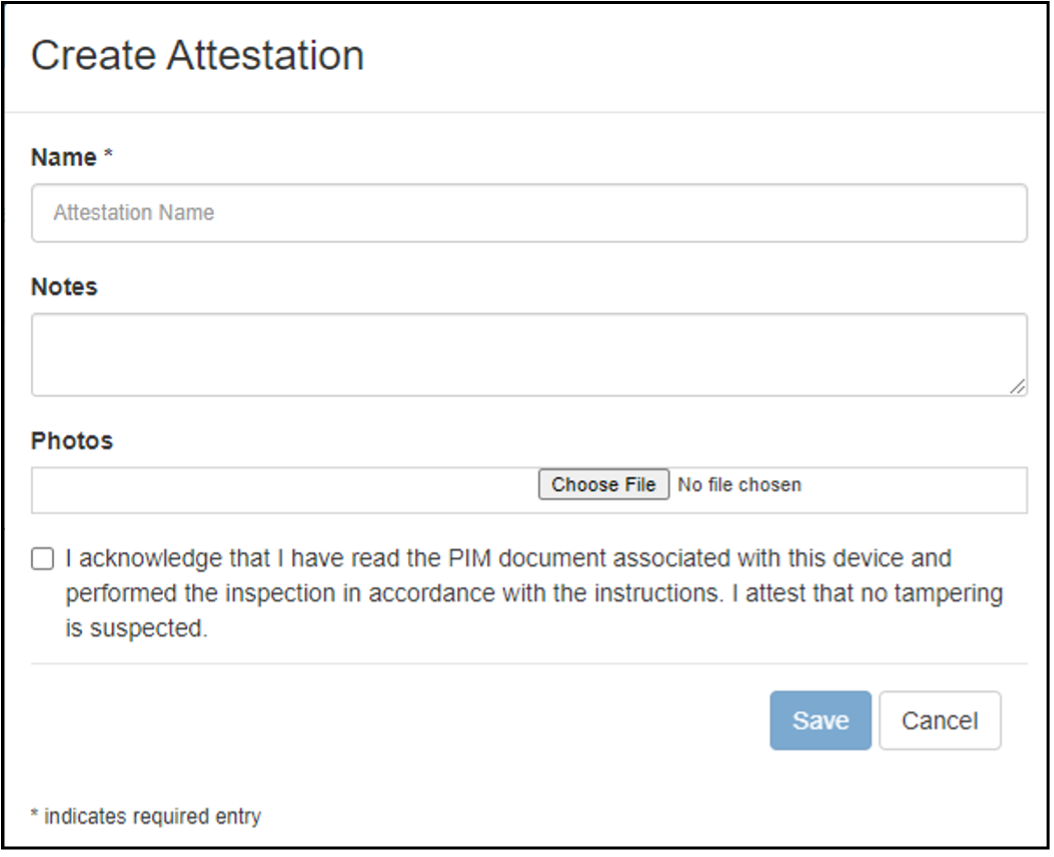
- Optional: Based on your preference, you can upload one image. Click Choose File and then navigate your network to select the image file.
NOTE: The following file types can be selected: .jpg, .jpeg, .png. (Maximum file size = 25 MB) - Click Save when you’re done.
Attestations can also be performed in the Past Due Attestations tab by following Step 2 through Step 5.
Changing Device Attestation Date
PCI standards indicate a device should be inspected at least once per year, but some merchants choose to inspect devices more often. Other merchants do inspections once per year but will adjust initial inspection dates to make sure that inspections of all devices are done on the same day.
- Select the Devices tab. All devices will be listed.
- Click Edit (pencil icon) next to the device you want to edit.
- You can set the attestation period frequency by selecting from a list of options. Based on your selection, the system will prompt you to perform the attestation.
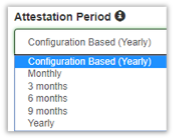
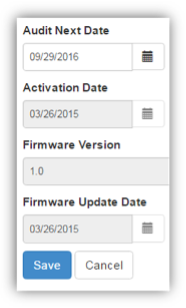
4.Optional. Update the Audit Next Date based on your preference and click Save
when you're done
Batch Process: Change Device Attestation Date
You can change the device attestation date for a group of devices (up to 500) from Attestation > Upcoming Attestation. You can use the Search feature to narrow the list and you can optionally download a list of devices into a PDF or CSV file.
- Select the device(s) you want to change and then click Update. NOTE: You can select up to 500 devices.

- Update the information as appropriate for Audit Next Date and Attestation Period.
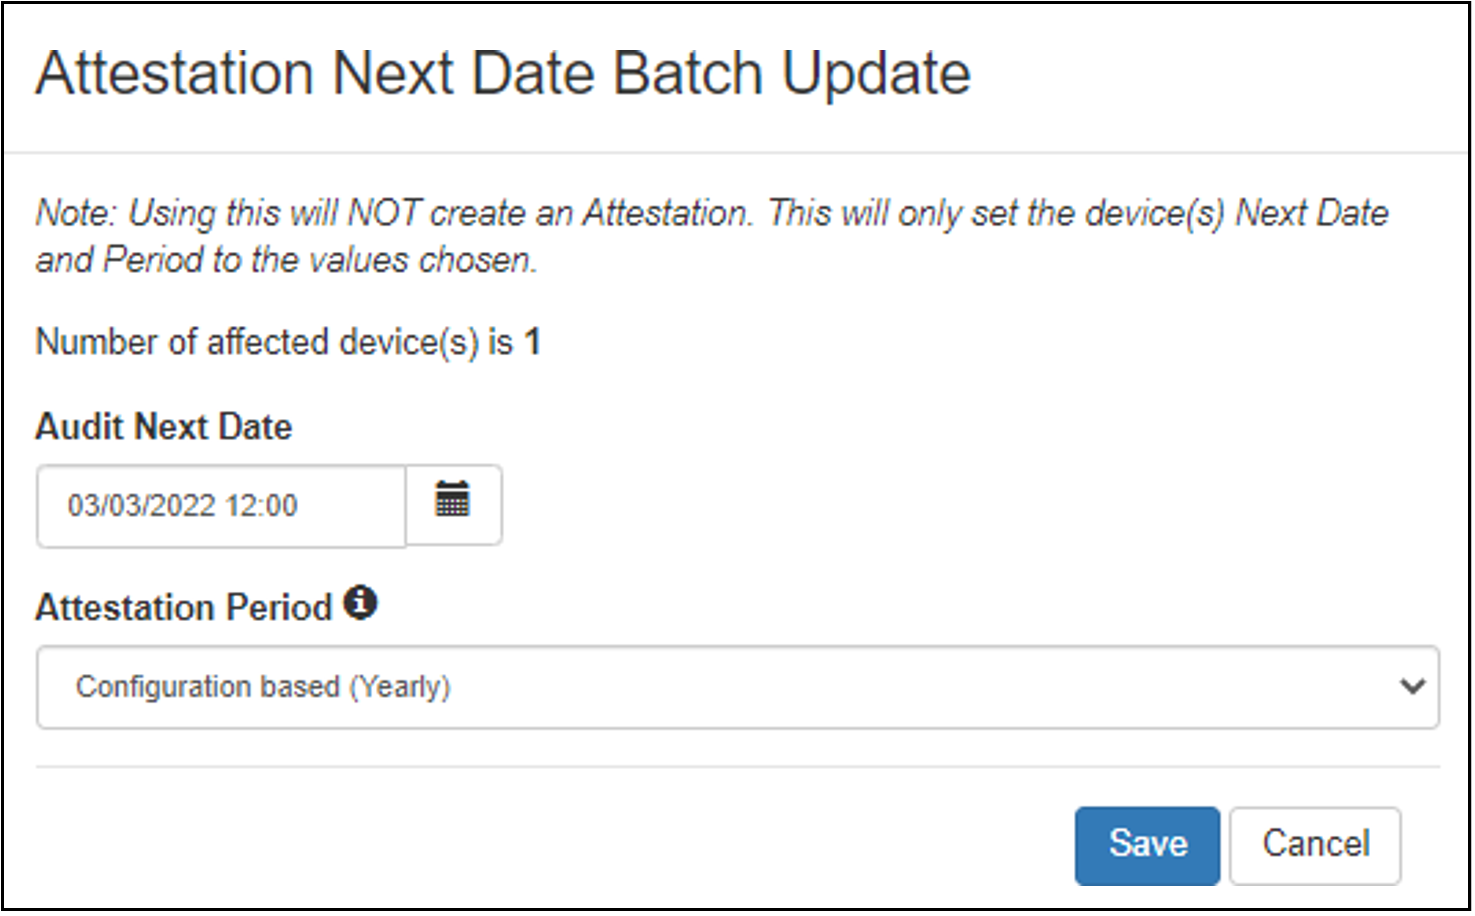
- Click Save when you’re done.
Viewing Upcoming Attestations
- Navigate to the Attestations tab
- Click Upcoming Attestations in the left column.
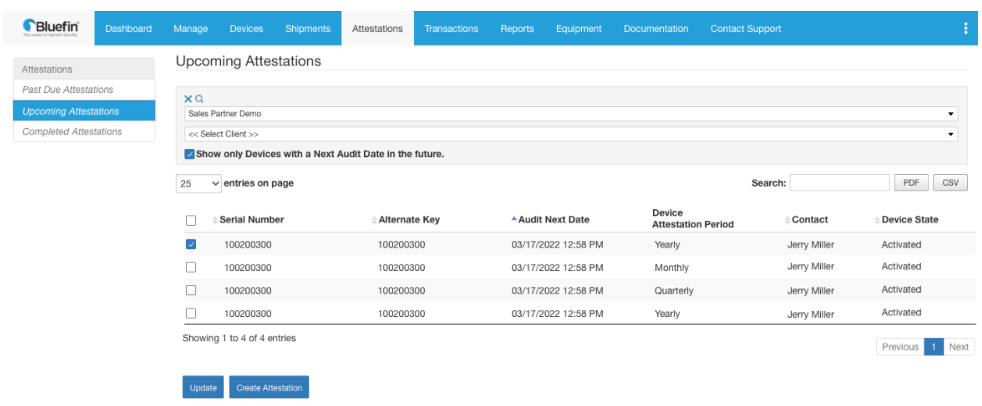
- Review the Audit Next Date for the next date the device is scheduled to be audited.
Upcoming Attestations table will only display attestations 14 days prior the Audit Next Date.
Viewing Past Due Attestations
- Navigate to the Attestations tab
- Click Past Due Attestations in the left column.
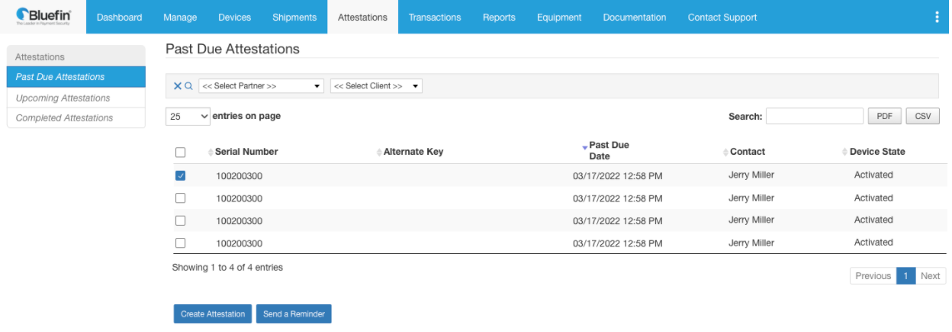
- Review the Past Due Date that the device was scheduled to be audited.
You can use the Search feature to narrow the list and you can optionally download a list of devices into a PDF or CSV file.
Sending a Reminder to Complete Past Due Attestations
Only Partner Supervisors and Partner Fulfilment user send a reminder to their Sub-Partners, Clients, and Sub-Partner’s Clients to remind them to complete past due attestations. The contact person listed for that device will receive the email.
- Navigate to the Attestations tab
- Click Past Due Attestations in the left column.
- Select the device(s) you want to send a reminder for and click Send a Reminder
NOTE: You can select up to 500 devices.
Device Tampering Detection
Bluefin’s P2PE devices have three mechanisms to detect tampering, each outlined below. The one that is triggered depends on the method of tampering that was utilized by the attempted data thief. For security reasons, the activities that trigger each of these mechanisms are omitted.
- If the device detects tampering at the time that it is tampered with, it will lose transaction processing ability and display tamper on the screen. If this happens there is no way to remotely reactivate the device and you will need to coordinate with Bluefin to replace it.
- If the device does not detect tampering at the time (which may be the case with external tampering), it will detect changes in the submitted data string and display quarantine within P2PE manager. The screen may look the same, but transaction processing ability will be deactivated. If this happens, please contact Bluefin.
- The device may suspect tampering by certain processing attempt patterns that are consistent with data thief testing. If these patterns are detected the device will display quarantine within P2PE manager. The screen may look the same, but transaction processing ability will be deactivated. If this happens, please contact Bluefin.
Partner Device Types
To view devices that are attributed to your organization, select Manage> Partner Device Types. Next, select the partner or sub-partner from the drop-down list. The devices will be displayed.
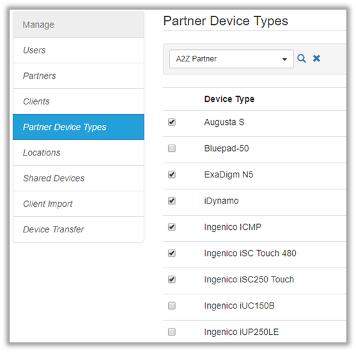
If a device is missing, please contact Bluefin support or your relationship manager.
Shared Devices

To display a summary of shared devices including the partner owner and the partner with whom the device is shared, do the following from the Manage tab:
- Select Shared Devices in the left column
- Select the Partner from the drop-down list. For this partner, a list of their shared devices displays. For each device, you can track the Device Owner Partner, Device Owner Client, and Device Locaction.
Updated over 3 years ago
