API Authentication
For authentication, the ShieldConex® Management API supports basic, HMAC and RSA authentication. For testing purposes you can use Basic or RSA encryption for authentication; however, our production environment requires the use of HMAC.
NoteIf you're experiencing difficulties generating either the HMAC or RSA authentication header, please visit our GitHub repository for assistance. As these two are generally tricky to deal with, we provide scripts and resources to help with HMAC and RSA header generation. Check out the HMAC/RSA Generators for code examples.
Before using one of these methods, they must be checked and set up from UI from the user settings you are applying the method to.
After logging into ShieldConex® Management Portal, select the Manage tab and clicking the Users on the sidebar and click on the edit icon on your user.
Select one of the following authentication methods:
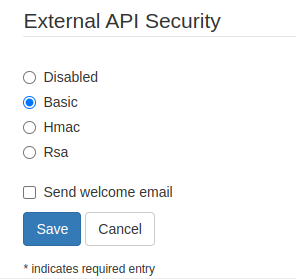
ShieldConex® Management API Security
Basic Authentication
Our Basic authentication method requires that you place the username and password in the authentication header. These are the credentials you use to log into the ShieldConex Portal.
Build a Basic Authentication Header
- Concatenate your username and password with a colon(:) separator.
[email protected]:waterford123- Base64 encode the string.
base64Encode('[email protected]:waterford123')

// output: d2F0ZXJmb3JkQGV4YW1wbGUuY29tOndhdGVyZm9yZDEyMw==- Build the Basic Auth Header.
Authorization: Basic d2F0ZXJmb3JkQGV4YW1wbGUuY29tOndhdGVyZm9yZDEyMw==Example
curl 'https://portal-staging.shieldconex.com:4010/api/v1/clients?partner=partnerName' \
    -X GET \
    --header 'Content-Type: application/json' \
    --header 'Accept: application/json' \
    --header 'Authorization: Basic d2F0ZXJmb3JkQGV4YW1wbGUuY29tOndhdGVyZm9yZDEyMw=='
HMAC Authentication
The hash-based message authentication code (HMAC) method provides replay protection, time-to-live, and request integrity. Our implementation requires that you use the sha-256 and hmac-sha-256 hashing algorithms. Before you can implement this auth method, you must ensure that you are using the decoded value of the HMAC secret as the secret key generated via UI as shown below.
RemainderCheck out our script for generating the HMAC authentication: HMAC Generator.
ShieldConex® Management HMAC Security
Decode Base64
atob('NDQ2MWJmNzlxOTI4NTA3YzEyZTljNTA0NGE1ZjY4NjE=')An HMAC authentication header must contain the following properties:
| Property | Description |
|---|---|
username | This property must be set to your username. |
nonce | This property must be set to a nonce. A nonce is a unique random string. If a nonce is encountered more than once during a 15 minute period the API call is rejected. It is your responsibility to ensure that the nonce is unique. |
timestamp | A unix timestamp. Our service will reject API calls with a timestamp older than 15 minutes. |
response | The response property is a HMAC-SHA256 hash (in hexadecimal format) of a number of the API call's properties. See the guide Building the String-to-Hash for a detailed description of string that must be included in the hash. Once you have the StringToSign, generate the response like this: Hex( HMAC-SHA256( sharedKey, StringToHash ) ) |
Building an HMAC Authentication Header
- Generate a nonce
be4e24a29ad716b70a172780a1a9d62c8b077e42560d4c480e1c306a9e4a4379- Generate a unix timestamp
Math.round(new Date().getTime() / 1000)
// output: 1723512776
(int) (System.currentTimeMillis() / 1000L)
// output: 1723512776- Generate the content hash by SHA-256 hashing the request body and we can also make sure to remove all the whitespace in case there is an extra character we are not seeing if copying and pasting the body.
sha-256(`{
  "name": "Test Client",
  "isActive": false,
  "directPartner": {
    "id": 999,
    "name": "partnerName"
  },
  "contact": {
    "id": 2666,
    "firstName": "WATERFORD",
    "lastName": "Example",
    "email": "[email protected]"
  }
}`.replace(/\s/g, ''))

// output: 6451b1671e4fcd4c814f5c25f79d798dee447dc4d3664c94c6b5875729f16c86
NOTE: In the case of a
GETrequest, the body is always an empty string and, thus, the content hash is alwayse3b0c44298fc1c149afbf4c8996fb92427ae41e4649b934ca495991b7852b855.
- Build the String-to-Hash.
When creating the String-to-Hash, it is important that you follow the format described exactly as outlined below, otherwise the request will be rejected. The String-to-Hash is composed of the following elements.
| Element | Description |
|---|---|
HttpVerb | The http method for the endpoint: GET/POST/PATCH/DELETE |
CanonicalizedResource | Should be the HTTP Request URI, without protocol, port, and domain parts; for example: /api/v1/clients = create client |
nonce | Same value as set in the auth header nonce property. |
timestamp | Same value as set in the auth header timestamp property. |
ContentHash | A SHA-256 hash in hexadecimal format of the HTTP POST's body. Our service expects you to hash the whole body, including any leading and trailing whitespaces that you may have included. See step 3. |
\n | The Unicode code point U+000A, commonly called newline. |
The String-to-Hash is composed of these elements gathered together in this exact format. Once you have the String-to-Hash, you pass it into the HMAC-SHA256 hashing algorithm to generate the HMAC authentication header's response property.
HttpVerb + " " + CanonicalizedResource + "\n" + nonce + "\n" + timestamp
  + "\n" + "\n" + ContentHash;
For our example the String-to-Hash is:
"POST /api/v1/clients\nbe4e24a29ad716b70a172780a1a9d62c8b077e42560d4c480e1c306a9e4a4379\n1723512776\n\n6451b1671e4fcd4c814f5c25f79d798dee447dc4d3664c94c6b5875729f16c86"- HMAC-SHA256 hashes the String-to-Hash with the secret key. Note that this secret key is base64 encoded and it has to be decoded, which makes it look like in the function below.
Hex( HMAC-SHA256( '4461bf79q928507c12e9c5044a5f6861',
                 "POST /api/v1/clients\nbe4e24a29ad716b70a172780a1a9d62c8b077e42560d4c480e1c306a9e4a4379\n1723512776\n\n6451b1671e4fcd4c814f5c25f79d798dee447dc4d3664c94c6b5875729f16c86" ) )

// output: aaf2f682333bb23c7694fc019f99bcdda54184b44f85d8201228eb14c2f5dad6- Build the Digest authentication header:
Authorization: Hmac username="WATERFORD", nonce="be4e24a29ad716b70a172780a1a9d62c8b077e42560d4c480e1c306a9e4a4379", timestamp="1723512776", response="aaf2f682333bb23c7694fc019f99bcdda54184b44f85d8201228eb14c2f5dad6"Example
The following example is for demonstration purposes only. The WATERFORD user is not configured for HMAC authentication and the header's timestamp is out of date; if you try the cURL command, you will receive an authentication required error message.
curl 'https://portal-staging.shieldconex.com:4010/api/v1/clients' \
    -X POST \
    --header 'Content-Type: application/json' \
    --header 'Accept: application/json' \
    --header 'Authorization: Hmac username="WATERFORD", nonce="be4e24a29ad716b70a172780a1a9d62c8b077e42560d4c480e1c306a9e4a4379", timestamp="1723512776", response="aaf2f682333bb23c7694fc019f99bcdda54184b44f85d8201228eb14c2f5dad6"' \
    -d '{"name":"TestClient","isActive":false,"directPartner":{"id":999,"name":"partnerName"},"contact":{"id":2666,"firstName":"WATERFORD","lastName":"Example","email":"[email protected]"}}'
RSA Authentication
Generate RSA Key Pair
The following section outlines the steps involved in generating an RSA key pair with OpenSSL. We recommend that you generate a 2048 bit key pair as 1024 bit keys are no longer considered secure and 4096 bit keys consume considerable CPU resources when signing API calls.
NoteIf you are having trouble generating this header, we wrapped up all the following steps into one script: RSA Generator.
- Generate a 2048-bit RSA private key and write it to a file
private.pem.
# Output an RSA private key with 2048 bit protection.
openssl genrsa -out private.pem 2048- Generate a PKCS8 formatted file from the private key and write it to file
private8.pem. Theprivate8.pemfile must be used in the RSA-DIGEST function to sign the requests.
# Generate a pk8 file from the private key.
openssl pkcs8 -topk8 -inform PEM -outform PEM -nocrypt -in private.pem -out private8.pem- Generate the public key file from the private key and write it to a file
public.pem.
# Generate a public key from the private key.
openssl rsa -in private.pem -outform PEM -pubout -out public.pem
This is the key that is copied and pasted into the RSA public key text field after you have selected RSA from the four options.
Note that the entire output file must be copied including BEGIN and END. Omitting anything would cause some issues resulting in the unauthenticated error message.
-----BEGIN PUBLIC KEY-----
MIIBIjANBgkqhkiG9w0BAQEFAAOCAQ8AMIIBCgKCAQEA51Jy/gk71DHyULWUQ1j8
4fvspqC77GSqRd4obm50+r/YA9W3agfFnDoKvIUXKOgULL94ATxFb/xRMVZXgLZZ
jkaDEArAGlsUxFChYh+laFvhmhn8APhfn3rpcAouWE1w36DCbbE9gFvKzFB2Qx/e
...
-----END PUBLIC KEY-----
The content hash is generated with the same sha256 algorithm used for HMAC. However, RSA-SHA256 is used for signing the String-to-Hash.
Example
const privateKey = Fs.readFileSync('private8.pem', 'utf8')

function signString(stringToSign) {
  const sign = crypto.createSign('RSA-SHA256')
  sign.update(stringToSign)
  const signature = sign.sign(privateKey, 'hex')

  return signature
}

// StringToSign can be declared but we use the same name as the HMAC to avoid confusion.
const StringToHash = "POST /api/v1/clients\nbe4e24a29ad716b70a172780a1a9d62c8b077e42560d4c480e1c306a9e4a4379\n1723512776\n\n6451b1671e4fcd4c814f5c25f79d798dee447dc4d3664c94c6b5875729f16c86"

const response = signString(StringToHash)

const authHeader = "Rsa "
    + "username=\"" + USERNAME + "\""
    + ", nonce=\"" + nonce + "\""
    + ", timestamp=\"" + timestamp + "\""
    + ", response=\"" + signature + "\""

console.log('Authorization: ' + authHeader)
Output
Authorization: Rsa username="WATERFORD", nonce="1b09256f6ed430f5d8fed72ab0bc86edc996db1812361efc5802c7d6ed18c41e", timestamp="1723207220", response="14743a0624ce39b4564fd570c91eb85f6e46d86817031c38f5e33caf26697d72b0ba15273c10110acb58cb027aa2e145ae230d596971e9c6c0343fcbf425ee20dadb94c539e3621dae0f494411ae7c1104e525d46498b4ad730136581493f8435965ff06fa53ec6aabeb9c7abe7ca157ab9ad0b742d4916311f73505ed5716292343db09f7a1481de4dfb411d200ceb24e7c54909b41e971b5fe8c82ac1616d2ca3d825d5f3796eb48d393740f938ad1f2bd9e8c54cc808a07dbcf58a2541a44e77dd123793c884ba3d92f15d4d15a7773d60412c1bf18e4c54661a91da0e6a1745de9c9cdc974e2ad65a2e8f2982281f5631313675d9b12efb11ce66c8e5818"Authentication Header Guide
As shown above, the RSA authentication method is almost identical to HMAC. The only difference is that it uses an RSA private key to sign the String-to-Hash and a RSA public key to validate that the signature is valid. RSA keys provide a more secure way of signing your auth headers than using a password. While a password can eventually be cracked with a brute force attack, RSA keys are nearly impossible to decipher by brute force alone. The downside of using RSA to sign API calls, is that RSA signatures require a lot more CPU resources (up to ~250 times) than HMAC hashing.
To validate that the signature is valid, the following code can be applied:
function verify(StringToHash) {
  let pem = Fs.readFileSync('public.pem')
  let publicKey = pem.toString('ascii')

  const verifier = crypto.createVerify('RSA-SHA256')
  const signature = signString(StringToHash)

  verifier.update(StringToHash, 'ascii')

  const publicKeyBuf = Buffer.from(publicKey, 'ascii')
  const signatureBuf = Buffer.from(signature, 'hex')

  return verifier.verify(publicKeyBuf, signatureBuf)
}

if(!verify(StringToHash)) {
  throw new Error('Signature Not Valid')
}
Our Generating an RSA key pair guide outlines how you can create a public and a private key. You must send the public key to Bluefin, and keep the private key on your server.
| Property | Description |
|---|---|
username | This property must be set to your username that you use to log into the ShieldConex Management Portal. |
nonce | This property must be set to a nonce. A nonce can be any arbitrary string, however each nonce can once over a 15 minute period. Our service keeps a record of these nonces; if a nonce is encountered more than once during a 15 minute period the API call is rejected and an auth error response is produced. It is up to you to keep the nonce unique. |
timestamp | A unix timestamp. Our service will reject API calls with a timestamp older than 15 minutes. |
response | The response property is an RSA private key signature of a number of the API call's properties. |
Resource Mutability
With the ShieldConex Management API, once a resource has been utilized it cannot be deleted. Only two resource types can be deleted: clients and templates. However, if a template has been published, it cannot be deleted via UI or API. As an alternative to deletion, each of these resources (excluding transactions) can be set to inactive.
Updated 4 months ago