Example Use Cases
Overview
This section showcases some of the most common use cases of ShieldConex® Orchestration in practice. You may as well extend these by studying ORCA Configuration JSON Schema Definitions and API Examples to put together the most suitable ORCA solution according to your needs.
These can also be found in the Introduction Use Cases with the diagram illustrations.
Iframe-Based Secure Tokenization and Detokenization Processing
Start by creating a template using the ShieldConex® Manager, specifying the fields you would like to tokenize. Below is a sample payment form. Instructions for creating a template like this are available in the Getting Started page.
After creating a template and configuring the iframe payment form, the iframe element looks like this.
For example,
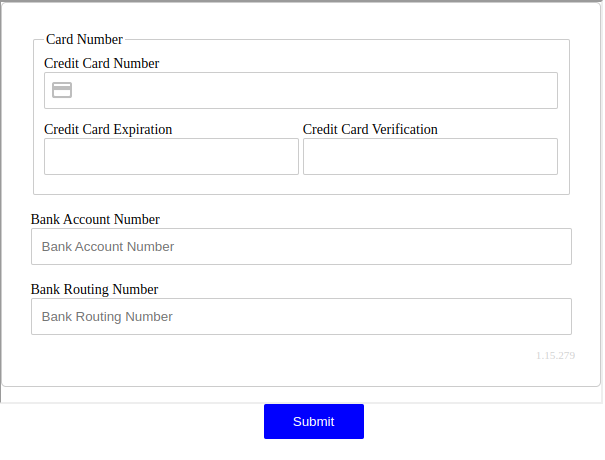
Screenshot of Example Payment Form
For the full guide on the iFrame SDK and Templates, check out iFrame SDK & Tokenization and Templates.
Next, create an ORCA configuration, again using the ShieldConex® Manager. This extracts, detokenizes and forwards the data securely. Instructions for creating a configuration are also detailed in the Quickstart Guide.
ORCA Configuration
{
  "proxy": {
    "method": "post",
    "target": "{The target URL/IP Address}",
    "authorization": {
      "type": "passthrough"
    },
    "logSettings": {
      "requestMasks": [
        {
          "transformationSource": "body",
          "transformationType": "jsonpath",
          "transformationPath": "$.Card.CCN",
          "pattern": "all"
        },
        {
          "transformationSource": "body",
          "transformationType": "jsonpath",
          "transformationPath": "$.Card.Expiry",
          "pattern": "all"
        },
        {
          "transformationSource": "body",
          "transformationType": "jsonpath",
          "transformationPath": "$.Card.CVV",
          "pattern": "all"
        },
        {
          "transformationSource": "body",
          "transformationType": "jsonpath",
          "transformationPath": "$.Card.BAN",
          "pattern": "all"
        },
        {
          "transformationSource": "body",
          "transformationType": "jsonpath",
          "transformationPath": "$.Card.RTN",
          "pattern": "all"
        }
      ],
      "responseMasks": [
        {
          "transformationSource": "body",
          "transformationType": "jsonpath",
          "transformationPath": "$.Result.Secret",
          "pattern": "all"
        }
      ]
    }
  },
  "requestActions": [
    {
      "type": "shieldconex",
      "authorization": {
        "type": "basic",
        "username": "{partnerID}",
        "password": "{partnerKey}"
      },
      "templateRef": "{templateRef}",
      "method": "detokenize",
      "instructions": [
        {
          "transformationSource": "body",
          "transformationType": "jsonpath",
          "transformationPath": "$.Card.CCN",
          "fieldName": "scx_token_card_number"
        },
        {
          "transformationSource": "body",
          "transformationType": "jsonpath",
          "transformationPath": "$.Card.Expiry",
          "fieldName": "scx_token_card_expiration"
        },
        {
          "transformationSource": "body",
          "transformationType": "jsonpath",
          "transformationPath": "$.Card.CVV",
          "fieldName": "scx_token_card_verification"
        },
        {
          "transformationSource": "body",
          "transformationType": "jsonpath",
          "transformationPath": "$.Card.BAN",
          "fieldName": "scx_token_bank_account_number"
        },
        {
          "transformationSource": "body",
          "transformationType": "jsonpath",
          "transformationPath": "$.Card.RTN",
          "fieldName": "scx_token_bank_routing_number"
        }
      ]
    }
  ]
}
The client can then tokenize and retrieve sensitive data through the onToken iframe event, an example of which can be seen in the source code supplied below, on line 96 of the file PaymentFormScript.js. The tokens can then be read via the ShieldConex® tokenization service, by way of the CURL command given in the token-read.sh shell script below.
From this point on, the client will include these tokens, along with other necessary payload elements, in the data sent to ShieldConex® Orchestration. ShieldConex® then performs detokenization - seen in the given proxy-detokenize.sh shell script - and forwards the payload to the designated endpoint.
See the links below for the sample source code. As well as an example of a payment form, we have included a sample user form example.
API-Based Tokenization and Detokenization Processing
For this example use case, the ORCA Configuration is set up to extract, detokenize and forward the data securely. Instructions for creating a configuration are also detailed in the Quickstart Guide. An example ORCA Configuration can be seen below.
To demonstrate this, we use Track2 data such as CCN, EXP and CVV.
ORCA Configuration
{
  "proxy": {
    "method": "post",
    "target": "{The target URL/IP Address}",
    "authorization": {
      "type": "passthrough"
    },
    "logSettings": {
      "requestMasks": [
        {
          "transformationSource": "body",
          "transformationType": "jsonpath",
          "transformationPath": "$.Card.CCN",
          "pattern": "all"
        },
        {
          "transformationSource": "body",
          "transformationType": "jsonpath",
          "transformationPath": "$.Card.Expiry",
          "pattern": "all"
        },
        {
          "transformationSource": "body",
          "transformationType": "jsonpath",
          "transformationPath": "$.Card.CVV",
          "pattern": "all"
        }
      ],
      "responseMasks": [
        {
          "transformationSource": "body",
          "transformationType": "jsonpath",
          "transformationPath": "$.Result.Secret",
          "pattern": "all"
        }
      ]
    }
  },
  "requestActions": [
    {
      "type": "shieldconex",
      "authorization": {
        "type": "basic",
        "username": "{partnerID}",
        "password": "{partnerKey}"
      },
      "templateRef": "{templateRef}",
      "method": "detokenize",
      "instructions": [
        {
          "transformationSource": "body",
          "transformationType": "jsonpath",
          "transformationPath": "$.Card.CCN",
          "fieldName": "card_number"
        },
        {
          "transformationSource": "body",
          "transformationType": "jsonpath",
          "transformationPath": "$.Card.Expiry",
          "fieldName": "card_exp"
        },
        {
          "transformationSource": "body",
          "transformationType": "jsonpath",
          "transformationPath": "$.Card.CVV",
          "fieldName": "card_cvv"
        }
      ]
    }
  ]
}
This example uses a simple local server with Express and SQLite3 to emulate how this process would work in a real-world use case.
First, we tokenize the sensitive card data from a file and insert it into the database. This "devalues" the sensitive data. The token and a BFID are returned for storage.
- Card data to tokenize
- The token and a BFID returned for storage
- Tokens and BFIDs reinserted into the database
To emulate the billing cycle, we set up the process payments that retrieve the ShieldConex® token and BFID from storage and send them to ShieldConex Orchestration for detokenization. The response is proxied back to the client.
PointConex Example Use Case | EMV Transaction Orchestration
For this example use case, the ORCA configuration specifies that Decryptx® extracts and decrypts PAN, CVV, and Expiry, so we can process the transaction.
We are going to add additional payload elements such as transaction identifier, transaction amount and transaction currency. ShieldConex® Orchestration leaves these untouched as per the configuration instructions and forwards them to the target destination unchanged.
NoteNote that this example use case is directed to all of the three PointConex integrations. For more, see PointConex Use Case.
ORCA Configuration
{
  "proxy": {
    "method": "post",
    "target": "{The target URL/IP Address}",
    "authorization": {
      "type": "passthrough"
    },
    "logSettings": {
      "requestMasks": [
        {
          "transformationSource": "body",
          "transformationType": "jsonpath",
          "transformationPath": "$.Card.Expiry",
          "pattern": "all"
        },
        {
          "transformationSource": "body",
          "transformationType": "jsonpath",
          "transformationPath": "$.Card.PAN",
          "pattern": "all"
        },
        {
          "transformationSource": "body",
          "transformationType": "jsonpath",
          "transformationPath": "$.Card.CVV",
          "pattern": "all"
        },
        {
          "transformationSource": "body",
          "transformationType": "jsonpath",
          "transformationPath": "$.Transaction.Amount",
          "pattern": "all"
        },
        {
          "transformationSource": "body",
          "transformationType": "jsonpath",
          "transformationPath": "$.Transaction.transactionId",
          "pattern": "all"
        },
        {
          "transformationSource": "body",
          "transformationType": "jsonpath",
          "transformationPath": "$.Transaction.Currency",
          "pattern": "all"
        }
      ],
      "responseMasks": [
        {
          "transformationSource": "body",
          "transformationType": "jsonpath",
          "transformationPath": "$.Result.Secret",
          "pattern": "all"
        }
      ]
    }
  },
  "requestActions": [
    {
      "type": "parser",
      "authorization": {
        "type": "basic",
        "username": "{partnerID_FROM_P2PEManager}",
        "password": "{partnerKey_FROM_P2PEManager}"
      },
      "instructions": [
        {
          "transformationSource": "body",
          "transformationType": "jsonpath",
          "transformationPath": "$.Card.PAN",
          "format": "pan",
          "dataType": "string",
          "default": "mydefault"
        },
        {
          "transformationSource": "body",
          "transformationType": "jsonpath",
          "transformationPath": "$.Card.CVV",
          "format": "cvv",
          "dataType": "string",
          "default": "mydefault"
        },
        {
          "transformationSource": "body",
          "transformationType": "jsonpath",
          "transformationPath": "$.Card.Expiry",
          "format": "expiry",
          "dataType": "string",
          "default": "mydefault"
        }
      ]
    }
  ]
}
Request Configuration
POST https://proxy{-*}.shieldconex.com/api/v1/partners/{partnerID}/configurations/{configReferenceID}
{
  method: "POST",
  headers: {
    "dpx-device-serial": "{deviceSerial}",
    "dpx-device-type": "{deviceType}",
    "dpx-payload": "{devicePayload}",
    "Authorization": "{authKey}",
    "Content-Type": "application/json",
  },
  body: {
    "Card" : {
      "PAN" : "XXXXXXXXXXXXX",
      "CVV" : "XXX",
      "Expiry" : "XXXX"
    },
    "Transaction": {
      "Amount": "100",
      "transactionId": "23",
      "Currency": "USD"
    }
  }
}
NoteBased on the ORCA configuration above, all the
Xs are substituted with the data that Decryptx® extracts and decrypts from the device payload, which ShieldConex® Orchestration then reinserts and forwards, securely over the TLS protocol, to the designated endpoint; that is, the payment processor. For the detailed workflow, make sure to examine the PointConex Use Case.The decrypted payload accepted by the target destination is the following:
{
  "Card": {
    "PAN": "4444333322221111",
    "CVV": "123",
    "Expiry": "1225"
  },
  "Transaction": {
    "Amount": "100",
    "transactionId": "23",
    "Currency": "USD"
  }
}
Updated 3 months ago