Templates
The template feature exists to make configuring ShieldConex Tokenization iFrames as simple as possible. This guide covers basic setup as well as detailing the capabilities and limitations of the iFrame.
Navigating to the Template Editor
Step 1: Login
Keep in mind that you will want to first test your integration with our certification environment. You can use the following links to log in to either environment.
Certification Environment: https://portal-cert.shieldconex.com/login
Production Environment: https://portal.shieldconex.com/login
Step 2: Navigate to Manage Templates
Once you log in, finding the templates is easy. Navigate to Manage in the top banner, and then Templates from the left navigation pane.

Step 3: Create or Select a Template
Once on the Manage Templates page, you’ll see a list of existing templates and above it, a button to Create Template. You can either use this button to create a new template from scratch or you can click the edit icon at the left of an existing template to edit it.
You can change the sort order (ascending / descending) by clicking a column heading. To mark a template as a favorite, click the star to the right of the template.
Filtering
You can filter existing templates by organization (depending on access level) and published status as well as search by name using the search box in the upper right hand part of the page. You can change the sort order (ascending / descending) by clicking a column heading.
To mark a template as a favorite, click the star to the right of the template.
Exporting
Next to the search box, you also have buttons that allow you to export a detailed list of templates in either PDF or CSV format.
Pre-Built Templates

Let’s take a closer look at the Create Template button. The main function of the button is to create a template with no existing setup, but if you look at the right-hand side of the button you’ll see a dropdown that displays options to create partially configured templates. The intent is to simplify integration with PayConex. Which template you use will depend on your settings and PayConex. If you aren’t sure which to use, please contact your integration specialist or send us an email at [email protected].
PayConex Token Payments Template
This template includes Card Information (number, cvv, & expert), ACH Payment Information, Name and Address fields.PayConex Tokenization Template
This template includes Card Information (number, cvv, & expert) & ACH Payment Information.
Template Setup
Our secure iFrames offer a lot of flexibility. Consequently, it may seem like there’s a lot of setup involved, but don’t worry — the template editor is designed to make it easy. We’ll walk you through each step and explain your options as we go.
General Template Settings
Before you begin building out your iFrame you should configure the core template settings. Those are the settings shown within the “Template” section of the editor. Settings may vary based on your user role, but you will find all of the options below.

| Field | Description |
|---|---|
| Partner | Required. Depending on your role, you must select partner or subpartner from the drop-down list when applicable. |
| Client | Required. Depending on your role, you must select a client from the drop-down list. |
| Name | Required. The template’s name. Though the name has no impact on integration, it is helpful when managing multiple templates. |
| TemplateRef | Required. Click the red Generate button to associate a unique ID with this template. This value is used to tokenize and detokenize data. If you are using the template without the Bluefin iFrame, you will need this ID and the ShieldConex API to secure your web page. |
| Access Mode | Required. Access Mode refers to token sharing. When a token is shared, it can be used to detokenize data.
|
Irreversible Tokenization and Time-Boxed Detokenization
These features can be turned on and off in the template configuration as shown below:

Detokenization Restrictions
Irreversible Tokenization
This is turned on using a checkbox. If enabled, this allows the user to permanently prohibit the detokenization of any tokens created using this template. In tandem with our token idempotency, tokens can still be used to work with sensitive data by relying on parity.
For example, if a user enters a card number in a checkout and a token is generated, that token can be compared against other tokenized card numbers to find a match. If the tokens are identical, then we know that the card numbers were also identical. Technically, this type of tokenization can also be referred to as One-way encryption.
Time Token Activation and Deactivation
Token activation and deactivation offsets can be configured in the Detokenization Restrictions settings as well. There are two fields that enable this; the Active From and Active To dates. The Active From field controls the offset from tokenization until the token can be detokenized and the Active To field controls the time offset time from tokenization until the token can no longer be detokenized. Please note that these are not specific dates, but rather the amount of time that has passed since detokenization. The duration designated in the Active To field should always be greater than the Active From date.
These fields are set based on the format defined in ISO 8601. ISO 8601 Durations are expressed using the following format, where (n) is replaced by the value for each of the date and time elements that follow the (n):
P(n)Y(n)M(n)DT(n)H(n)M(n)S
Where:
- P is the duration designator (referred to as "period"), and is always placed at the beginning of the duration.
- Y is the year designator that follows the value for the number of years.
- M is the month designator that follows the value for the number of months.
- W is the week designator that follows the value for the number of weeks.
- D is the day designator that follows the value for the number of days.
- T is the time designator that precedes the time components.
- H is the hour designator that follows the value for the number of hours.
- M is the minute designator that follows the value for the number of minutes.
- S is the second designator that follows the value for the number of seconds.
For example,P3Y6M4DT12H30M5Srepresents a duration of three years, six months, four days, twelve hours, thirty minutes, and five seconds.
In accordance with Active From and Active To, this feature also introduces new error messages and codes such as:
- 400 (Bad Request)
errMessage(string)"Detokenization period start violated""Detokenization period end violated"
"errCode"(number)1403
3D Secure Payment Options
**3D Secure **(3DS) is an e-commerce security standard that spans three domains - the interoperability domain (processor), the issuing bank, and the acquiring bank. These three entities work together to verify the cardholder’s identity using web authentication, as well as share robust data relevant to the transaction. 3D Secure may only be available to certain users.
There are several fields that need to be configured for 3DS to be enabled. This is where you can select your Authentication and Challenge Options, configure Shipping & Delivery, as well as specify transactions as Reorder or New Order. Please see below for a detailed guide to setting up each field.
| Field | Description |
|---|---|
| API Key | This is provided to the user by Bluefin via encrypted channel or telephony |
| Secret | This is provided to the user by Bluefin via encrypted channel or telephony |
| 3DS Authentication Options | Payment - Select this option if the form will be used to process typical 1-time payments. Recurring - Select this option for recurring payments with an unspecified end date. This would be your typical setup for selling a subscription service. Installment - Select this if you’re accepting payment in installments. **Installments must be supported by the merchant’s processor. Cardholder Verification as Part of EMV Token ID&V - EMV Token Identification and Verification (ID&V) triggers the 3DS Challenge authentication without the intent to immediately process a transaction. Instead, this authentication is tied to the cardholder’s Primary Account Number (PAN) and eliminates the need for the cardholder to repeat the challenge for purchases on that account. |
3DS Challenge Options Note: the challenge option is only applicable in some countries - notably not in the U.S. These merchants should specify ‘No Preference’ | With the rollout of 3D Secure 2, the cardholder can be prompted for additional authentication called a 3DS Challenge. In this process, the cardholder's bank will provide the cardholder with a one-time password via text or phone, which can then be entered in the Challenge field to complete the transaction. No Preference - A challenge can be triggered via 3DS authentication response messages if the issuer decides additional verification is needed to return a successful 3DS authorization No Challenge Requested - Enforces that no challenge will be requested - regardless of issuer or cardholder preference Challenge Requested (3DS Requestor Preference) - Defaults to the cardholder’s account preferences - typically this is defaulted to no challenge Challenge Requested (Mandated) - Enforces that a challenge be passed in order to authenticate the cardholder |
| Shipping Method | Required for AMEX transactions. Indicates shipping method chosen for the transaction. |
| Delivery Timeframe | Required for AMEX transactions. Indicates the merchandise delivery timeframe. |
| Reordering Previously Ordered Merchandise | Indicates whether the cardholder is reordering previously purchased merchandise. |
| Continue After 3DS Fail | When enabled, this will allow Amex, Discover, Visa, and Mastercard transactions to be run even after failing 3DS authentication. This is used when the card acceptor is willing to continue with the transaction without the liability shift to the issuing bank. |
| Use Sandbox | When enabled, cards can only be run as test transactions. |
Fields
This section helps you set up the fields that will show up in your iFrame. When you create a new template, there won’t be anything in this section but the Click to add new field button.
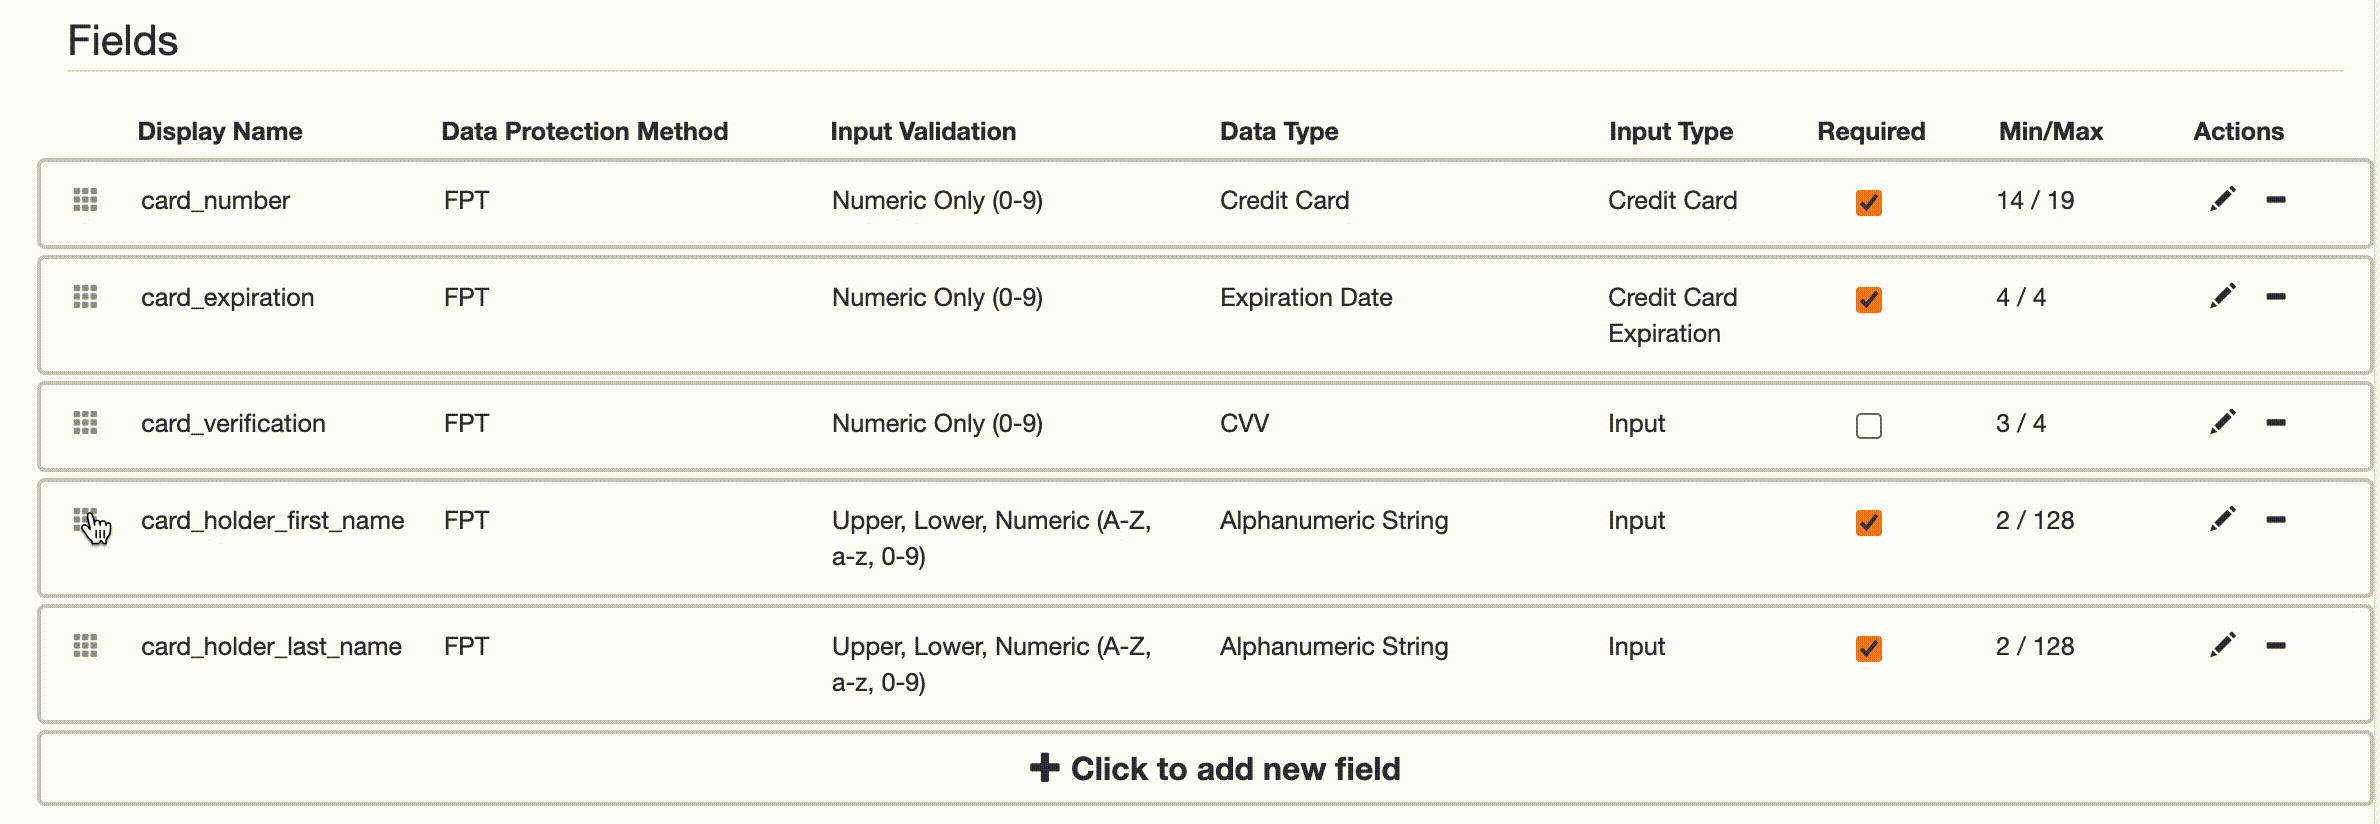
Field Types
There are 9 field types that you can add to your template. In this section, we’ll go over the basics of each field type, but if you’re looking for more details on the field setup process, please check out the Field Setup section further down in the guide.
| Field | Description | Min/Max Length |
|---|---|---|
| Card Information | Field Group. Includes the basic card information fields - Card Number, CVV, and Card Expiration Date. Name Alphanumeric + Space Card Number Numeric Expy Numeric CVV Numeric | Name 1/22 Card Number Automatic based on BIN Expy 4/4 CVV 3/4 |
| Address | Field Group. Includes the basic card information fields - Street Address 1, Street Address 2, City, State/Province, Zip/Postal Code, and Country. All of the fields can be toggled on or off during setup or edits. | |
| Date | Numeric. This field accepts a date and can accommodate multiple formats. | 5/10 |
| Email Address | Alphanumeric. Accepts an email address. | 9/56 |
| Bank Account Number | Numeric. Accepts a bank account number. Account numbers can vary greatly with little regulation around length, so loose validations are applied. | 1/128 |
| Routing Number | Numeric. Accepts a bank routing number. | 9/9 |
| Tax ID | Numeric. Accepts a 9-digit tax ID suech as an EIN or SSN. | 9/9 |
| Phone Number | Numeric. Accepts a phone number with several options for input masking for 10 digit numbers. | 10/10 |
| Custom Field | A flexible option that gives control over input validations using regex and min/max length options. | Custom set in the range of 1/128 |
iFrame Options
Domain Whitelist
Optional. As an added security measure, you can enable domain whitelisting in your ShieldConex Templates. When enabled, the form will only load when embedded in the given domain. This prevents any bad actors from hosting your iFrame elsewhere on the web.
If you decide to use domain whitelisting, make sure to include all sites where your iFrame is hosted. Please refer to the user guide for more information on how to set up domains and subdomains.
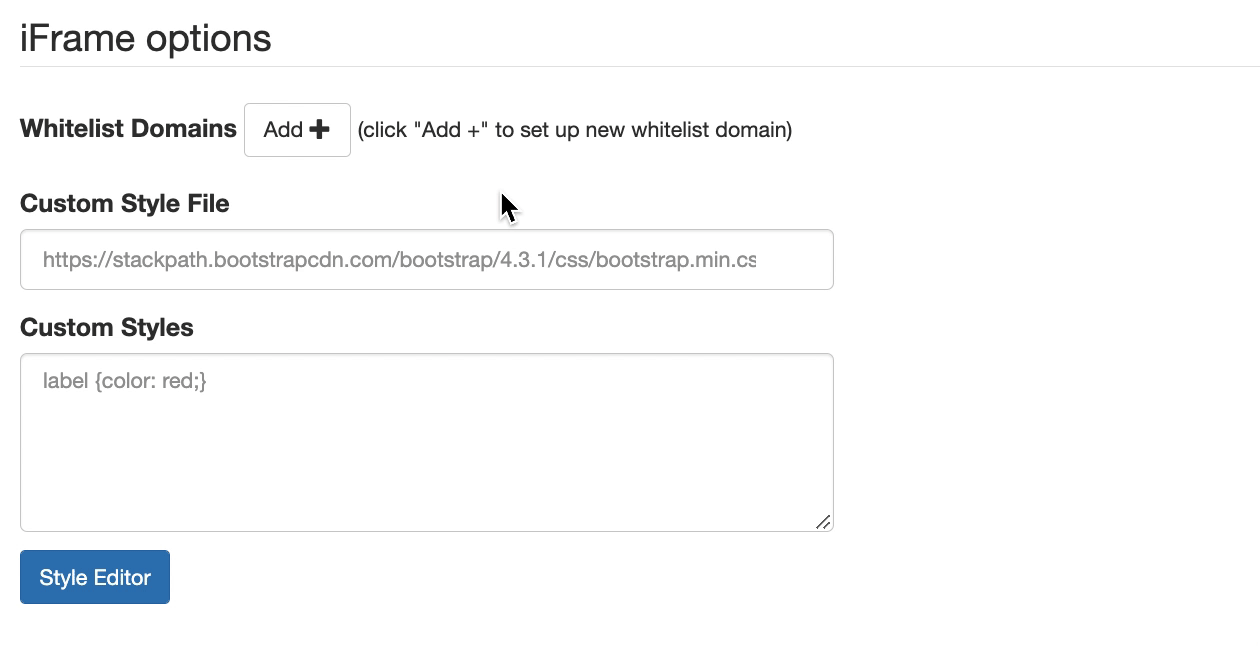
Custom StyleSheet (CSS)
Optional. There are 2 methods to set style your iFrame - Custom Style File and Custom Styles.
Custom Style File
You can provide the path for a CSS file that’s hosted online. Your file could be hosted in your own domain, or it could be hosted on a platform like Github. As long as the file is public, it can be referenced by the iFrame.
Example. If your file is hosted on Github and has been published, copy the public link and paste it in this field. The URL should look something like this:
https://raw.githubusercontent.com/your-project/assets/main/yourcssfile.css
Custom Styles
This is where you can enter any additional styles to override the default appearance of your iFrame. You use the same syntax here as you would in a Custom StyleSheet.
Example.
div {
    font-family: Arial;
    font-size: 14px;
    }
    div.field-group-expiration_date {
    width: 49%;
    float: left;
    }
    div.field-group-cvv {
    width: 49%;
    float: right;
    }
    footer { display: none;}
    [for="cvv"]{ display: none;}
    [for="card_expiration"]{ display: none;}
Publishing, Cloning, Previewing and Saving
These functions can all be found at the bottom of the editor.

Publish
The most important thing to note about publishing is that you cannot modify the template after saving it in the published state. This change is also permanent. To publish, select the Publish checkbox at the bottom of the page.
The template will only be set to ‘published’ once you click the save button.
Clone
This button creates a copy of the current template. After you click ‘Clone’ a dialog will pop up prompting you to name the copy. The copy will be identical in every way except for the following:
- The TemplateRef will be different
- The name will change based on what you specified in the dialog
- The template will be unpublished
Since you can’t modify published templates, this feature is useful for safely updating an existing implementation or speeding up the creation of new templates based on the ones you already have.
Preview
When you click preview, it opens a pop-up dialog where your iFrame is automatically hosted. The preview function is useful for reviewing the appearance of the iFrame as you work on it. Note that in order to view your most recent changes, you must click Apply. Also keep in mind that this tool helps you test the aesthetics and composition of the iFrame, but is not meant to test iFrame functionality.
Sample & Beginning Your Implementation
The sample function is a little different than the Preview. Whereas preview is meant to help you take a quick look at the iFrame, sample is an actual mock integration with a submit button included. Here, you can test tokenizations using the iFrame as well as copy the iFrame element from the Page Source.
Data Setup Reference
This reference section is meant to help you understand the different configuration settings for creating or editing iFrame input fields. Configuration options may vary by field type.

Field Type
Selecting a field type, is the first step when adding a new field. There are 9 types in total:
- Card Information
- Bank Account Number
- Routing Number
- Date
- Address
- Phone Number
- Email Address
- Tax ID
- Custom
The first 8 cover common use cases and have some built in validations based on length and allowed characters. The custom field type comes without pre-built validation and is meant to accomodate any use cases that the first 8 field types do not.
Display Name
The Display Name is the name that appears above the input in the iFrame. For a Field Group, this Display Name appears at the top of the group container.
Data Protection Method
There are 2 ways you can protect data — Format Preserving Encryption (FPE) & Format Preserving Tokenization (FPT). Encryption is an algorithmic transformation of data and does not support idempotency. Tokenization is a process that replaces data with a non-sensitive substitute.Both allow you to implement data security without changes
System Name
The variable name that represents the field in JSON requests and responses with the ShieldConex API. The System Name also impacts the tags you use to reference a specific field in CSS. Example. If your system name is first_name1, then you would refer to the field's containing div using field-group-first_name`.
Placeholder Text
The text that appears within an input box before the user begins to enter a value into the field. The default text color is gray. The style of of the placeholder text can be controlled using the following CSS tags:
- ::placeholder for Chrome, Firefox, Opera, Safari 10.1+
- :-ms-input-placeholder for Internet Explorer 10-11
- ::-ms-input-placeholder for Microsoft Edge
Non-Idempotent Tokens
Idempotency means that the same result will be returned given the same input. When this option is selected a unique token will be returned even if the same data is tokenized.
Group Id
The Group ID impacts idempotent tokens. Tokenizing the same value with the same Group ID will produce identical tokens, however changing the Group ID will produce a different, but still idempotent token.
Label
Unique to field groups. If you would like for individual fields within groups like Card Information and Address to additionally have a display name, you can configure one using this input.
Width
The width of the field within the iFrame. Options are 25%, 50%, 75%, and 100%. Sequential fields that can fit on the same row will be adjacent by default. For example, if I have 2 fields set to 50% and they are adjacent in the field order, they will occupy the same row.
Min Length
The minimum input length the user must reach before the value is considered to be of valid length. Must be less than or equal to maximum length.
Max Length
The maximum input length. If the user exceeds this number of characters, the input will not be accepted as valid. Must be greater than or equal to max length.
Input Type
The options for this setting are Input, Dropdown or Password. Input is a standard alphanumeric field that can be completed by typing characters. Dropdown fields offer the user one of a limited set of possible values from a dropdown input. If you choose Dropdown, you will be prompted to enter possible values. Password is similar to Input, however characters in this fields will be hidden.
Pattern
The Pattern. input accepts regular expressions, or regex for short. A regular expression is a string of characters that define a format or structure of ASCII characters. Using this, you can define any set of rules for a valid input for the given field.
Pattern Message
The message shown to the user if the pattern is not matched. This setting is useful if you would like to present the user with a custom error message when the form is submitted with a value that does not match the regular expression.
3DS Field Type
3DS Field Type determines how this information is packaged in the 3DS authentication request. The value you pick should match the input you expect from a user.
Updated 4 months ago