WooCommerce Payment Gateway Plugin
This is the official eCommerce plugin for accepting and processing payments via the Bluefin Payment Gateway for the WooCommerce platform/stores.
These are the Card-Not-Present transaction types this WooCommerce payment gateway plugin supports:
| Sale | Authorization + Manual Capture | Refund | Partial Refund | Void (Authorization Reversal) |
|---|---|---|---|---|
| ✔ | ✔ | ✔ | ✔ | ✗ |
Checkout Blocks Support
This plugin uses the latest WooCommerce Checkout Blocks UI, built with the React library, to improve the checkout flow and overall user experience.
For more information, see WooCommerce block-based checkout.
WooCommerce Checkout Compatibility
The Bluefin plugin for WooCommerce requires the use of the standard WooCommerce Checkout Blocks. This is the official, built-in checkout solution provided by WooCommerce and ensure a seamless, reliable, and highly customizable checkout experience.
CriticalUsing any third-party plugins or custom page builders to create checkout pages will cause the Bluefin plugin to break.
This includes (but is not limited to) themes and builders such as Avada and similar solutions.
The classic (legacy) WooCommerce checkout, under the
[woocommerce_checkout]shortcode, is considered outdated and is not supported either.
Why WooCommerce Checkout Blocks?
- Comprehensive UI Support: They provide a wide range of modern UI components and full support for web-based checkout customization
- Easy to Use: The block-based system is relatively straightforward and integrates natively with WooCommerce
For its usage, please refer to:
- WooCommerce block-based checkout
- WooCommerce | Checkout block
- How to customize the WooCommerce checkout page
In the following video, we demonstrate how to get started with the Checkout Blocks in WooCommerce by going to Pages -> All Pages -> Add/Edit Page.
Bluefin Integrations TeamIf you still experience your Bluefin plugin breaking even after Setting up and Configuring the Plugin, please reach out to Bluefin Integrations Team via [email protected].
Overview
This plugin implements and combines the Bluefin Checkout Component and Bluefin REST API, constituting the complete ready-to-use Bluefin payment method for WooCommerce platform.
The checkout component supports Card Payment, Google Pay, Mastercard Click to Pay, providing an all-in comprehensive eCommerce payment solution.
The plugin requires the merchant integration with the Bluefin Gateway where the integration team sets up your configuration according to your needs. The merchant is free to customize their Iframe configuration and configure their payment method options on their own as they have gained enough experience while certifying their Bluefin integration.
The plugin is built upon the Bluefin® PayConex™ REST API that connects to various PayConex™ services, thus serving as an HTTPS communication bridge to the PayConex™ Gateway.
NoteThe merchant using this plugin is not required to understand much of what's happening behind the scenes and how the Bluefin APIs are used.
If you are interested in all the ins and outs, check out our Comprehensive Documentation and Reference Materials and the plugin source code.
Here are some of the key components that the Bluefin payment plugin offers to the merchant.
Bluefin Hosted Checkout Components
- Easy Integration: Use our secure, pre-built Checkout Component UI via our SDK, designed for seamless integration into your existing systems.
- Security: These components are hosted on Bluefin's servers and handle all payment data input through an HTML iframe, ensuring that no sensitive credit card data reaches your servers.
- Flexible Management and Configuration: With a set of API endpoints, you can easily configure and create iframe payment instances, and effectively overwrite the configuration for a specific instance per customer. For more, see Creating an Instance.
- Tokenization: Once the form is completed, it securely tokenizes the information for CNP transactions by communicating with the ShieldConex® tokenization service and utilizes a payment authentication service based on the type of payment method, e.g. 3DS (Credit or Debit Card), Google Authentication Methods (Google Pay), ACH (Bank Information), Mastercard Click to Pay. After tokenization, a transaction is supposed to be processed during the PayConex™ token life-span (within 10 minutes).
- Saved Cards: The Checkout Component enables the customer to securely save their card data by checking the
Save payment method. During the initialization of the iframe instance, the merchant supplies the saved token references, which facilitates faster checkout.
Versatile Transaction Processing
- Security: Bluefin ShieldConex® ensures that no sensitive card information is ever stored on your servers, significantly reducing the PCI scope.
- Card Not Present Transactions: Before processing, CNP transactions primarily rely on ShieldConex® for security. ShieldConex® does not store any sensitive cardholder data. Instead, it uses tokenization/detokenization on its vaultless tokens for online PII, PHI, payments and ACH account data. These tokens can be securely utilized or stored on the merchant's server, significantly reducing the vendor's or merchant's PCI footprint. However, if the merchant loses these tokens, they cannot be recovered. For more information, check out PayConex™ and ShieldConex®.
- Transaction Types: Our gateway supports a variety of the most common transaction types used on a day-to-day basis such as sale, authorization, store, capture, refund and credit.
3DS Support
- Security Backbone: Besides the vaultless tokenization solution by ShieldConex®, Bluefin provides one of the security backbones for processing online CNP transactions, with iframe configurations that can fully integrate 3DS as a feature of PayConex™.
- Fraud Prevention: Implement 3DS to enhance fraud prevention and secure customer authentication.
- User Experience: Ensure a smooth user experience while maintaining high security standards.
- 3DS MPI Simulation: Bluefin 3DS Solution can be simulated in the certification environment for testing purposes.
Installing the Plugin
First, download the latest release of our Bluefin Payment Gateway Plugin from GitHub.
After downloading the zip of the plugin's build (bluefin-payment-gateway.zip), go to Admin -> Plugins -> Add Plugin -> Upload Plugin and upload the zip. Then, you are set to activate and configure your plugin instance.
Building is not requiredBy downloading
bluefin-payment-gateway.zip, you do not need to build the plugin - only install it as mentioned above.If you are a developer testing, you may as well download the source code and build our solution.
Setting up and Configuring the Plugin
Once the plugin is installed and is active, the merchant is required to go to WooCommerce -> Payments and configure the plugin with the credentials provided by the Bluefin integrations team.
The merchant will either see Complete Setup if the required fields are missing or Manage if they want to modify the existing configuration of the Bluefin payment method.

Action Needed: Complete Setup

Active: Manage
NoteOnce the merchant is integrated with Bluefin Payment Gateway, the Bluefin Integrations Team provides them with the optimal Iframe configuration for their WooCommerce store.
For more details on configuring the Bluefin plugin, make sure to check out below and be up-to-date with the Bluefin Checkout Component Documentation.
Here is a sample configuration.
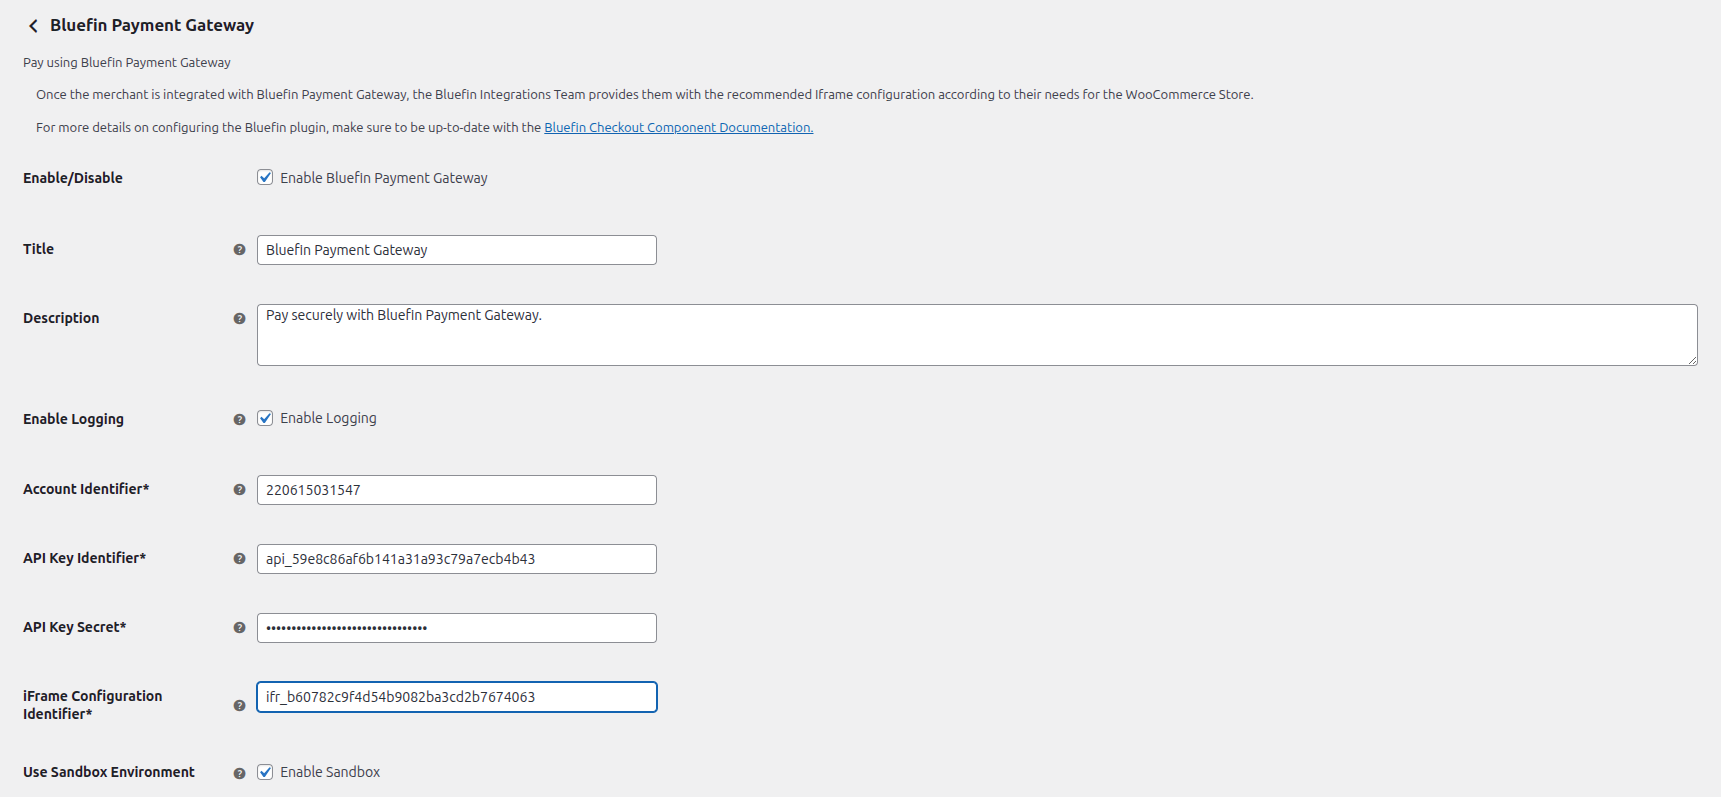
There, we can see the Configure Page that consists of the following options.
-
Enable Logging
- This setting is primarily used for debugging purposes in development mode. To understand its functionality, refer to Logging below.
-
Account Identifier (Required)
- The primary PayConex account ID associated with the API key.
-
API Key Identifier (Required)
- The secret API key ID, used in conjunction with the secret for API authentication. For more information, see API Key Management.
-
API Key Secret (Required)
-
The API key secret, used in conjunction with the API key ID for API authentication. For more information, see API Key Management.
Note
Keep this secret secure and never expose it in your client-side code.
API Key Identifier and Secret are both used to generate either Basic Authentication or HMAC Authentication depending on the environment the merchant integrates with.
-
-
iFrame Configuration Identifier (Required)
- iFrame Configuration used by the Checkout Component. Preconfigure payment methods and their settings
-
Use sandbox environment
- This check box must be selected if the merchant is in the process of conducting thorough testing in the Bluefin certification environment.
- This also includes
- Simulating various transaction scenarios to ensure reliability and security.
- Performing end-to-end testing, from Checkout Component rendering to transaction completion.
- For going to Production, this option must be unchecked.
- Note that in the certification environment, the plugin uses the Base64 Basic Authentication whereas for production, it automatically generates the HMAC Authentication.
-
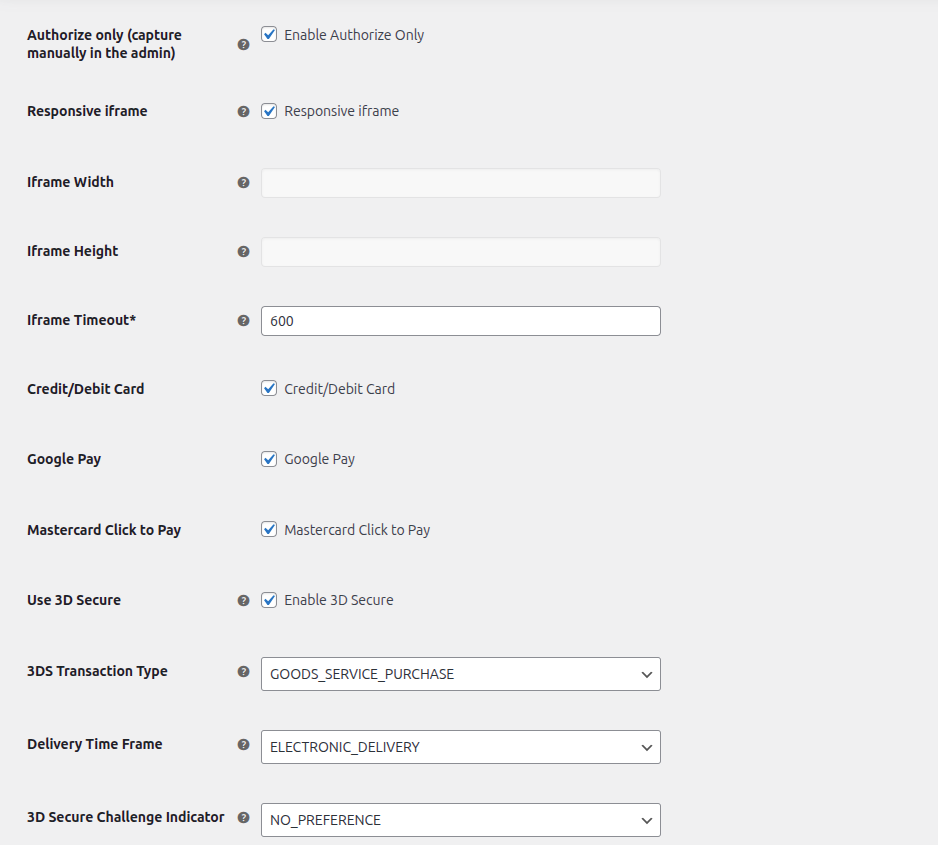
Authorize only (capture manually in the admin)
- With this property checked, the merchant is required to capture the payment after customer's confirming the order. Otherwise, the sale is processed with the payment status of
Completed. - For the real-world use case of Authorization + Capture in WooCommerce, refer to Sale and Authorization.
- With this property checked, the merchant is required to capture the payment after customer's confirming the order. Otherwise, the sale is processed with the payment status of
Iframe Settings
- Responsive iframe
- The responsive iframe option enables the Checkout Component to automatically adjust to different screen sizes.
- Iframe Width
- Specify custom CSS iframe width for the Checkout Component such as
100%,500px,50vw
- Specify custom CSS iframe width for the Checkout Component such as
- Iframe Height
- Specify custom CSS iframe height for the Checkout Component such as
600px,60vh,400px
- Specify custom CSS iframe height for the Checkout Component such as
- Iframe Timeout (Required)
- The user interaction limit timeout in seconds.
Payment Methods
Specify the payment methods to be enabled for the Checkout Component.
Available payment method include:
- Credit/Debit Card
- Google Pay
- Click to Pay
threeDSecureInitSettings
With Use 3D Secure enabled, the merchant is required to configure the following 3DS Settings accordingly. All of these properties can as well be found in our Documentation Reference.
-
Use 3D Secure
- Use 3D Secure for the Checkout Component, Card Payment Method.
- With this setting enabled, the
threeDSecureInitSettingsmust be configured according to your needs. Note that this setting is required ifcardSettings.threeDSecureis defined as"required". For more information, check out Creating an Instance. - While in the certification environment, make sure to use the following 3DS Test Card Numbers where you can simulate real-life scenarios to gain a better understanding of how 3D Secure operates with our Checkout Component and transaction authorization.
- For the comprehensive information on Bluefin 3D Secure Protocol, check out 3D Secure and Bluefin 3DS Support.
-
3DS Transaction Type
-
Each option provides context about the nature of the transaction, helping to ensure accurate processing and risk assessment.
-
Option Description "GOODS_SERVICE_PURCHASE"Indicates a purchase of goods or services. This is the most common type of transaction for retail or eCommerce. "CHECK_ACCEPTANCE"Refers to the acceptance of a check as a form of payment. "ACCOUNT_FUNDING"Represents a transaction that involves funding an account, such as adding funds to a digital wallet or prepaid card. "QUSAI_CASH_TRANSACTION"Refers to transactions similar to cash withdrawals, such as purchasing traveler's checks, foreign currency, or gambling tokens. "PREPAID_ACTIVATION"Refers to activating a prepaid account or card, often involving an initial funding transaction.
-
-
Delivery Time Frame
-
As the setting name suggests, this is the time for the goods to be delivered. The descriptions are pretty much self-explanatory given the options.
-
Option Description "ELECTRONIC_DELIVERY"Electronic Delivery. "SAME_DAY_SHIPPING"Same day shipping. "OVERNIGHT_SHIPPING"Overnight shipping. "TWO_DAYS_OR_MOSRE_SHIPPING"Two-day or more shipping.
-
-
3D Secure Challenge Indicator
-
Option Description "NO_PREFERENCE"We suggest that our merchants leave this option blank. This option is the most frictionless. "PREFER_NO_CHALLENGE"Preference for no challenge to be presented to the end user. "PREFER_A_CHALLENGE"Preference for the issuing bank to present a challenge to the end user. "OVERWRITE_NO_CHALLENGE"Challenge is never presented to the end user. "REQUIRES_MANDATE_CHALLENGE"This option dictates that a challenge must be presented to the end users.
-
-
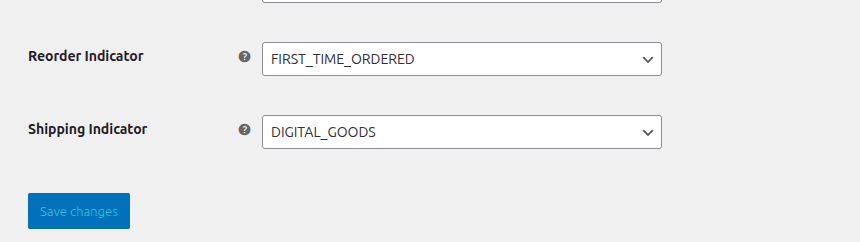
Reorder Indicator
-
This setting indicates whether the order is new or was ordered before.
-
Option Description "FIRST_TIME_ORDERED"First time ordered. "REORDER"Reordered.
-
-
Shipping Indicator
-
Option Description "BILLING_ADDRESS"Ship to cardholder's billing address. See Transaction Metadata billingAddress. "MERCHANT_VERIFIED_ADDRESS"Ship to another verified address on file with merchant. "NOT_BILLING_ADDRESS"Ship to address that is different than the cardholder's billing address. "SHIP_TO_STORE"Ship to Store / Pick-up at local store (Store address will be populated in shipping address fields). "DIGITAL_GOODS"Digital goods (includes online services, electronic gift cards and redemption codes). "TRAVEL_AND_EVENT_TICKETS"Travel and Event tickets, not shipped. "PICK_UP_AND_GO_DELIVERY"Indicates that the customer will pick up the purchased items in person or that the delivery service is immediate and does not involve standard shipping processes. Often used for express orders or convenience-driven transactions like curbside pickup. "LOCKER_DELIVERY"Indicates that the purchased items will be delivered to a secure locker for the customer to retrieve at their convenience. Commonly used in scenarios like package lockers at residential complexes, stores, or designated pick-up locations. "OTHER"Other (for example, Gaming, digital services not shipped, emedia subscriptions, etc.).
-
Form Validation
To improve user experience, the configuration settings implements the form validation in real-time where the user can exactly see the fields required and their sample values.
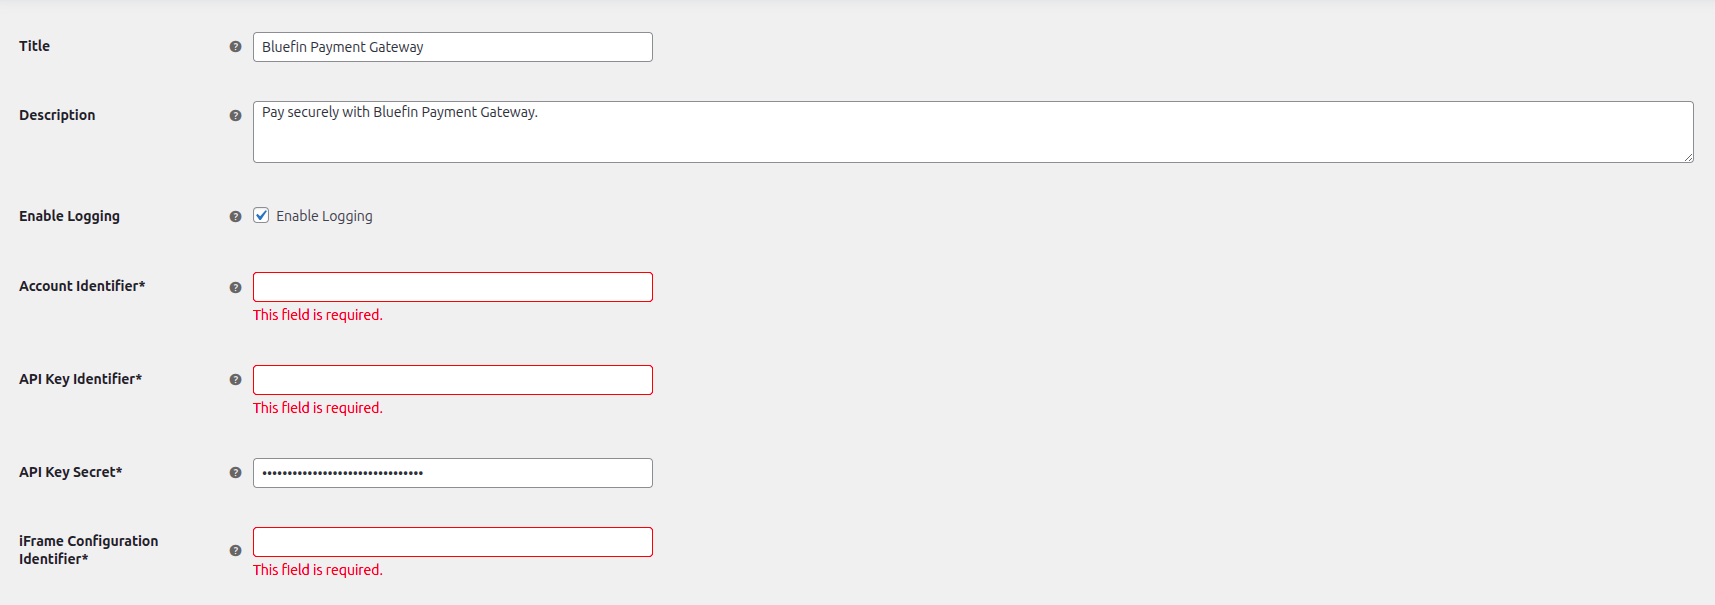
Form Validation
Iframe Configuration
Throughout this documentation, we are using the following iframe configuration.
NoteFor the
cardSettings, we pretty much omit all of the customer-related information since we are passing it all before the checkout from the WooCommerce (current) customer.Typically, the Bluefin Integrations team create this iframe configuration for the merchant if they don't necessarily prefer to use our APIs directly.
POST /api/v4/accounts/{accountId}/payment-iframe
{
  "label": "Multi-Payment iframe",
  "language": "ENGLISH",
  "timeout": 600,
  "allowedPaymentMethods": [
    "CARD",
    "ACH",
    "GOOGLE_PAY",
    "CLICK_TO_PAY"
  ],
  "allowedParentDomains": [
    "demo.woocommerce.com"
  ],
  "cardSettings": {
    "cvv": "required",
    "billingAddress": {
      "address1": "omit",
      "address2": "omit",
      "city": "omit",
      "state": "omit",
      "zip": "omit"
    },
    "capturePhone": "omit",
    "threeDSecure": "required",
    "captureEmail": "omit",
    "captureShippingAddress": false
  },
  "achSettings": {
    "billingAddress": {
      "address1": "required",
      "address2": "optional",
      "city": "required",
      "state": "required",
      "zip": "required"
    },
    "capturePhone": "omit",
    "captureEmail": "omit",
    "captureShippingAddress": false
  },
  "clickToPaySettings": {
    "srcDpaId": "3fa85f65-6728-4562-b3fd-2c963f66afa6",
    "dpaName": "PayConex",
    "dpaPresentationName": "PayConex App",
    "allowedCardBrands": [
      "VISA",
      "MASTERCARD",
      "AMERICAN_EXPRESS",
      "DISCOVER",
      "CHINA_UNION_PAY"
    ]
  },
  "googlePaySettings": {
    "merchantId": "12345678901234567890",
    "merchantName": "Demo Merchant",
    "billingAddressRequired": false,
    "shippingAddressRequired": false,
    "emailRequired": true,
    "billingAddressParameters": {
      "format": "MIN",
      "phoneNumberRequired": false
    },
    "shippingAddressParameters": {
      "allowedCountryCodes": ["US"],
      "phoneNumberRequired": false
    },
    "allowedAuthMethods": [
      "PAN_ONLY",
      "CRYPTOGRAM_3DS"
    ],
    "allowedCardBrands": [
      "VISA",
      "MASTERCARD",
      "AMERICAN_EXPRESS",
      "DISCOVER",
      "JCB",
      "INTERAC"
    ],
    "threeDSecure": "omit"
  },
  "currency": "USD",
  "savePaymentOption": "required"
}
For the full breakdown of these settings, dive into Creating a Configuration.
In response, we receive the iFrame Configuration Identifier that is used to configure the plugin.
Test Accounts, Cards, and Cases
In the certification environment, verify that transactions are processed correctly and validate that all the response codes are returned correctly based on your needs and the payment processor you integrate with.
For these test cards based on the payment processor, refer to Test Accounts, Cards, and Cases.
With 3DS enabled, make sure to use the following 3DS Test Card Numbers in the certification environment where you can simulate real-life scenarios to gain a better understanding of how 3D Secure operates with our Checkout Component and 3DS transaction authorization. For the comprehensive information on Bluefin 3D Secure Protocol, check out 3D Secure and Bluefin 3DS Support.
Also see: Getting Started | Integration Steps.
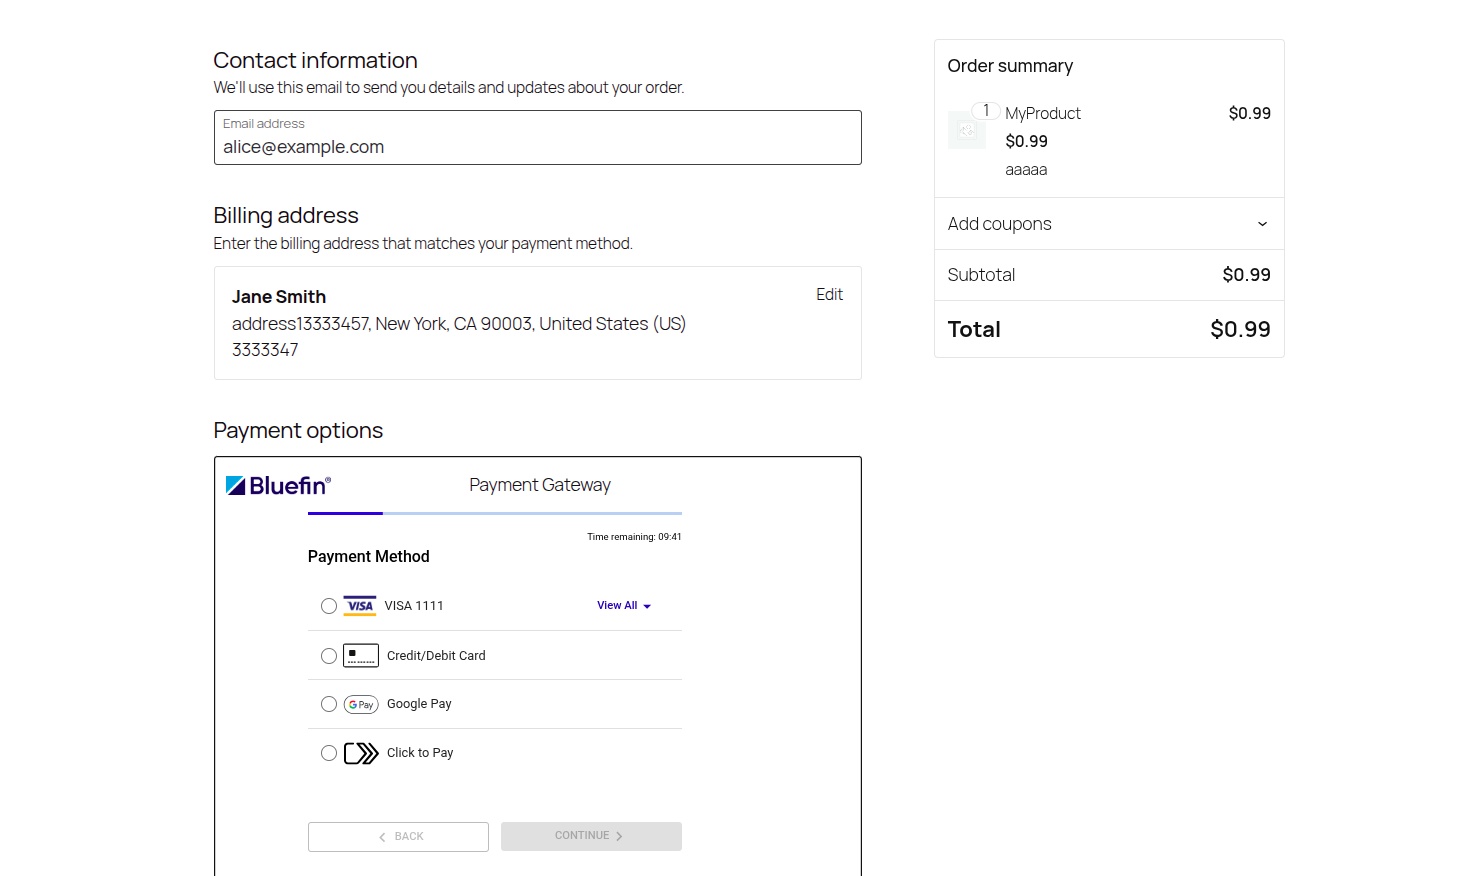
Customer Checkout
After configuring the plugin, we need some Products we can check out with and test the Bluefin payment method.
If you are in the WooCommerce sandbox environment, it is necessary to create some Products so that we have something to check out to start with.
This can be accomplished by going to WooCommerce -> Products -> Add new product.
Next, we add the Product to the cart and go to the checkout.

Customer Checkout
Checkout
The Checkout Component securely transmits payment details directly to Bluefin's system, mitigating risk while maintaining a smooth and user-friendly checkout experience. This also reduces PCI compliance scope and enhances security.
For all the examples of the payment methods, various checkout scenarios, and technical details specific to the Bluefin Checkout, check out the comprehensive Customer Checkout page.
Even though the Bluefin Checkout Component supports the billing and shipping address form fields, the billing and shipping address is filled out and managed via WooCommerce. These are then passed onto the Checkout Component so that the customer is not required to reinput the same fields.
With the WooCommerce block-based checkout UI, customers can update their billing and shipping details at any time during checkout, whether correcting errors or changing their minds.
If updates are made while using the Bluefin checkout, the Bluefin Checkout Component temporarily collapses until the customer finishes editing their details in the WooCommerce forms. Afterward, the customer reselects the Bluefin payment method, at which point the updated information is loaded, and the checkout can continue.
NoteWhen the iFrame temporarily collapses (e.g., because the customer edits billing/shipping in WooCommerce), the checkout session is not lost or reset.
This ensures consistency, better user experience, and reduced friction.
Here is the showcase of this very common user interaction:
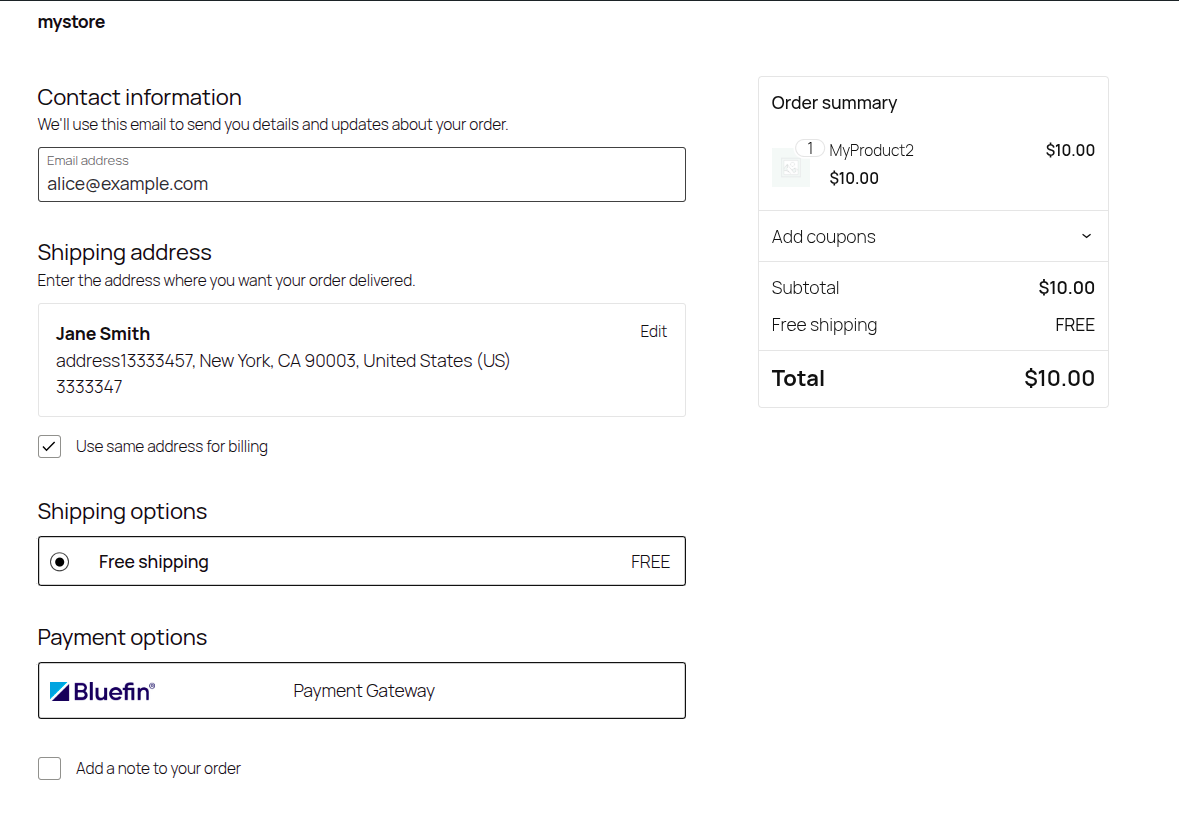
Omitting Shipping Address
If the shipping address is omitted, the plugin is capable of handling that scenario by completely excluding the shipping address from the Bluefin transaction itself as well.
While there are many ways to configure shipping in WooCommerce, it is most commonly enabled per product. Thus, in order to omit it, the merchant needs to go to WooCommerce -> Products -> All Products, select their desired product, and make their product Virtual.
NoteIf the merchant configures their WooCommerce product not to use the shipping address while using the 3D Secure, then the
shippingIndicatoris required to beBILLING_ADDRESS.It is crucial to note that If, at least, one product in the cart requires shipping, the entire checkout will require the shipping address all the same.
Checkout Example
With no shipping address for a product, here is what the WooCommerce checkout looks like.
Shipping Disabled | Checkout Example
Order Example
Shipping Disabled | Order Example
At the same time, if we get the transaction metadata using the transaction identifier, there is no shipping address in the Bluefin Payment Gateway either.
Viewing Transaction MetadataThe merchant can also get the transaction metadata from the WooCommerce UI by going to
WooCommerce -> Orders -> Edit OrderandView Transaction Metadata via Bluefin.For the video demonstration, check out the Viewing Transaction Metadata section.
For example,
{
  "transactionId": "000000082046",
  "status": "CAPTURED",
  "timestamp": "2025-09-25T16:11:15.000000Z",
  "customer": {
    "name": "Jane Smith",
    "email": "[email protected]",
    "phone": "+3333347",
    "billingAddress": {
      "address1": "address13333457",
      "city": "New York",
      "state": "CA",
      "zip": "90003",
      "country": "US"
    }
  },
  "trace": {
    "customId": "119",
    "source": "WooCommerce Plugin",
    "history": [
      {
        "action": "init",
        "requestId": "507333be-8845-43a6-92ff-6a918f2eb76c",
        "correlationId": "1acb6679-5575-4c69-b0c3-788c0cbe4bd4",
        "timestamp": "2025-09-25T11:10:30-05:00"
      },
      {
        "action": "transaction",
        "requestId": "41764ba1-74f3-48ad-9876-c803ec444dfa",
        "correlationId": "4fbd4e2f-85d4-4e0b-a92f-33d10b198309",
        "timestamp": "2025-09-25T11:11:12-05:00"
      }
    ],
    "networkTransactionId": "015268170865150G049"
  },
  "amounts": {
    "currency": "USD",
    "approved": "0.99",
    "requested": "0.99",
    "balance": "0.99"
  },
  "auth": {
    "code": "OK5081",
    "processorMessage": "APPROVED",
    "message": "APPROVED",
    "networkName": "VISA",
    "avsResponseCode": "Y"
  },
  "card": {
    "name": "Jane Smith",
    "last4": "1111",
    "expiry": "1225",
    "brand": "VISA"
  },
  "binData": {
    "program": "UNKNOWN"
  },
  "transactionType": "SALE",
  "entryMode": "KEYED",
  "refundObject": {
    "refundBalance": "0.99"
  }
}
Selecting Payment Method
Now, we select the Bluefin Payment Gateway as the payment option.
NoteThis step requires the plugin to be enabled/active and correctly configured from WooCommerce.
Selecting Payment Method
Payment Information
This is the WooCommerce built-in component placeholder where the customer uses the embedded third-party checkout component that is the Bluefin Checkout Component in our case.
Payment Information
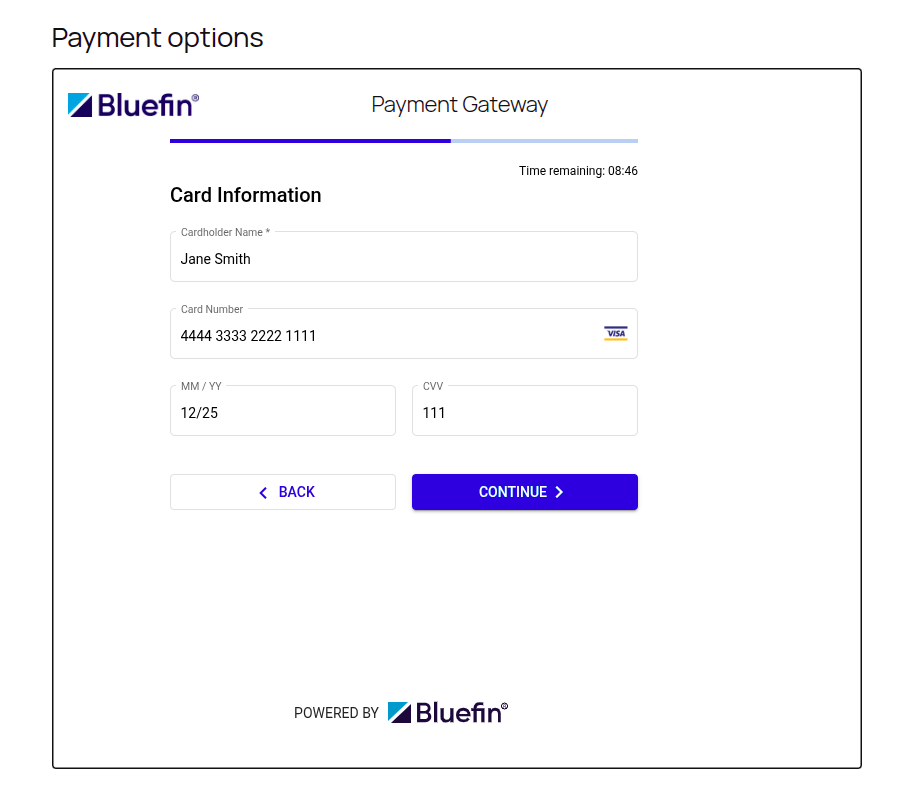
Card Information
The customer then inputs their card information to be tokenized and used for transaction processing. If required, this is where 3DS authentication takes place.
Card Information
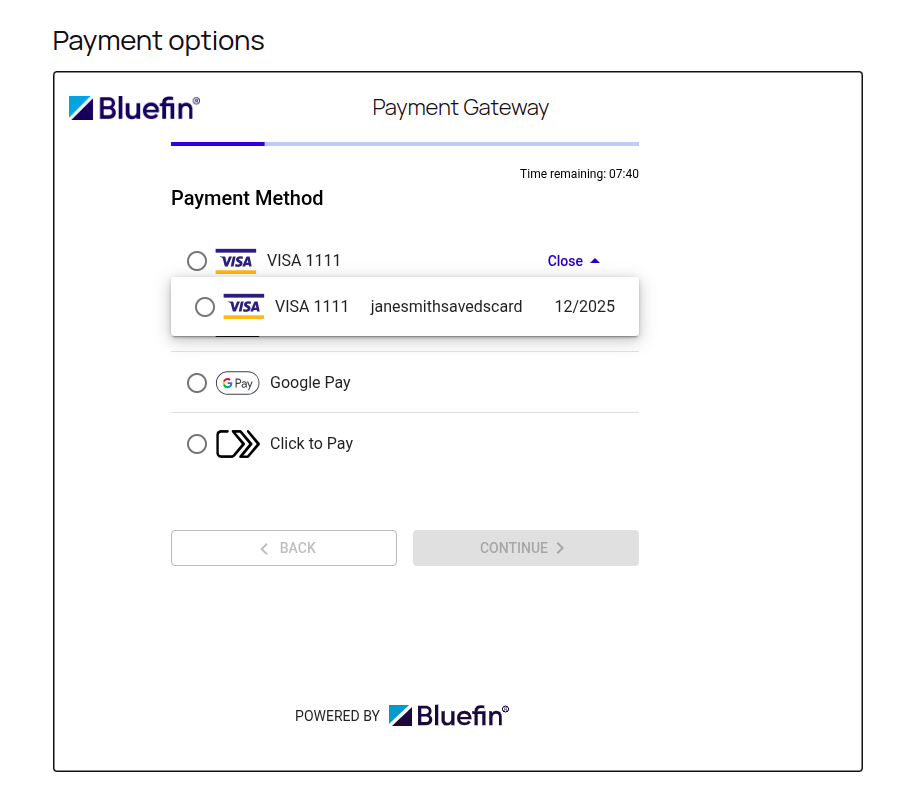
Saved Card
The Card Information step is skipped if the customer has selected Save payment method in their previous checkouts. The customer is only required to confirm the CVV on their card.
Saved Card
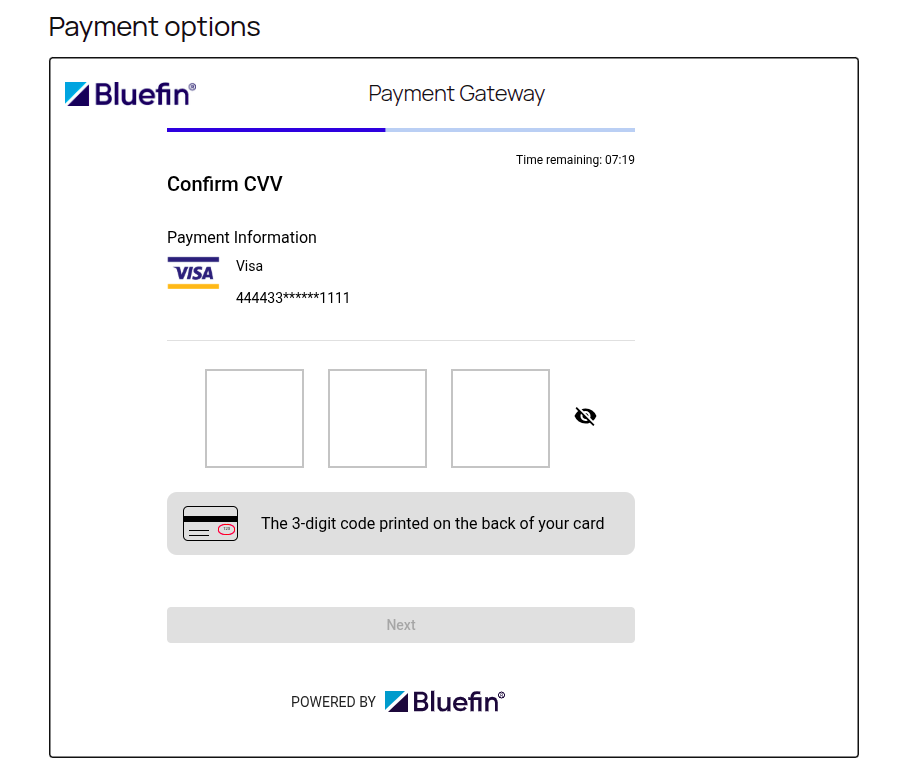
Confirm CVV
NoteIn the certification environment, we can input just about any CVV since we are using Test Cards.
Review & Confirm
On the checkout completion, the Checkout Component securely returns the Bluefin token reference that is going to be used for subsequent transactions.
NoteWe also make sure that the transaction was previously initialized if a communication error, packet loss, or similar issue occurs. For more information, see Initializing a Transaction.
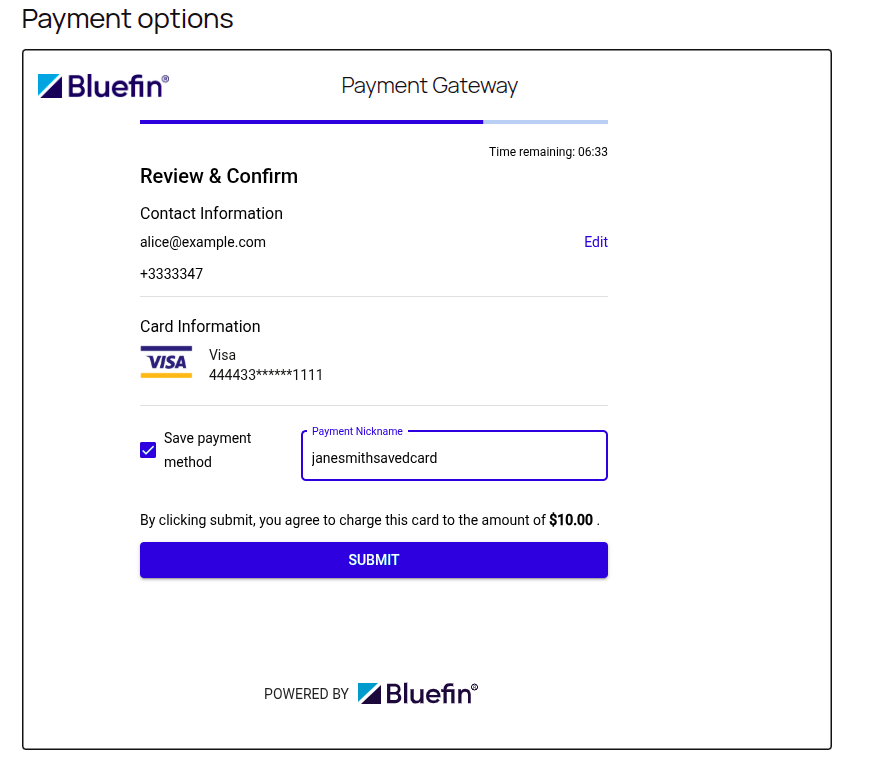
Review & Confirm
During this step, we select Save payment method on purpose to showcase that the customers of your store can securely save the card information so that they can reuse the saved card in future. See Card Information above.
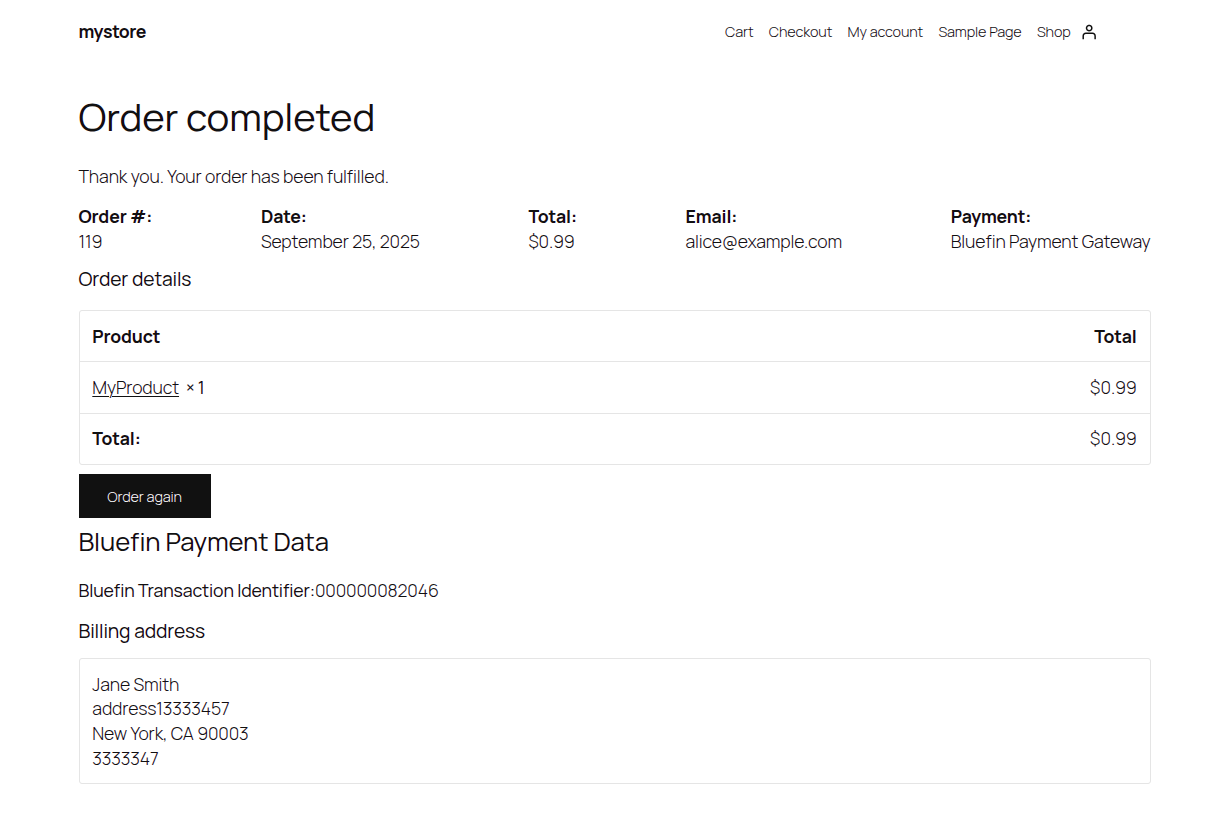
By submitting the Bluefin Checkout form, we are also confirming the order, which is then processed by the Bluefin Payment Gateway.
Order Completed
Depending on the plugin configuration, a sale or authorization transaction is processed with a Bluefin Transaction Identifier attached to the order.
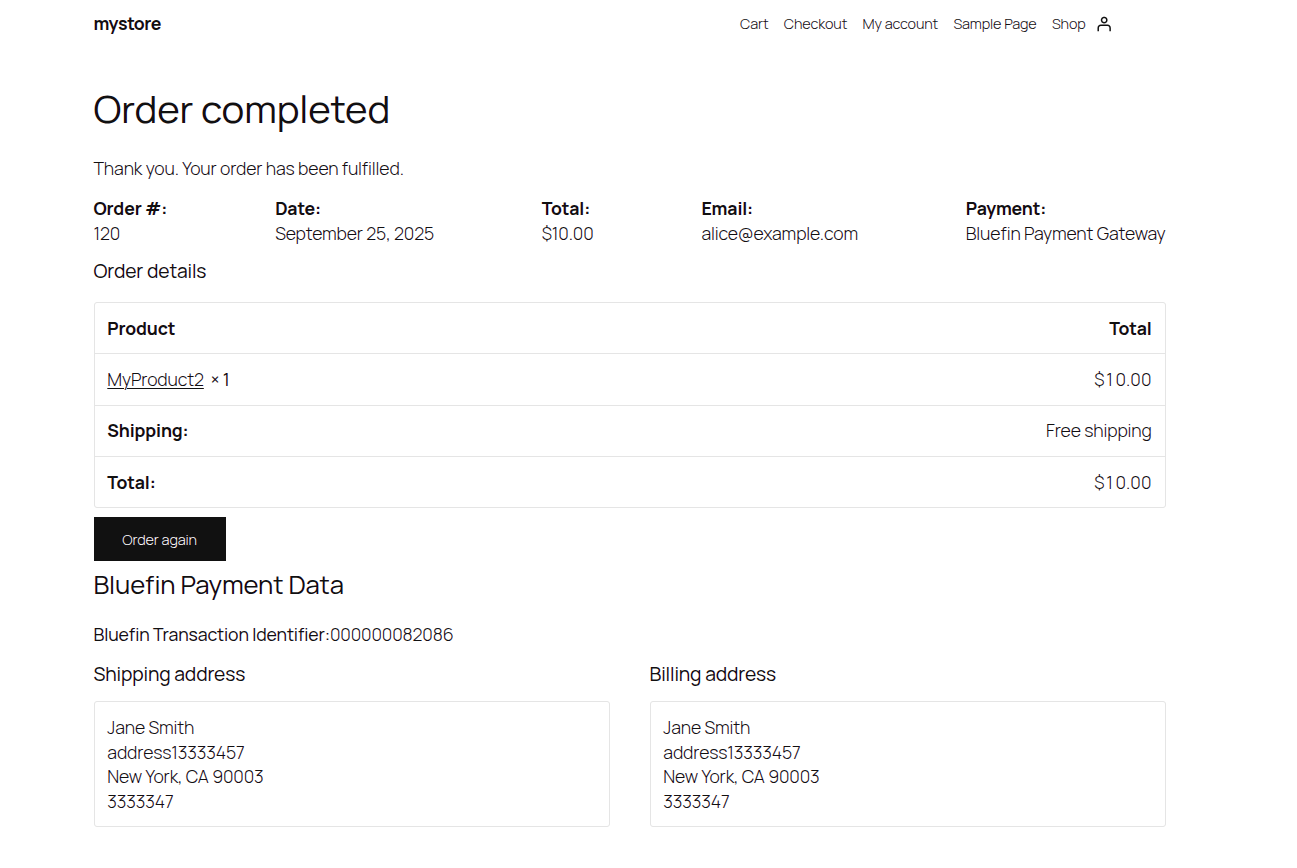
Order Completed
The Bluefin Transaction Identifier is primarily used for capturing or refunding the transaction through WooCommerce in the context of Bluefin Payment Gateway.
NoteIf there are any kind of problems processing your transaction, please contact Bluefin Integrations team with the
traceIdor this transaction id attached to your order.The administrator can get this
traceIdfrom the WooCommerce Logs under thewoocommerce-gateway-bluefinnamespace. Do see Logging below.
This id can be used for transaction reporting or debugging purposes. For more guidance on transaction reporting, consult the Bluefin Integrations Team, or refer to Bluefin PayConex Transaction Reporting Service.
If we get its transaction metadata via GET, we can see the billing and shipping address, the transaction history, etc.
Viewing Transaction MetadataThe merchant can also get the transaction metadata from the WooCommerce UI by going to
WooCommerce -> Orders -> Edit OrderandView Transaction Metadata via Bluefin.For the video demonstration, check out the Viewing Transaction Metadata section.
For the comprehensive reference on transaction metadata, check out Get a Transaction Metadata.
For example, this is what we get in response.
{
  "transactionId": "000000082086",
  "status": "CAPTURED",
  "timestamp": "2025-09-25T16:27:45.000000Z",
  "customer": {
    "name": "Jane Smith",
    "email": "[email protected]",
    "phone": "+3333347",
    "billingAddress": {
      "address1": "address13333457",
      "city": "New York",
      "state": "CA",
      "zip": "90003",
      "country": "US"
    }
  },
  "shippingAddress": {
    "address1": "address13333457",
    "city": "New York",
    "state": "CA",
    "zip": "90003",
    "country": "US",
    "recipient": "Jane Smith"
  },
  "trace": {
    "customId": "120",
    "source": "WooCommerce Plugin",
    "history": [
      {
        "action": "init",
        "requestId": "3a09d2c6-be65-4c8d-9b25-a99991d17255",
        "correlationId": "a449eb8c-8869-4d0f-8f00-84a69c6fb9ee",
        "timestamp": "2025-09-25T11:21:23-05:00"
      },
      {
        "action": "transaction",
        "requestId": "e3c29f88-6016-42c1-96b7-a7ca45f0dcdb",
        "correlationId": "f80f87c9-6dc9-4a04-adc6-4be5f610ef7c",
        "timestamp": "2025-09-25T11:27:43-05:00"
      }
    ],
    "networkTransactionId": "015268173607840G187"
  },
  "amounts": {
    "currency": "USD",
    "approved": "10.00",
    "requested": "10.00",
    "balance": "10.00"
  },
  "auth": {
    "code": "OK7771",
    "processorMessage": "APPROVED",
    "message": "APPROVED",
    "networkName": "VISA",
    "avsResponseCode": "Y"
  },
  "card": {
    "name": "Jane Smith",
    "last4": "1111",
    "expiry": "1225",
    "brand": "VISA"
  },
  "binData": {
    "program": "UNKNOWN"
  },
  "transactionType": "SALE",
  "entryMode": "KEYED",
  "refundObject": {
    "refundBalance": "10.00"
  }
}
Transaction Processing
Here is a table of Bluefin transactions with their corresponding payment statues in WooCommerce platform.
| Transaction Type | WooCommerce Payment Status | Access Level |
|---|---|---|
| Sale | Completed | Customer CheckoutCustomer Initiated Transaction. Also see Customer and Merchant Initiated Transactions. |
| Authorization | On hold | Customer CheckoutCustomer Initiated Transaction. Also see Customer and Merchant Initiated Transactions. |
| Capture | Completed | WooCommerce Admin |
| Refund | Refunded | WooCommerce Admin |
| Partial Refund | Completed (until the full refund) | WooCommerce Admin |
| Void (Authorization Reversal) | Refunded | WooCommerce Admin |
Other than the authorization and sale, all the operations require merchant interaction by going to WooCommerce -> Orders -> Select Order where the merchant has the ability to capture, refund, partially refund, or void their payments.
Partial Refund | Status Completed
By default, the WooCommerce has the order status of Completed after the partial refund meaning that there is still an amount assigned to the order, indicating the order balance.
Only after full refund is the order status Refunded.
Also check out Order Statuses in WooCommerce.

Partial Refund | Status Completed
Sale and Authorization
By reviewing & confirming the order, we first either process an authorization or sale transaction, depending on the Authorize only (capture manually in the admin) property in the plugin configuration.
With that property checked, the merchant is required to capture the payment after customer's confirming the order. Otherwise, the sale is processed with the payment status of Completed.
Authorization + Manual CaptureOne of the most common use cases of Authorization + Manual Capture is when an order requires shipping (shipping-related information including address, phone number, etc). Upon the order having been shipped to the customer, the merchant manually captures the authorization - completing the order.
In the case of Bluefin authorization transaction, note that the status of the WooCommerce order is
On hold. Upon capture, it isCompleted.For the tutorial of authorizing and capturing a WooCommerce order via the Bluefin Plugin, see below.
Also check out Order Statuses in WooCommerce and WooCommerce | Authorize and capture.
Capturing Authorization
As mentioned above, to capture an authorization - the Authorize only (capture manually in the admin) property must be enabled.
Now, if we get the transaction metadata, we can see the order of actions applied to the transaction: init, authorization and capture.
{
  "transactionId": "000000082866",
  "status": "CAPTURED",
  "timestamp": "2025-09-30T14:17:56.000000Z",
  "customer": {
    "name": "Jane Smith",
    "email": "[email protected]",
    "phone": "+3333347",
    "billingAddress": {
      "address1": "address13333458",
      "city": "New York",
      "state": "CA",
      "zip": "90006",
      "country": "US"
    }
  },
  "trace": {
    "customId": "136",
    "source": "WooCommerce Plugin",
    "history": [
      {
        "action": "init",
        "requestId": "fa1d55f7-41f3-41ef-ad9a-a96f9a7e4478",
        "correlationId": "7015cc08-33af-43dc-beb0-678e42ba76ea",
        "timestamp": "2025-09-30T09:13:37-05:00"
      },
      {
        "action": "authorization",
        "requestId": "1504c20b-a8a5-4e34-9cef-4c8605edf4ab",
        "correlationId": "31ea7d2b-46bc-4e07-ad43-e8a592dfb0af",
        "timestamp": "2025-09-30T09:13:59-05:00"
      },
      {
        "action": "capture",
        "requestId": "5d035bb0-f6a3-49eb-b509-508052ebe26e",
        "correlationId": "bedbe14d-7020-4701-a67d-497d9f4351c6",
        "timestamp": "2025-09-30T09:17:54-05:00"
      }
    ],
    "networkTransactionId": "015273346068535G631"
  },
  "amounts": {
    "currency": "USD",
    "approved": "2.97",
    "requested": "2.97",
    "balance": "2.97"
  },
  "auth": {
    "code": "OK3021",
    "processorMessage": "APPROVED",
    "message": "APPROVED",
    "avsResponseCode": "Y"
  },
  "card": {
    "name": "Jane Smith",
    "last4": "1111",
    "expiry": "1225",
    "brand": "VISA"
  },
  "binData": {
    "program": "UNKNOWN"
  },
  "transactionType": "SALE",
  "entryMode": "KEYED",
  "refundObject": {
    "refundBalance": "2.97"
  }
}
Partial Refund
For the partial refund, we input the amount we would like to refund.
Using the transaction id, here is our partially refunded transaction in the context of Bluefin Payment Gateway.
NoteGiven the
$.trace.history,$.refundObject.refundBalanceand$.amounts.balance, we can see that this was a partial refund.For more examples, see Transaction Management | Refunding a Transaction.
{
  "transactionId": "000000082866",
  "status": "CAPTURED",
  "timestamp": "2025-09-30T14:17:56.000000Z",
  "customer": {
    "name": "Jane Smith",
    "email": "[email protected]",
    "phone": "+3333347",
    "billingAddress": {
      "address1": "address13333458",
      "city": "New York",
      "state": "CA",
      "zip": "90006",
      "country": "US"
    }
  },
  "trace": {
    "customId": "136",
    "source": "WooCommerce Plugin",
    "history": [
      {
        "action": "init",
        "requestId": "fa1d55f7-41f3-41ef-ad9a-a96f9a7e4478",
        "correlationId": "7015cc08-33af-43dc-beb0-678e42ba76ea",
        "timestamp": "2025-09-30T09:13:37-05:00"
      },
      {
        "action": "authorization",
        "requestId": "1504c20b-a8a5-4e34-9cef-4c8605edf4ab",
        "correlationId": "31ea7d2b-46bc-4e07-ad43-e8a592dfb0af",
        "timestamp": "2025-09-30T09:13:59-05:00"
      },
      {
        "action": "capture",
        "requestId": "5d035bb0-f6a3-49eb-b509-508052ebe26e",
        "correlationId": "bedbe14d-7020-4701-a67d-497d9f4351c6",
        "timestamp": "2025-09-30T09:17:54-05:00"
      },
      {
        "action": "refund",
        "requestId": "3940f9ff-ad27-4cdd-85bc-32b9907450dc",
        "correlationId": "b4a1d565-8be9-4235-b850-eef29d3cc0f5",
        "timestamp": "2025-09-30T09:19:57-05:00"
      }
    ],
    "networkTransactionId": "015273346068535G631"
  },
  "amounts": {
    "currency": "USD",
    "approved": "2.97",
    "requested": "2.97",
    "balance": "1.98"
  },
  "auth": {
    "code": "OK3021",
    "processorMessage": "APPROVED",
    "message": "APPROVED",
    "avsResponseCode": "Y"
  },
  "card": {
    "name": "Jane Smith",
    "last4": "1111",
    "expiry": "1225",
    "brand": "VISA"
  },
  "binData": {
    "program": "UNKNOWN"
  },
  "transactionType": "SALE",
  "entryMode": "KEYED",
  "refundObject": {
    "refundBalance": "1.98",
    "refundIds": [
      "000000082886"
    ]
  }
}
Refund
NoteRefund and Partial Refund are only allowed when the payment status is
Completed.
If we fetch the transaction metadata with the transaction id via PayConex API, we can see all the metadata of the refunded transaction with $.trace.history, $.refundObject.refundBalance and $.amounts.balance.
For an in-depth look at Bluefin Refunds, see Transaction Management | Refunding a Transaction.
{
  "transactionId": "000000082866",
  "status": "VOIDED",
  "timestamp": "2025-09-30T14:17:56.000000Z",
  "customer": {
    "name": "Jane Smith",
    "email": "[email protected]",
    "phone": "+3333347",
    "billingAddress": {
      "address1": "address13333458",
      "city": "New York",
      "state": "CA",
      "zip": "90006",
      "country": "US"
    }
  },
  "trace": {
    "customId": "136",
    "source": "WooCommerce Plugin",
    "history": [
      {
        "action": "init",
        "requestId": "fa1d55f7-41f3-41ef-ad9a-a96f9a7e4478",
        "correlationId": "7015cc08-33af-43dc-beb0-678e42ba76ea",
        "timestamp": "2025-09-30T09:13:37-05:00"
      },
      {
        "action": "authorization",
        "requestId": "1504c20b-a8a5-4e34-9cef-4c8605edf4ab",
        "correlationId": "31ea7d2b-46bc-4e07-ad43-e8a592dfb0af",
        "timestamp": "2025-09-30T09:13:59-05:00"
      },
      {
        "action": "capture",
        "requestId": "5d035bb0-f6a3-49eb-b509-508052ebe26e",
        "correlationId": "bedbe14d-7020-4701-a67d-497d9f4351c6",
        "timestamp": "2025-09-30T09:17:54-05:00"
      },
      {
        "action": "refund",
        "requestId": "3940f9ff-ad27-4cdd-85bc-32b9907450dc",
        "correlationId": "b4a1d565-8be9-4235-b850-eef29d3cc0f5",
        "timestamp": "2025-09-30T09:19:57-05:00"
      },
      {
        "action": "refund",
        "requestId": "dc830f4c-c20a-49b2-ba5d-4a92afc6bc5f",
        "correlationId": "46c2034e-ac3e-4520-b3ab-9fd144793489",
        "timestamp": "2025-09-30T09:24:16-05:00"
      }
    ],
    "networkTransactionId": "015273346068535G631"
  },
  "amounts": {
    "currency": "USD",
    "approved": "2.97",
    "requested": "2.97"
  },
  "auth": {
    "code": "OK3021",
    "processorMessage": "APPROVED",
    "message": "APPROVED",
    "avsResponseCode": "Y"
  },
  "card": {
    "name": "Jane Smith",
    "last4": "1111",
    "expiry": "1225",
    "brand": "VISA"
  },
  "binData": {
    "program": "UNKNOWN"
  },
  "transactionType": "REFUND",
  "entryMode": "KEYED",
  "refundObject": {
    "refundBalance": "0.00",
    "refundIds": [
      "000000082886",
      "000000082906"
    ]
  }
}
Viewing Transaction Metadata
In the WooCommerce -> Order -> Edit Order, the merchant has the ability to get the transaction metadata from Bluefin Payment Gateway in real time and view it as admin. This comes in handy if the merchant wants to check the current status of the Bluefin transaction with all the metadata Bluefin Payment Gateway has to offer.
Here is a short showcase of how the merchant can view their Bluefin transaction metadata, which is also used for generating reports
For the comprehensive reference on transaction metadata, check out Get a Transaction Metadata.
Trace Custom Identifier
The $.trace.customId of the Bluefin transaction metadata is the identifier of the WooCommerce order.
This identifier is included so that the merchant generates more effective transaction reports in order to link a Bluefin transaction to a WooCommerce order.
NoteIf you would like to include the value of
customIddifferent from the WooCommerce order id, please consult Bluefin Integrations Team via [email protected].
...
  "trace": {
    "customId": "121",
    "source": "WooCommerce Plugin",
    ...
  },
...
Logging
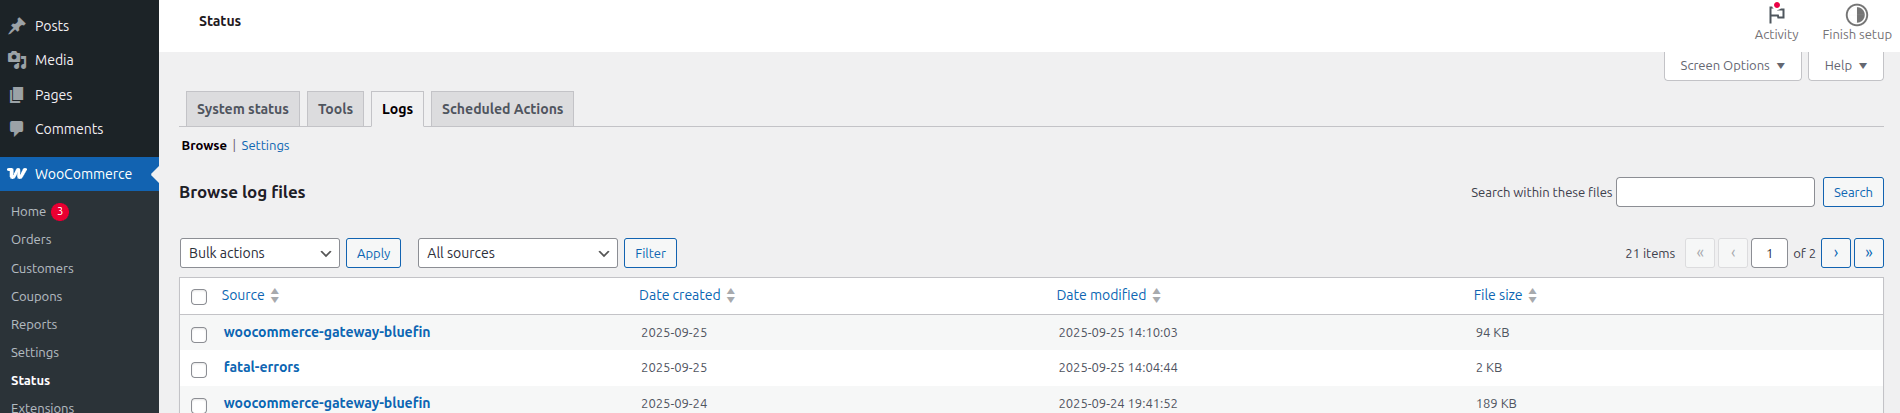
The log for the Bluefin Payment plugin lives under the woocommerce-gateway-bluefin namespace of WooCommerce -> Status -> Logs. This log includes the message at all logging levels with Enable Logging option turned on.
For the troubleshooting purposes, the messages at the error or fatal level are, at all times, included under this namespace to make sure that the merchant has the ability to troubleshoot any error responses from the Bluefin Gateway APIs.
Debug Level | Enable LoggingNote that this setting enables messages at the debug level and is primarily used for debugging purposes in development mode as the WooCommerce logs can exponentially grow in memory with many customers checking out their cart.
Logging 1

Logging 2
Contact SupportYou are still unable to resolve the error, please reach out, with the respective
traceIdfrom the response body, to Bluefin Integrations Team via [email protected].For this use case of
traceId, please refer to API Endpoint Overview | API Header Response Codes.
Tracking Bluefin Transaction History
Over the course of transaction actions, the order notes are updated according to the Bluefin Plugin for WooCommerce tracking purposes.
These transaction actions can be initiated either by the merchant or customer.For instance, the merchant captures, voids, refunds a transaction while the customer initiates processing a sale or authorization during the checkout.
For example,
Tracking Bluefin Transaction History
With the corresponding transaction id attached to the order to get the transaction metadata, these can be found under $.trace.history. This can also be accomplished by Viewing Transaction Metadata.
{
  "transactionId": "000000082106",
  "status": "VOIDED",
  "timestamp": "2025-09-25T16:58:20.000000Z",
  "customer": {
    "name": "Jane Smith",
    "email": "[email protected]",
    "phone": "+3333347",
    "billingAddress": {
      "address1": "address13333457",
      "city": "New York",
      "state": "CA",
      "zip": "90003",
      "country": "US"
    }
  },
  "trace": {
    "customId": "121",
    "source": "WooCommerce Plugin",
    "history": [
      {
        "action": "init",
        "requestId": "986ae405-5fef-44a0-a39a-6c74aad15321",
        "correlationId": "eca74734-86ce-49ae-9ec7-efadafb8b5dd",
        "timestamp": "2025-09-25T11:55:06-05:00"
      },
      {
        "action": "authorization",
        "requestId": "afb5854b-30e7-4a17-a66f-0eed7e0b97ca",
        "correlationId": "142ce0cf-bf28-4fcd-84df-8e8f39936fe5",
        "timestamp": "2025-09-25T11:55:28-05:00"
      },
      {
        "action": "capture",
        "requestId": "69398b39-b54f-4e8f-a5a5-e60da53cf52c",
        "correlationId": "ede3b16d-ceaf-4735-8b20-972b7474bfef",
        "timestamp": "2025-09-25T11:58:17-05:00"
      },
      {
        "action": "refund",
        "requestId": "22cb8888-bda0-4059-9a0e-7e96486ecaf6",
        "correlationId": "59fd3eba-be3a-4b70-900b-7094df795109",
        "timestamp": "2025-09-25T12:00:55-05:00"
      },
      {
        "action": "refund",
        "requestId": "1c6bd28c-eec6-4539-8d9a-b4716a0c272b",
        "correlationId": "878160aa-9096-42e8-aec8-f1fcd82780ba",
        "timestamp": "2025-09-25T12:05:42-05:00"
      }
    ],
    "networkTransactionId": "015268021983966G381"
  },
  "amounts": {
    "currency": "USD",
    "approved": "3.96",
    "requested": "3.96"
  },
  "auth": {
    "code": "OK3731",
    "processorMessage": "APPROVED",
    "message": "APPROVED",
    "avsResponseCode": "Y"
  },
  "card": {
    "name": "Jane Smith",
    "last4": "1111",
    "expiry": "1225",
    "brand": "VISA"
  },
  "binData": {
    "program": "UNKNOWN"
  },
  "transactionType": "REFUND",
  "entryMode": "KEYED",
  "refundObject": {
    "refundBalance": "0.00",
    "refundIds": [
      "000000082126",
      "000000082146"
    ]
  }
}