Processing Transactions
This guide is meant to provide examples on using the transaction processing functions within the PayConex Portal.
When you run a transaction in PayConex, the Transaction Type field defaults to SALE. The other transaction types are summarized below.
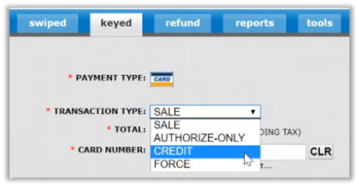
| Transaction Type | Description |
|---|---|
| SALE | The card is authorized and will batch out at the next batch time. |
| AUTHORIZE ONLY | The card is authorized but will not batch out until manually captured (See Capturing an Auth-Only Transaction below for more information.) CREDIT |
| CREDIT | Process a transaction in which funds are credited to a credit card when there has been no previous offsetting sale. Refer to Unreferenced Refunds (CREDIT Transactions) for more information. |
| FORCE | Only used when you already have an authorization code obtained from a different source. |
Notes on the FORCE Transaction Type
"Forcing a transaction" refers to running a transaction when you have already obtained an authorization code from another source.
When processing a transaction this way, the card is not authorized a second time. This might occur when you or the cardholder contact the card issuer to obtain an authorization code.
Another scenario is if you are processing transactions with a standalone terminal that stopped working and could not batch out your transactions.
- Click the Keyed tab.
- Select Force from the Transaction Type drop-down arrow.
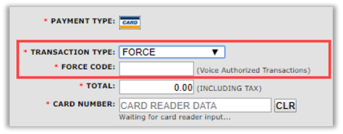
- Enter the authorization code (also called "approval code") into the Force Code field.
- Populate the remaining required fields.
- Click Process Transaction.
Swiped Transactions
- Click the Swiped tab.
- Enter the amount.
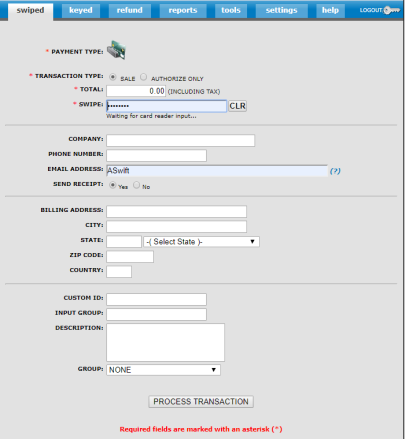
- Place your cursor in SWIPE field and swipe the card in the card reader. The card information will populate.
On the card reader device, after swiping a transaction, a message will display under the Card Number field to indicate a successful swipe.
If using an encrypted card reader the message displayed will be "Card Data Validated."
If using a non-validated P2PE card reader the message displayed will be "Device Found."
- Optional. For reporting purposes only, you can complete additional fields such as email address, phone number, or group.
Note
To enter multiple email addresses, separate them with a comma. Also, this field has a 100-character limit.
- Click PROCESS TRANSACTION when you're done.
Keyed Transactions
- Click the Keyed tab.
- Enter the amount, card number, and expiration date.
Note
If you are using an encrypted card reader, you must enter the card number and expiration date into the card reader. (Do not enter the card number into the keyboard.)
Card Reader / SRED Key Entry

Keyboard Entry
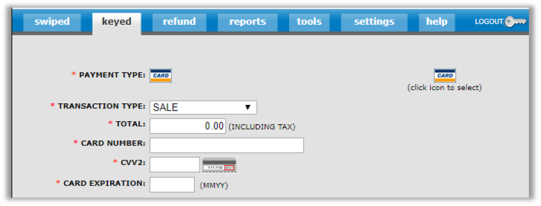
- Optional: For reporting purposes only, enter additional information such as email address, phone number, or group.
Note
To enter multiple email addresses, separate them with a comma. Also, this field has a 100-character limit.
Best Practice: We recommend that you provide the address and zip code for all keyed transactions. This will provide the highest level of security against fraud and ensure that the processing bank qualifies the transaction at the best possible rate.
- Click PROCESS TRANSACTION when you're done.
NOTE: To reissue an existing transaction for any amount, refer to Reissuing a Transaction in this guide.
Refunding Transactions
The process for refunding a transaction is as simple as navigating to the transaction and clicking Refund. There are multiple ways to navigate to a transaction; here is just one way that it can be done.
- Click the Tools tab and then TRANSACTION SEARCH.
- Enter the search criteria and click Search.
- Locate the transaction in the list and click Refund / Reversal (the red "X" icon) to the right of the transaction.

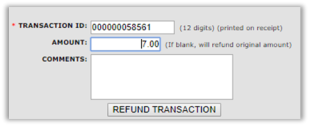
- Click REFUND TRANSACTION.
For a partial refund, change the amount to what you want to refund and then click REFUND. More information regarding multiple refunds can be found below.
Note: REFUND vs. VOID
You can only void transactions that have not been batched out.
PayConex will automatically void transactions that are refunded before the batch is settled.
To void a transaction, follow the instructions above for a refund. It will be processed as a void if the transaction has not been batched out.
Multiple Refunds
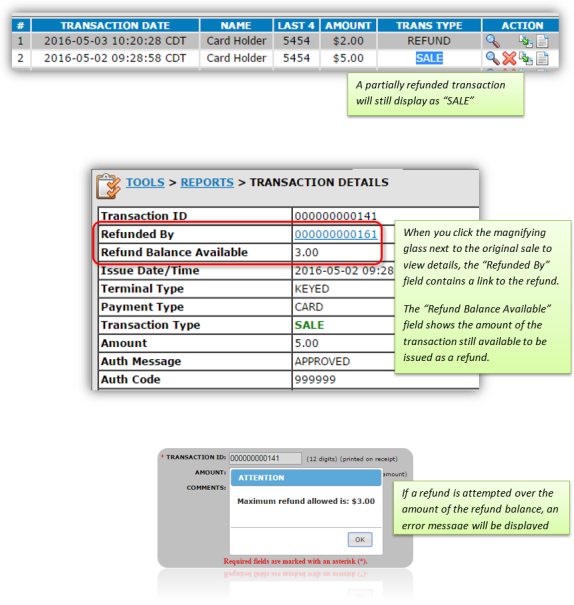
If a partial refund is issued, you can still issue additional refunds up to the amount of the original sale.
Related Information: Refunding a Transaction
Refund Display
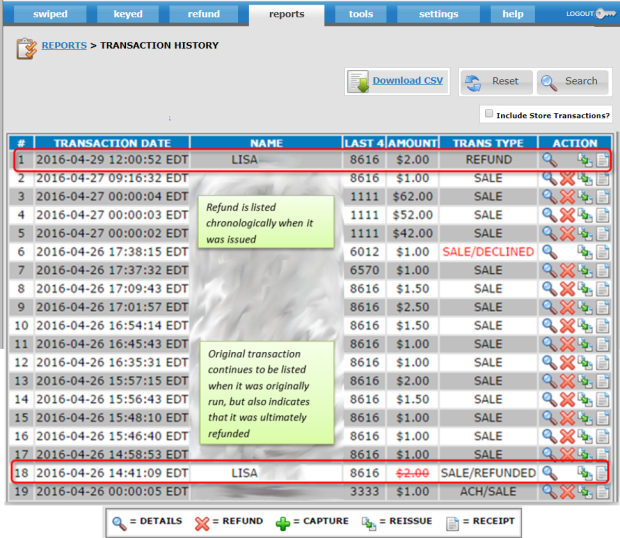
When a refund or void is processed, both the original sale and the refund are displayed in Transaction History chronologically.
The sale maintains its timestamp from when it was originally run, but the transaction type is SALE/REFUNDED. This denotes that there was a sale and that it was ultimately refunded.
Refunds display in a separate line item and the transaction type is REFUND. If a partial refund is processed, the original transaction displays SALE.
Reversing an Authorization Transaction
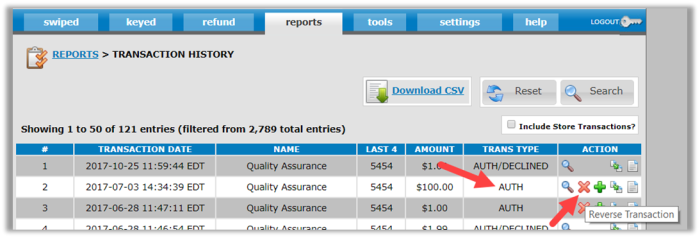
To reverse an AUTH transaction, click the Reverse Transaction icon (red "X") and then click Confirm Reversal.
Note
Authorization reversals are possible in PayConex for Elavon, RapidConnect, and Paymentech processors.
Unreferenced Refunds (CREDIT transactions)
An unreferenced refund is a transaction in which funds are credited to a credit card when there has been no previous offsetting sale. In PayConex, unreferenced refunds are known as CREDITs.
Important
By default, CREDIT transactions are disabled. To process credit transactions in your PayConex account, ask your Bluefin representative to enable this feature for you. Also, if you want the option to process a credit transaction directly in the PayConex Portal you will need to provide the usernames for those who will be allowed to perform this transaction type. (If you want to process CREDITs through an integrated PayConex point of sale, usernames are not necessary.)
To process a CREDIT transaction in the PayConex portal follow these steps:
- Click the Keyed tab.
- Select CREDIT from the Transaction Type drop-down list.
- Enter the amount and card number.
- Optional: For reporting purposes only, enter additional information such as email address, phone number, or group.
- Click PROCESS TRANSACTION when you're done.
Note
To enter multiple email addresses, separate them with a comma. Also, this field has a 100-character limit.
Reissuing a Transaction
To reissue a transaction (running another transaction using a card from a previous transaction) locate the transaction and then click Reissue.
There are multiple ways to navigate to a transaction; here is just one way that it can be done:
- Click "Tools" and follow the "Transaction Search" link.
- Enter the search criteria and click Search.
- Locate the transaction and click the icon to Reissue Credit Card Transaction.

- Edit the details as needed and click PROCESS TRANSACTION.

Capturing an Authorization
"Capturing a transaction" refers to manually settling a transaction that was previously run as "AUTHORIZE-ONLY."
This may be used if you want to validate that funds are on a card before services are rendered.
Note
If the new transaction amount is considerably more than the original authorization total, it is better to void the authorization and reissue it as a new sale. This avoids potential chargebacks or higher processing fees.
- Navigate to the transaction
- Click Capture Transaction (the green "+" icon.)

- Update the amount, if needed, and click Capture Transaction.
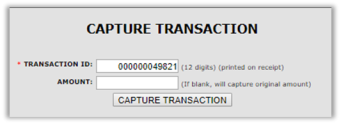
- Click Capture Transaction when you're done.
Updated about 2 years ago
