Getting Started
Our devices come pre-configured in accordance with the merchant's credentials, which are provided by Bluefin TECS. This ensures that the connection to your PAM account is secure and streamlined, which enables you to check the status of pending requests and manage transactions effectively, all from a centralized platform.
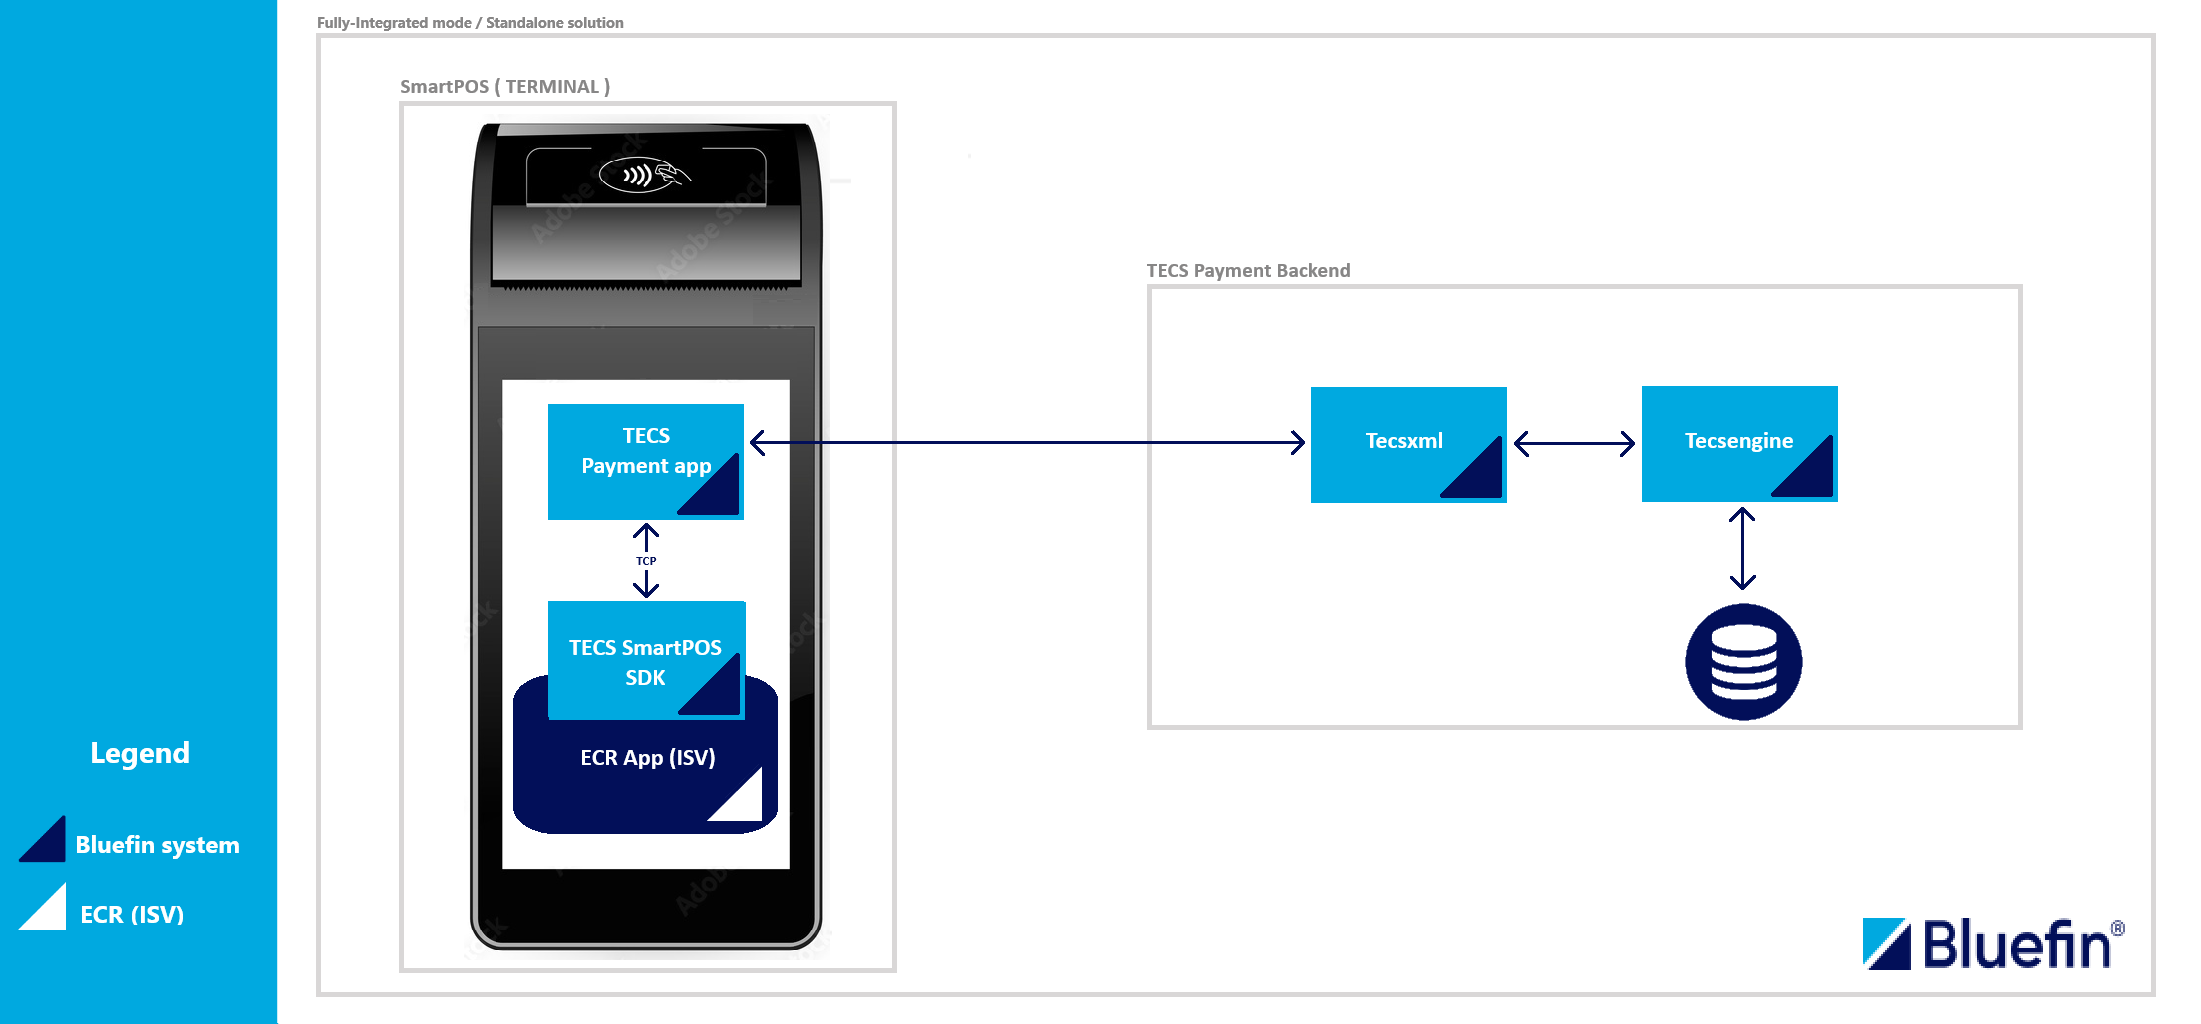
The ECR app uses SmartPOS to connect to the TECS payment application (NaTALI) via TCP. NaTALI is an essential component of the transaction workflow.
Standalone Integration Workflow
Note that an internet connection is required. This is built into the device, with NaTALI mounted on
localhost:9990. For more details, see Android NaTALI User Guide.
In addition to TCP, SmartPOS also supports two other connection methods: Bluetooth and Serial Port. These connections are implemented using the iConnection class interface.
See the following implementations to gain an understanding of how it fits together
Thanks to the flexibility of SmartPOS, you can modify terminal settings directly from your Android device during runtime. All the transaction data for each transaction can be specified in the transaction object. This includes important settings such as terminal ID, currency settings, terminal configurations, language preferences and more. Go to the QuickStart Guide to see this in action.
Overall, the combination of the PAM and the SmartPOS Java API creates a comprehensive and efficient payment processing solution for businesses.
As soon as you start integrating it, SmartPOS will become the backbone of your ECR applications.
See Tecs Smart POS for the full list of devices supported by SmartPOS.
QuickStart Guide
The SmartPOS SDK provides a layer that is accessible to external ECR systems on Android terminals, thus enabling payment device abstraction and managing both EMV and non-EMV EFT payment transactions.
Here are some of the external resources regarding this SDK:
SDK Setup
Version: 2.16.0
Dependencies
dependencies {
    implementation 'at.tecs.smartPOS-SDK:SmartPOS-SDK:2.16.0'
}
dependencies {
    implementation("at.tecs.smartPOS-SDK:SmartPOS-SDK:2.16.0")
}
Project Repository
dependencyResolutionManagement {
    repositories {
        google()
        mavenCentral()
        maven( "https://repo.tecs.at/repository/maven-tecs-public/")
    }
}
allprojects {
    repositories {
        google()
        jcenter()
        maven { url 'https://repo.tecs.at/repository/maven-tecs-public/' }
    }
}
Permissions
<?xml version="1.0" encoding="utf-8"?>
<manifest xmlns:android="http://schemas.android.com/apk/res/android"
    xmlns:tools="http://schemas.android.com/tools">

    <uses-permission android:name="android.permission.INTERNET"/>

    ...
</manifest>
Importing SmartPOS Java Classes
In order to be able to send and process a basic transaction, you need to import the essential SmartPOS Java classes. These classes are as follows:
// Standard Java Classes for exception handling
import java.net.UnknownHostException;
import java.io.IOException;
import java.lang.Exception;
import java.lang.InterruptedException;

import java.text.SimpleDateFormat;

// Standard Java utilities
import java.util.Random;
import java.util.Calendar;

// Classes for connection to the payment service
import at.tecs.smartpos.PaymentService;

// Classes for transaction initialization
import at.tecs.smartpos.data.Transaction;
import at.tecs.smartpos.exception.TransactionFieldException;

// Classes for handling and processing the response
import at.tecs.smartpos.data.Response;
import at.tecs.smartpos.connector.ResponseListener;
Take these three easy steps to run your first transaction:
- Establish the payment service connection to NaTALI.
- Make the payment transaction and send it using SmartPOS.
- Handle and process the response.
The SmartPOS sendTransaction works as follows:
- A customer performs a payment transaction.
- The customer is taken to the card reader screen.
- The customer is provided with these card present methods:
- Magnetic swipe: the customer swipes the magnetic stripe on the back of their card through a card reader.
- Chip insert (EMV): the customer inserts a card with an EMV chip into a card reader slot.
- Contactless tap: the customer taps their card on a contactless reader that supports NFC technology.
However, this is not the case for all kinds of transactions. Transactions that require the card reader screen include the following:
- Sale (authorization)
- Pre-auth
- Refund
- Sale and tip
After the payment is triggered on the ECR app (ISV) and the customer swipes, taps or inserts their card, the transaction request is sent to the TECS payment application (NaTALI). NaTALI comes back with the responseCode and responseText received from the TECS payment back end (TECSxml plus TECS engine). Lastly, the response is picked up by ResponseListener.
See the Android NaTALI User Guide for more information on NaTALI.
Payment Service Connection
- Communication with the payment device is handled via the singleton method
getInstanceof thePaymentServiceclass. - The
PaymentServiceclass must first connect to the TECS payment application (NaTALI) before any commands can be run such assendTransaction, etc. - The synchronous
Payment.connectreturns a boolean on successful/bad connection to NaTALI. PaymentServiceconnects to the payment device via TCP.- See the Java docs Payment Service for more information.
PaymentService paymentService = PaymentService.getInstance();

// TCP Connection
paymentService.setPort(port);
paymentService.setHostname(hostname);

if(paymentService.connect()) {
    // Payment service is successfully connected
} else {
    // Payment Service connection to NaTALI has failed
}
Use getType() of the PaymentService class to identify the connection type.
Note
PaymentService.connectmust be executed on a non-main thread to avoidandroid.os.NetworkOnMainThreadException. Use your preferred threading approach for Android applications to handle this. Throughout our examples, you won't see that we have scoped everything inside of a thread as we have usedStrictMode.enableDefaults()to make the examples more readable since this is the developer's preference as far as handling this.
The singleton getInstance method optionally takes a iConnection argument for the type of connection.
For example,
// NOTE: BluetoothConnection is a custom implementation of the iConnection interface. See above for connection methods.
iConnection connection = new BluetoothConnection();
PaymentService paymentService = PaymentService.getInstance(connection);
To get you up to speed, see our implementations of Bluetooth and Serial Port:
Transaction Initialization
After the payment service connection is established, you specify the basic payment request details and send the transaction for processing using sendTransaction and PaymentService.
All transaction requests need to have the following field settings:
- Terminal Number - provided by Bluefin TECS for the device.
- Transaction ID - must be unique for each transaction (the length is 20 - if less than 20, it is padded with zeros by default).
- Amount - in cents.
- Currency - based on the terminal configuration.
- DateTime - as a string in the format (YYYYMMDDHHMMSS).
String currentDateTime = new SimpleDateFormat("yyyyMMddHHmmss")
    .format(Calendar.getInstance().getTime());

StringBuilder postfix = new StringBuilder();

for(int i = 0; i < 3; i++) {
    Random rand = new Random();

    int randomNum = rand.nextInt(10);
    postfix.append(Integer.toString(randomNum));
}

Transaction transaction = new Transaction();
transaction.amount = "100";
transaction.ID = currentDateTime + postfix.toString(); // Unique ID per transaction (numeric 20) e.g. it will be padded with zeros to 00020240516182729007
transaction.dateTime = currentDateTime;
transaction.terminalNum = "TERMINALID";
transaction.msgType = Transaction.MessageType.SALE;
transaction.currency = Transaction.Currency.EUR;
transaction.receiptNum = "1";
transaction.txOrigin = "1";
transaction.sourceID = "1";
transaction.langCode = "EN";

System.out.println(transaction.toString()); // transaction object in JSON format

// Perform a transaction once the payment service is connected
if(paymentService.isConnected()) {
    try {
        paymentService.sendTransaction(transaction);
    } catch (TransactionFieldException e) {
        e.printStackTrace();
        // Exception thrown for incorrect transaction field formats
    }
}
Note
PaymentService.sendTransactionmust be executed on a non-main thread to avoidandroid.os.NetworkOnMainThreadException. Use your preferred threading approach for Android applications to handle this.
To ensure that the transaction ID is unique, we concatenate the currentDateTime and a random three-digit number that can contain leading zeros. Alternatively, you can use a logic of your own to generate the unique ID. This is a typical use of the void sendTransaction(Transaction transaction) method. The PaymentService class also supports methods that trigger some of the most common transactions, such as the following:
-
void sale(int terminalNum, java.lang.String transactionID, java.lang.String dateTime, int amount, java.lang.String currency)- performs a template sale transaction. -
void sale(int terminalNum, java.lang.String transactionID, java.lang.String dateTime, int amount, int tip, java.lang.String currency)- performs a template sale and tip transaction. -
void refund(int terminalNum, java.lang.String transactionID, java.lang.String dateTime, int amount, java.lang.String currency)- performs a template refund transaction. -
cancellation(int terminalNum, java.lang.String transactionID, java.lang.String dateTime, java.lang.String targetID, int amount, java.lang.String currency)- performs a template cancellation transaction. -
requestReconciliation(java.lang.String transactionID, java.lang.String dateTime)- performs a reconciliation request.
In cases where you need to be more specific about the transaction, we recommended that you use sendTransaction, which lets you specify the msgType of the transaction; for example, Transaction.MessageType.SALE,Transaction.MessageType.PRE_AUTHORIZATION, etc.
For the full list of message types, see Java Doc Transaction.MessageType.
For the full list of transactions that can be run using SmartPOS, see API Examples.
Handling and Processing the Response
paymentService.listen(new ResponseListener() {
    @Override
    public void onResponseReceived(Response response) {
        // Handle response
        // There are various fields and methods that can be used such as
        // For example
        if(response.msgType.equals("0002")) {           // Transaction response.
            if(response.responseCode.equals("0000")) {  // Transaction approved.
                // ...
            } else {   //Transaction not approved.
                // ...
            }
        } else if(response.msgType.equals("5747")) {    // Status message.
            // ...
        } else if(response.msgType.equals("9043")) {    // Get terminal status response.
            // Check out API Examples
        }
    }

    @Override
    public void onReadFailed() {
        // The reading failed
    }

    @Override
    public void onDisconnected() {
        // Payment service disconnected

    }
});
It is important to note that the 0000 response code indicates that the transaction has been authorized. All other response codes and response texts indicate that there were problems processing the transaction. These codes are processed by TECS.
A cancellation is performed only if the cash register (ECR) doesn't receive any response code from the TECS payment application (NaTALI). For example, the customer may decide not to proceed with the transaction and the card reader screen mode shuts down; or the card may not be read within a certain period of time, in which case the system returns the customer to the previous page.
Also, if a customer isn't satisfied with their transaction and makes a complaint or return, the ECR can initiate a refund. This is a whole separate transaction that returns money to the customer's bank account. For more information, see the API Examples.
The Response class supports various fields and methods, including msgType, responseCode, responseText and getResponse().
For more on the Response class, see Java Docs Response.
For more on the Response Listener class, see Java Docs ResponseListener.
Kotlin Code Example
This section explains how to initiate paymentService and Transaction in Kotlin.
Due to Kotlin's flexibility, we can use closures to form the transaction object.
// We used StrictMode.enableDefaults to avoid android.os.NetworkOnMainThreadException but feel free to use their own way to handle this
StrictMode.enableDefaults();

fun saleTransaction(terminalId: String): Transaction {

    val currentDateTime: String = SimpleDateFormat("yyyyMMddHHmmss")
        .format(Calendar.getInstance().getTime())

    val postfix = StringBuilder()

    for (i in 0..2) {
        val rand: Random = Random()

        val randomNum: Int = rand.nextInt(10)
        postfix.append(randomNum.toString())
    }

    val transaction: Transaction = Transaction()
    transaction.amount = "100"
    transaction.ID =
        currentDateTime + postfix.toString() // Unique ID per transaction (numeric 20) e.g. it will be padded with zeros to 00020240516182729007
    transaction.dateTime = currentDateTime
    transaction.terminalNum = terminalId
    transaction.msgType = Transaction.MessageType.SALE
    transaction.currency = Transaction.Currency.EUR
    transaction.receiptNum = "1"
    transaction.txOrigin = "1"; // PRE-AUTH: "5"
    transaction.sourceID = "1";
    transaction.langCode = "EN"
    return transaction
}


val paymentService = PaymentService.getInstance();

if(paymentService.connect()) {
    val transaction = saleTransaction("11450006");
    println("Connected!")
    println("Sending Sale Transaction: $transaction");
    // PaymentService is successfully connected
    paymentService.sendTransaction(transaction);

    paymentService.listen(object : ResponseListener {
        override fun onResponseReceived(response: Response) {
            println(response.responseText)
            println(response.msgType)
            println(response.responseCode)
            // Handle response
        }

        override fun onReadFailed() {
            // The reading failed
        }

        override fun onDisconnected() {
            // PaymentService disconnected
        }
    })
}
Updated about 1 month ago